
What You’ll Learn
- Supported cache plugins and services
- Automatically purging cache after updates
- Manually purging cache from MainWP Dashboard
- Controlling bulk purge speed with concurrent requests and request delay
- Configuring global and site-specific Cloudflare credentials
- Reading Cache Control logs and Cloudflare status indicators
- Using the Cache Control Abilities API for automation
Integration Add-on - This add-on connects MainWP Dashboard with Cloudflare and supported cache plugins on your MainWP Child sites.
MainWP Cache Control can automatically purge cache after MainWP Dashboard updates WordPress core, themes, or plugins on your MainWP Child sites. You can also manually purge cache for one site, selected sites, or all connected sites.
Prerequisites
- Activate and configure a supported caching plugin or service on each MainWP Child site you want to purge, or configure Cloudflare purging for that site. Cache Control sends purge requests to the existing cache; it does not set up the caching solution.
- For WP-Optimize, enable page caching in the plugin’s settings. Activating the plugin alone is not enough for Cache Control to detect it.
- Sync the sites after configuring their caching solution so MainWP Dashboard receives the detected cache information.
Supported Cache Systems
Cache Control supports Cloudflare and the following cache plugins or cache services: AccelerateWP, Autoptimize, Breeze, Cache Enabler, Comet Cache, FastPixel Cache, FlyingPress, Hummingbird Performance, LiteSpeed Cache, Nginx Helper, Nitropack, Pressable Cache Management, Rocket.net CDN Cache Plugin, RunCloud Hub, Seraphinite Accelerator, SiteGround Optimizer, Swift Performance, Swift Performance Lite, Swis Performance, W3 Total Cache, WP Fastest Cache, WP Optimize, WP Rocket, WP Super Cache. If a MainWP Child site has both Cloudflare and a supported cache plugin enabled, Cache Control can purge both during the same operation. When the Rocket.net CDN Cache Plugin is detected, Cloudflare purging is skipped to avoid double-purging the same Cloudflare-backed cache layer.Cloudflare API Token Permissions
For API Token authentication, create a Cloudflare API token with both of these zone permissions:- Zone - Read, which allows MainWP Child to find the site’s zone.
- Cache Purge, which allows MainWP Child to purge the zone’s cache.
Configure Global Settings
Use the global settings when most of your MainWP Child sites should use the same cache behavior.1
Open Cache Control
In MainWP Dashboard, go to MainWP > Add-ons > Cache Control.
2
Enable automatic cache purging
Turn on Automatically purge cache to purge supported cache after MainWP Dashboard updates WordPress core, themes, or plugins.
3
Optional: enable Cloudflare cache purging
Turn on Purge Cloudflare cache if you want Cache Control to purge Cloudflare cache for sites that use the global Cloudflare account.
4
Set the maximum concurrent requests
For Maximum concurrent requests, choose how many cache purge requests Cache Control sends at the same time during a bulk purge, from 1 to 10. The default is 3.
5
Set the delay between requests
For Delay between requests, choose how many seconds Cache Control waits before starting the next purge request during a bulk purge, from 0 seconds to 10 seconds. The default is 0 seconds.
6
Optional: enter Cloudflare credentials
If you enabled Purge Cloudflare cache, the Cloudflare API Credentials section appears. Select Email & API key or API Token, then enter the matching Cloudflare credentials. For a token, use the permissions described above.
7
Save and sync
Click Save Settings, then sync your MainWP Dashboard with your MainWP Child sites so the new settings are sent to the sites.
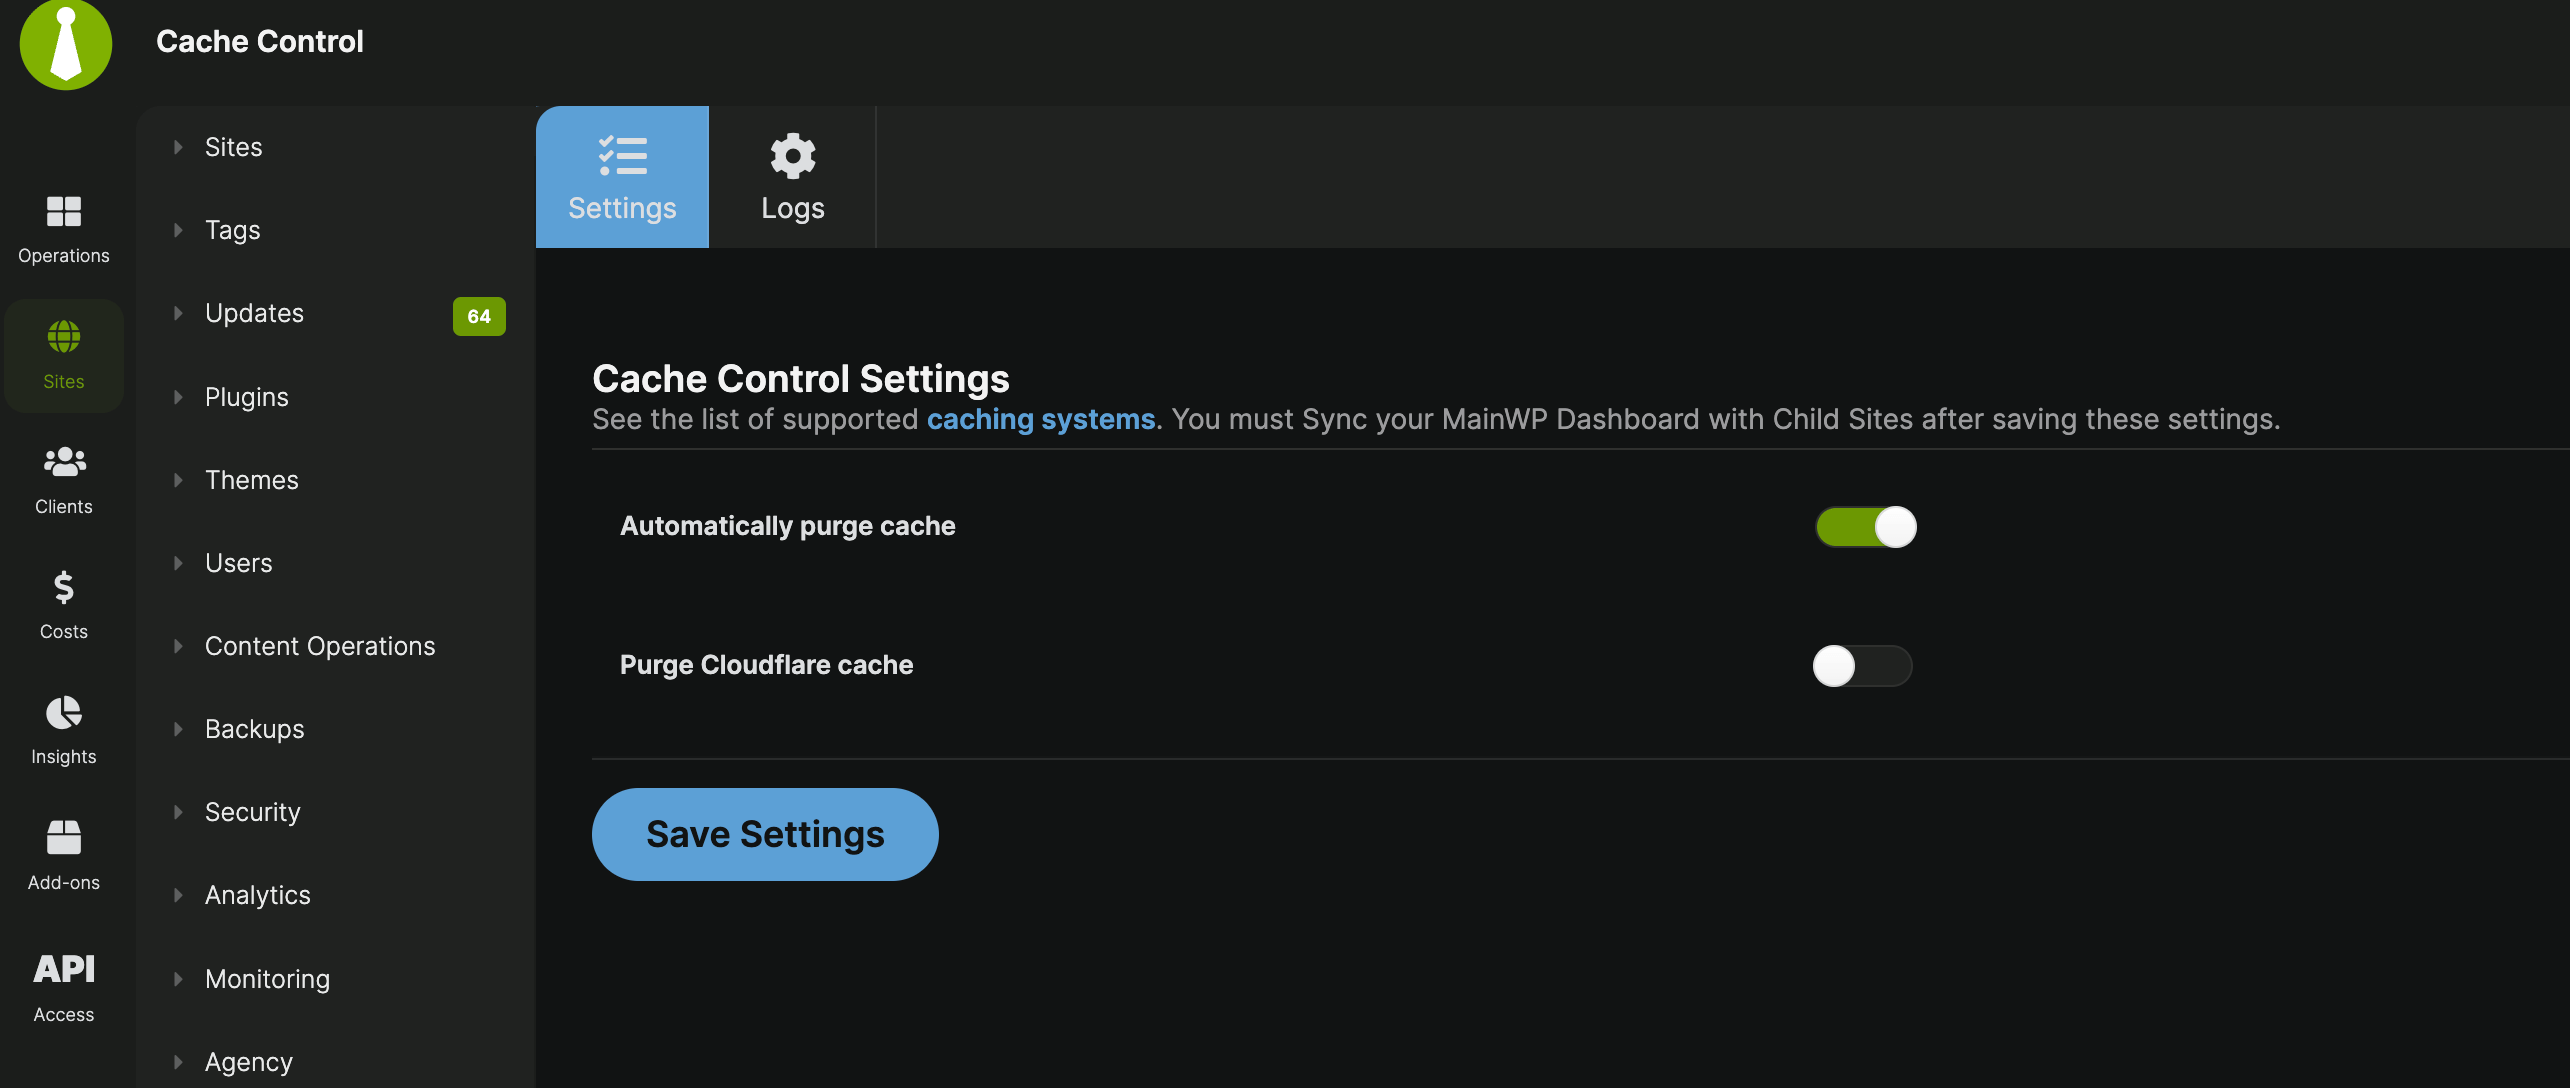
When Purge Cloudflare cache is enabled and the required credential fields are filled in, Cache Control checks the credentials after you click Save Settings. If Cloudflare returns an error, the settings are saved, but MainWP Dashboard shows a warning with the Cloudflare API error so you can correct the credentials before syncing.This checks credential validity, not permission to find or purge a particular site’s zone. Empty credentials are not validated. After saving and syncing, run a manual purge and review its result to check the site’s Cloudflare setup.
Configure a Single Site
Use single-site settings when one MainWP Child site needs different cache behavior or different Cloudflare credentials from the global settings.1
Open the site
In MainWP Dashboard, go to MainWP > Sites > Manage Sites, locate the site, and open its site dashboard.
2
Open Cache Control
Go to the site’s Cache Control page.
3
Set automatic purging
For Automatically purge cache, choose Yes, No, or Use global setting.
4
Set Cloudflare behavior
For Purge Cloudflare cache, choose Use global setting, Yes (use site-specific credentials), or No (disabled for this site).
5
Optional: enter site-specific Cloudflare credentials
If you choose Yes (use site-specific credentials), select Email & API key or API Token, then enter the Cloudflare credentials for that site. Site-specific tokens need the same zone permissions.
6
Save and sync
Click Save Settings, then sync the MainWP Child site.
Site-specific Cloudflare credentials are checked on save when Yes (use site-specific credentials) is selected and the required fields are filled in. If Cloudflare returns an error, MainWP Dashboard shows the returned API error in a warning notice. As with global credentials, this check does not test a purge of the site’s zone.
Manually Purge Cache
Cache Control can purge cache automatically after updates, but you can also start a manual purge from MainWP Dashboard. Bulk purges follow the Maximum concurrent requests and Delay between requests values from the global settings. Lower the concurrent requests or add a delay if bulk purges overload your server or trigger rate limits on your hosting or Cloudflare account. Raise the concurrent requests to finish bulk purges faster across many sites.From Manage Sites
Go to MainWP > Sites > Manage Sites, select the sites, choose Purge Cache (Cache Control) from the bulk actions menu, and click Apply.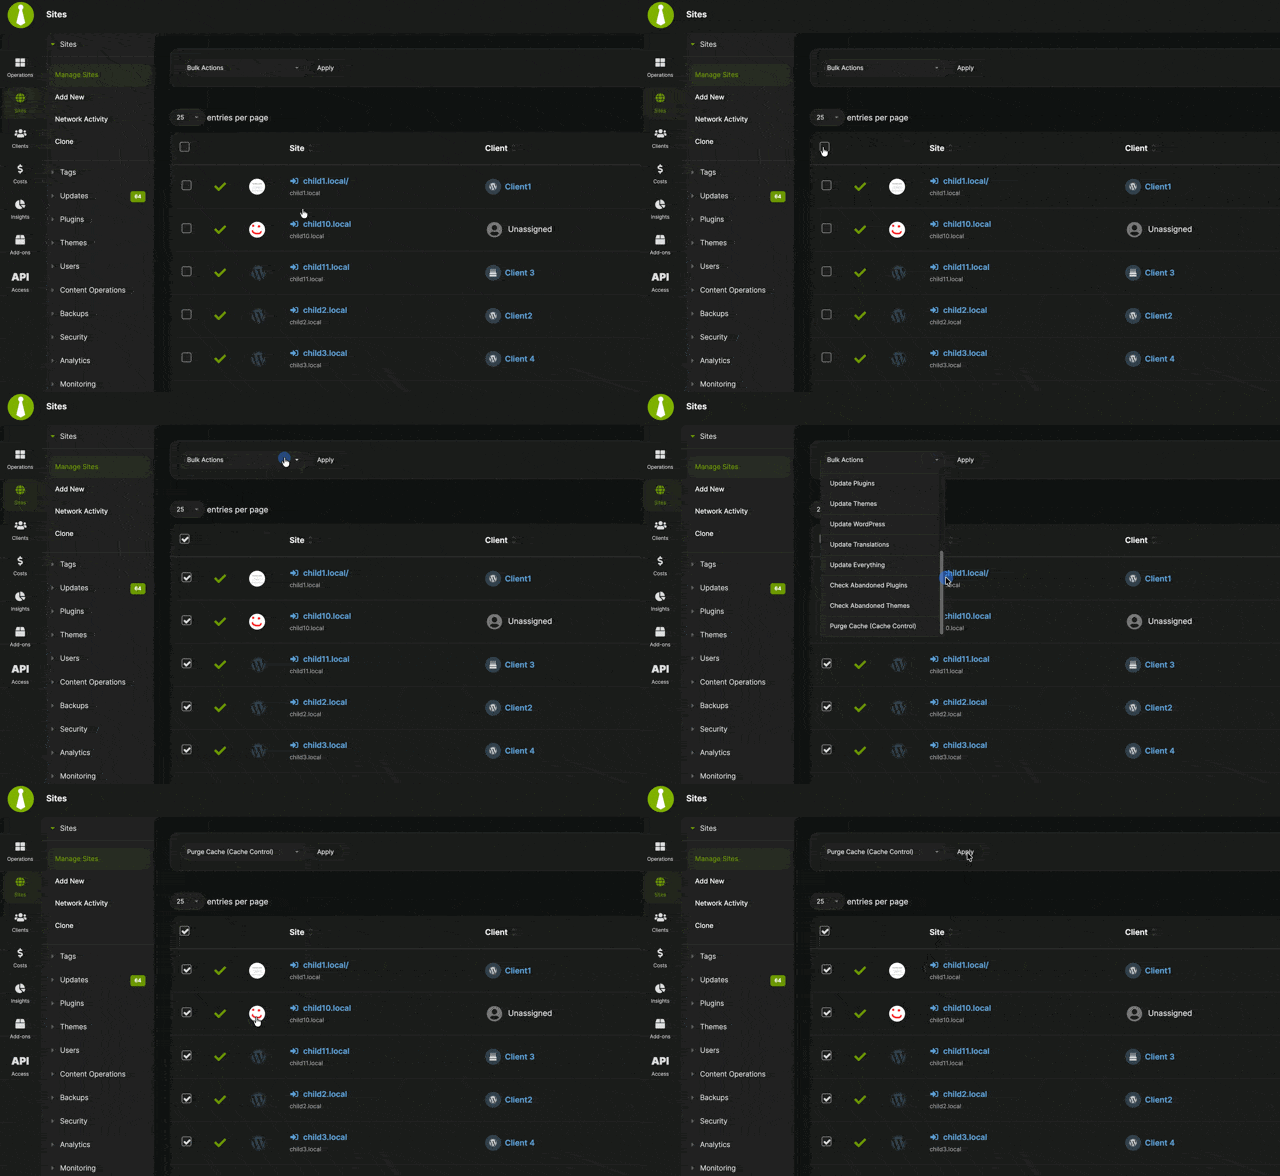
From Widgets
The Updates Overview widget includes Clear Cache on the Operations page and an individual site’s Overview page. Use it on Operations to purge all connected sites, or on an individual site’s Overview to purge only that site. If the widget is hidden, enable Updates Overview from Page Settings for that screen.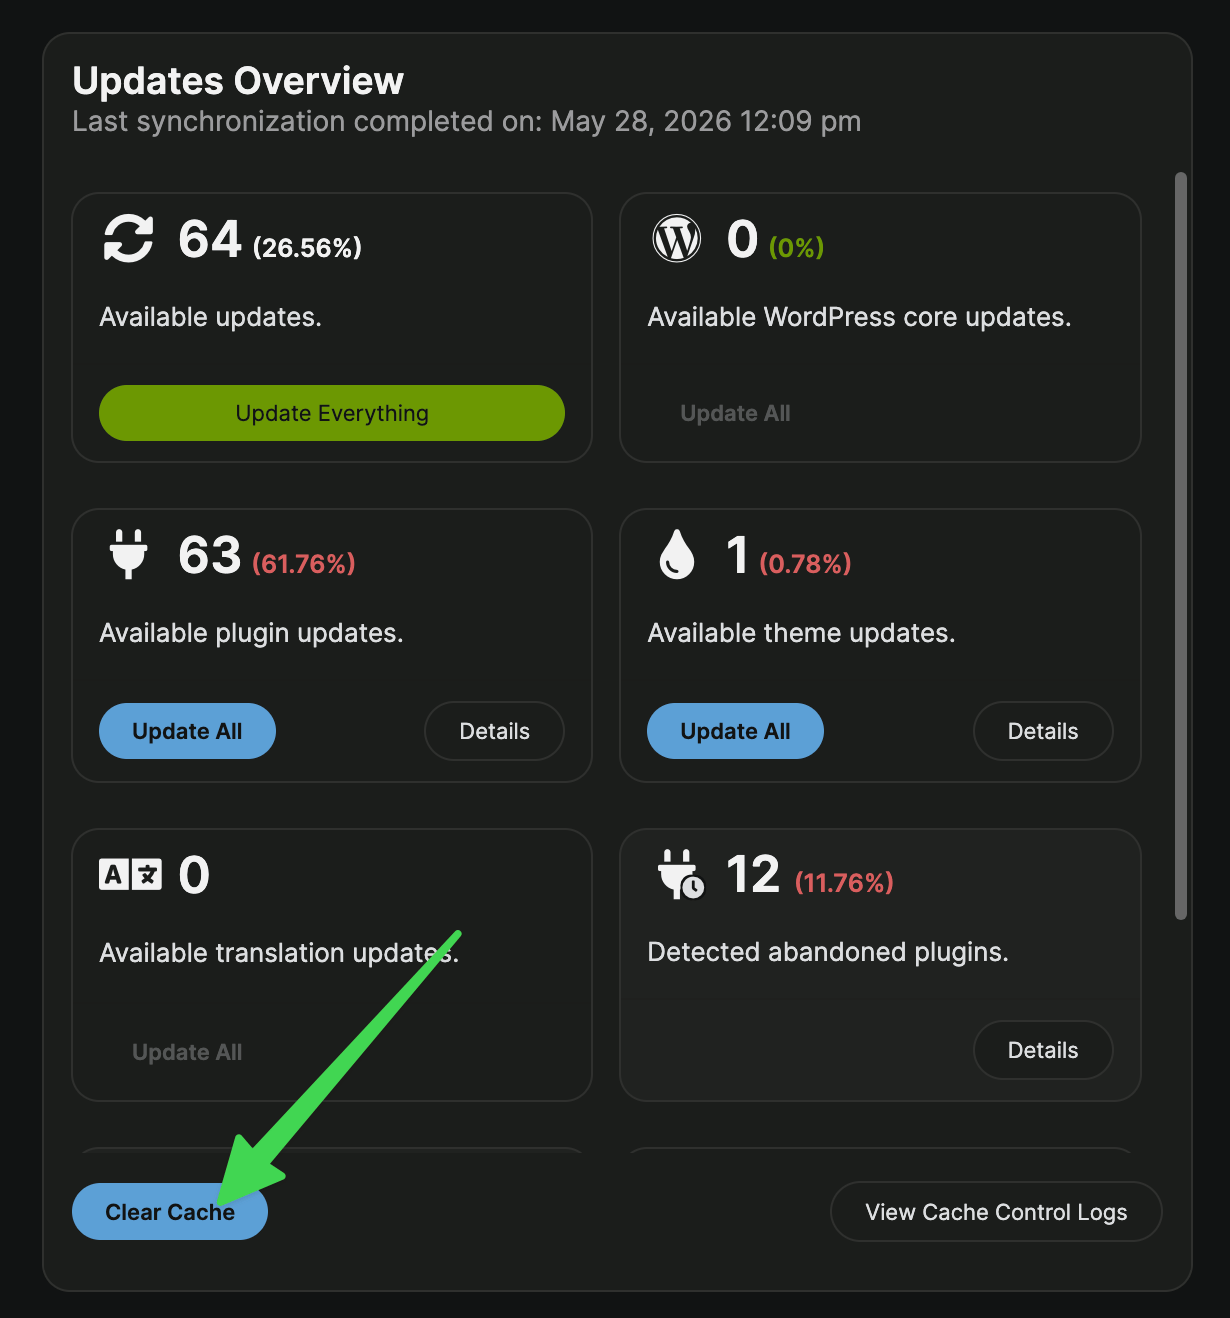
Review Results and Retry
Review each site’s result after a bulk purge. If the cache plugin succeeds but Cloudflare fails, or the reverse, Cache Control reports a partial result. The bulk completion message also indicates whether any sites returned warnings or failures. Sites with warnings or failures remain available for retry. Sync the affected sites, review Cache Control > Logs, and correct the reported issue. Then select the sites that need another attempt and run Purge Cache (Cache Control) again.View Cache Control Status
The MainWP > Sites > Manage Sites table can show Cache Control columns such as Last Purged Cache and Cache Solution. These columns help you confirm when cache was last purged and which supported cache plugin MainWP Child detected on each site.View Logs
After a manual purge finishes, sync the affected MainWP Child sites to refresh the purge information stored in MainWP Dashboard. Then go to MainWP > Add-ons > Cache Control > Logs to review the log table. Reloading Logs without syncing can leave the previous purge result and timestamp displayed. The log table includes:- Site - The MainWP Child site name and URL.
- Status - Whether automatic cache purging is enabled for that site after global and site-specific settings are applied.
- Cache Solution - The detected cache plugin or a not-found value when no supported cache plugin is detected.
- Cloudflare - A Cloudflare icon that reflects the current Cloudflare purge state.
- Last Purged - The most recent plugin or Cloudflare purge time, shown as elapsed time when available.
- Log - The plugin and Cloudflare purge messages returned by the site.
Use Last Purged and the Log messages to review a purge operation. A green Cloudflare icon alone does not confirm that a purge has run successfully.
Abilities API
Cache Control 5.3 adds eight abilities for reading cache status, managing purge settings, validating stored Cloudflare credentials, and purging an individual site’s cache. Status reads return the configuration and Child observations stored in MainWP Dashboard; they do not contact the site or refresh its status. See Cache Control Abilities for authentication, parameters, examples, and how to interpret purge results.Related Resources
- Performance Add-ons - Browse all performance tools
- WP Rocket Integration - Advanced WP Rocket management
- Manage Updates - Update management guide