> ## Documentation Index
> Fetch the complete documentation index at: https://docs.mainwp.com/llms.txt
> Use this file to discover all available pages before exploring further.
# Manage Backups
> MainWP integrates with popular backup solutions including BackWPup, BackupBuddy, Time Capsule, UpdraftPlus, and WPVivid. API Backups support cPanel, Plesk, Kinsta, Cloudways, GridPane, Vultr, Linode, and DigitalOcean.
MainWP integrates with popular backup solutions through extensions and API-based backups. Use backup extensions for plugin-based solutions, or API Backups to trigger backups directly through your hosting provider or cloud manager.
## What You'll Accomplish
* Configure backup extensions for plugin-based backups
* Set up API Backups with your hosting provider
* Create and restore backups from your Dashboard
* Troubleshoot common backup issues
## Prerequisites
* MainWP Dashboard installed and activated
* Child sites connected to your Dashboard
* Backup extension installed, or API credentials from your hosting provider
***
***
## Backup Extensions
MainWP integrates with popular backup plugins through dedicated extensions:
| Extension | Plugin |
| --------------------------------------------------------------- | ------------ |
| [BackWPup](https://mainwp.com/add-on/backwpup/) | BackWPup |
| [BackupBuddy](https://mainwp.com/add-on/mainwpbuddy/) | BackupBuddy |
| [Time Capsule](https://mainwp.com/add-on/time-capsule/) | Time Capsule |
| [UpdraftPlus](https://mainwp.com/add-on/updraftplus/) | UpdraftPlus |
| [WPVivid](https://mainwp.com/add-on/wpvivid-backup-for-mainwp/) | WPVivid |
***
## API Backups
API Backups lets you create backups directly through your hosting provider, cloud manager, or VPS without installing backup plugins on your sites.
### Supported Providers
| Provider | Notes |
| --------------- | ---------------------------------------------------- |
| cPanel | Native and WP Toolkit backups |
| Plesk | WP Toolkit backups |
| Kinsta | Full API integration |
| Cloudways | Automatic site assignment |
| GridPane | Requires Owner Account with Developer Plan or higher |
| Vultr | Full API integration |
| Akamai (Linode) | Full API integration |
| DigitalOcean | Full API integration |
### Connect API Backups
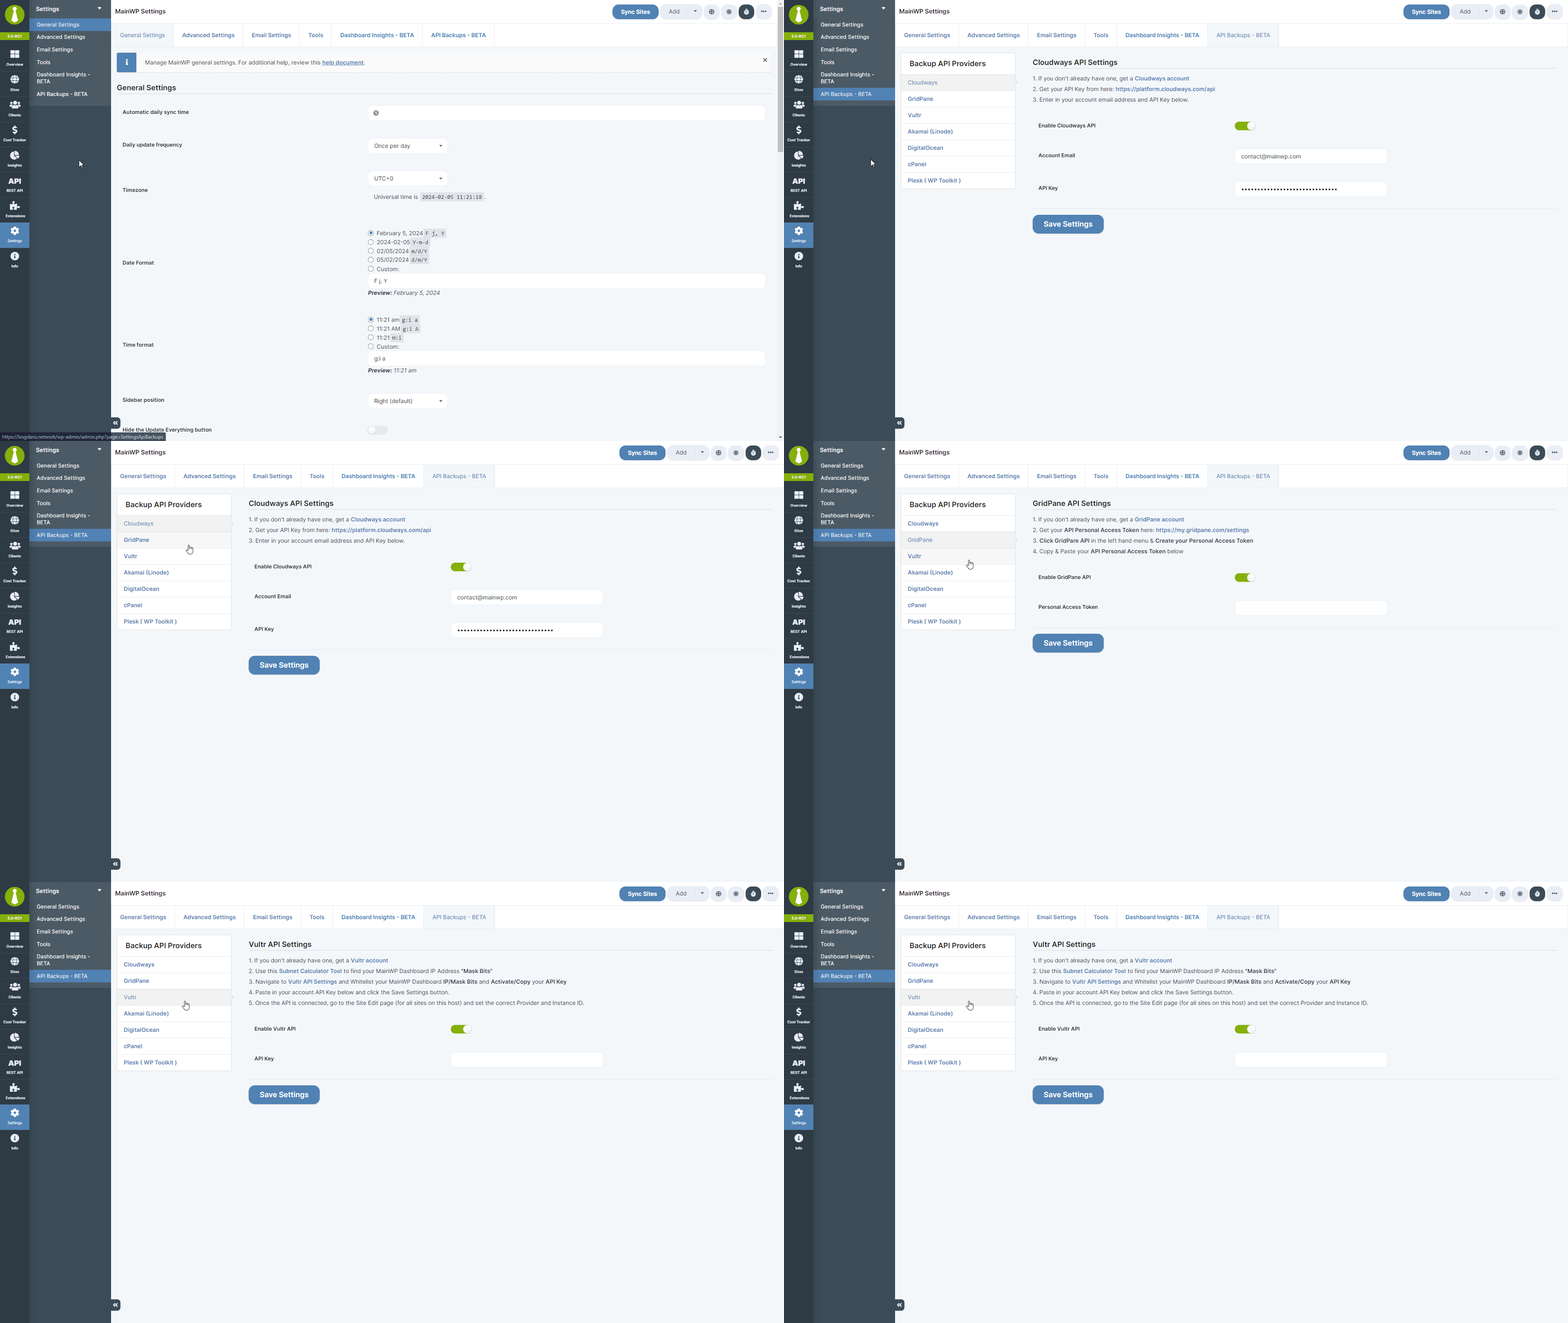
Each provider requires an API key from their platform. Obtain your API key and enter it in the MainWP settings.
For Plesk API Backups, enter only the Plesk panel URL in the **Plesk URL** field and do not add a trailing slash. Use `https://your-plesk-hostname:8443`, not `https://your-plesk-hostname:8443/`. Do not include `/api/`, paths, query strings, or fragments.
### Assign Provider to Child Sites
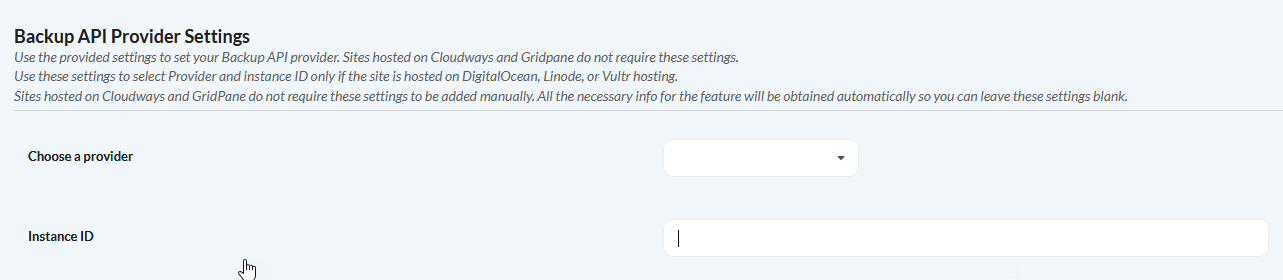
Cloudways and GridPane automatically detect sites. For all other providers, assign the VPS provider to each child site manually.
Go to the Child Site **Overview > Edit** page.
Locate the **Backup API Provider Settings** section, select your VPS provider from the dropdown, and enter the Instance ID.
Click **Save Settings**.
### Per-Site Configuration
For all providers except Cloudways and GridPane, you can enter hosting information per site. This allows you to use multiple accounts from the same provider across your child sites.
***
## cPanel Backups
New cPanel installations have backups disabled by default. Contact your hosting support to enable backups, or follow these steps if you have WHM access.
### Check Backup Status
The system displays a red notification on the File and Directory Restoration interfaces when backups are unavailable:
* cPanel: **Home > Files > File and Directory Restoration**
* WHM: **Home > Backups > File and Directory Restoration**
### Enable Backups via Terminal
If the red notification appears, run these commands to enable backups:
| Step | Command | Documentation |
| -------------------- | ------------------------- | ------------------------------------------------------------------------------------------------------------------ |
| Force initial backup | `backup --force` | [cPanel backup timing](https://support.cpanel.net/hc/en-us/articles/360050631974-How-can-I-change-the-backup-time) |
| Generate metadata | `backups_create_metadata` | [Metadata script](https://docs.cpanel.net/whm/scripts/the-backups_create_metadata-script/) |
cPanel automatic backups run on a cron schedule. You may need to manually trigger the first backup via terminal if no automatic backups exist yet. See [metadata management](https://docs.cpanel.net/knowledge-base/backup/how-to-manage-metadata-settings/) for details.
### Multi-Site Environment Configuration
For cPanel accounts with multiple WordPress sites, install each site in its own folder. Site paths are case sensitive.
**Multi-site example:**
| URL | Site Path |
| -------------------------------- | ----------------------- |
| `https://your-site.com/Child-1/` | `/public_html/Child-1/` |
| `https://child-2.your-site.com/` | `/public_html/child-2/` |
**Single-site example:**
| URL | Site Path |
| ----------------------- | --------------- |
| `https://your-site.com` | `/public_html/` |
***
## Connect DigitalOcean
Sign up at [DigitalOcean](https://mainwp.com/go/digital-ocean/) if you don't have an account.
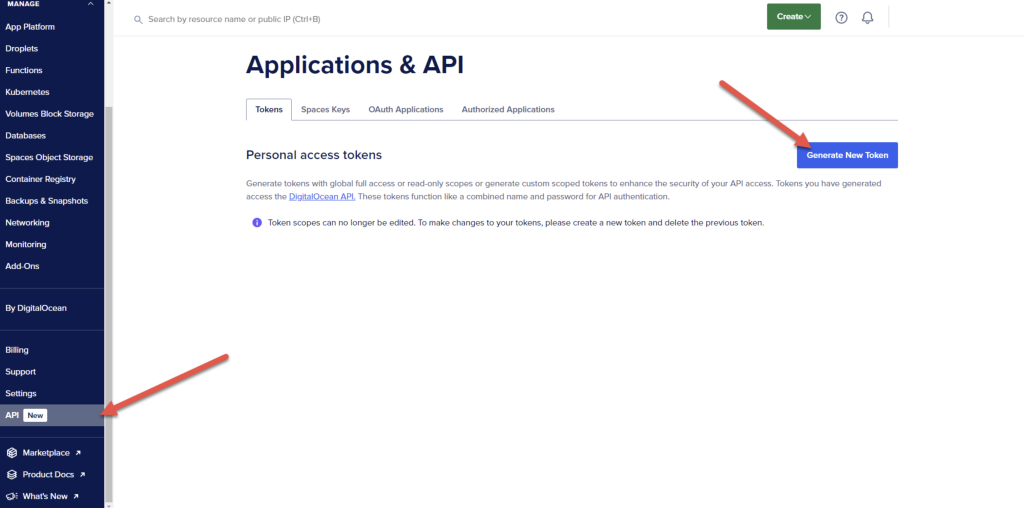
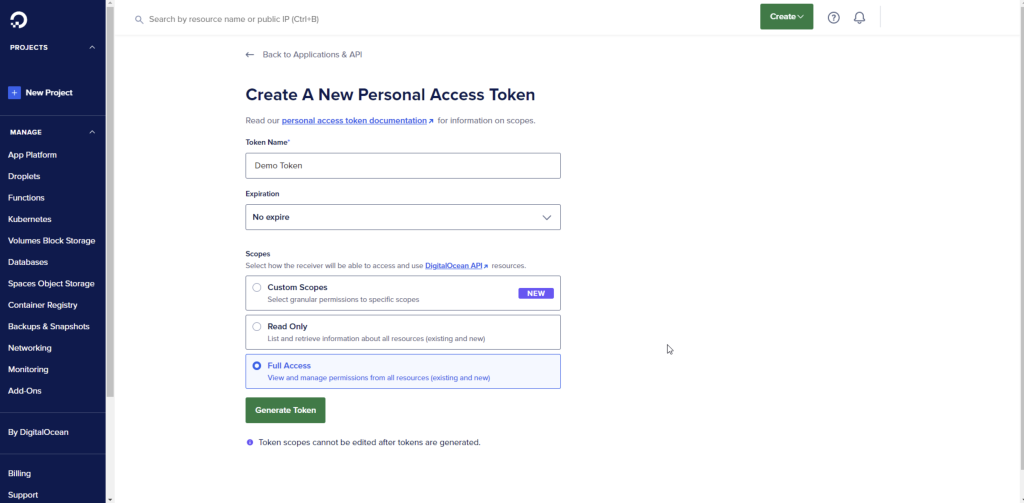
Visit **Apps & API > Tokens** in your DigitalOcean control panel.
Enter a token name, set expiration to **No expire**, and select **Full Access**.
Paste your Personal Access Token in the API Backups settings and click **Save Settings**.
Go to each site's Edit page and set the correct Provider and Instance ID. Find the Instance ID in the Droplet URL or through [droplet metadata](https://docs.digitalocean.com/products/droplets/how-to/retrieve-droplet-metadata/).
***
## Connect Kinsta
### Find Your Kinsta Credentials
| Credential | Location |
| -------------- | -------------------------------------------------------------------- |
| Account Email | The email address used to log into Kinsta (usually the main account) |
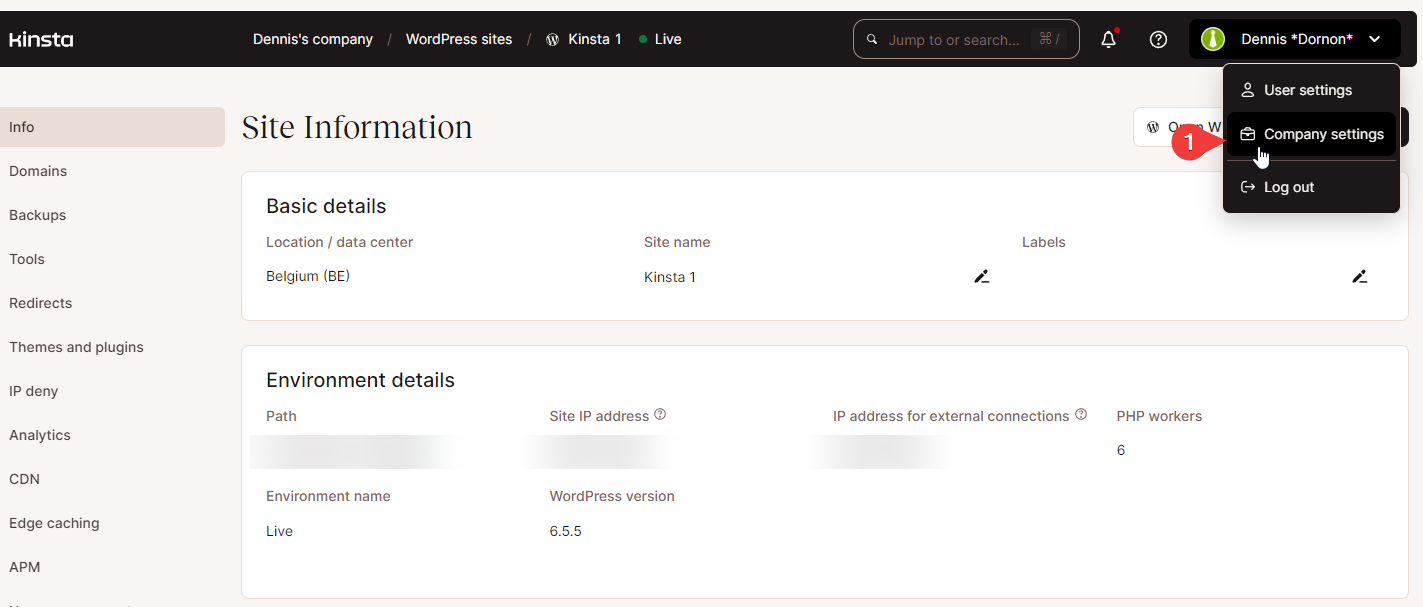
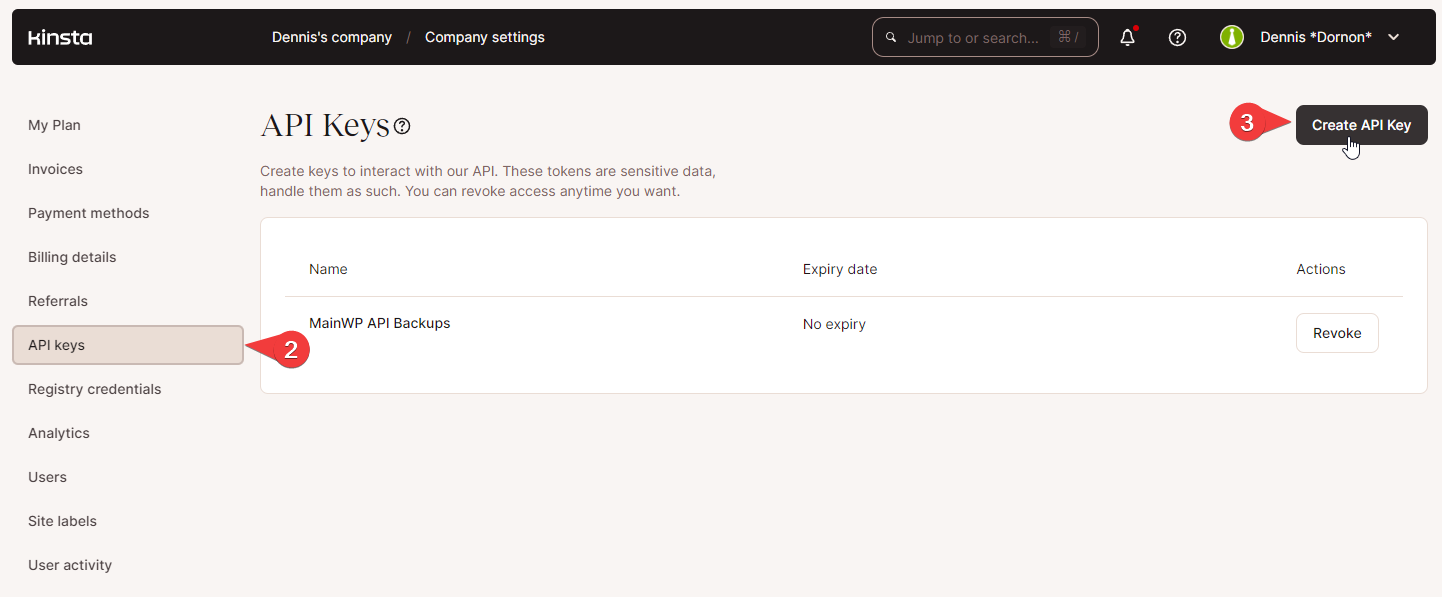
| API Key | **Company Settings > API Keys > Create API Key** |
| Environment ID | In the browser address bar when viewing site Info |
| Company ID | In the browser address bar when viewing site Info |
Navigate to **Company Settings > API Keys** and click **Create API Key**.
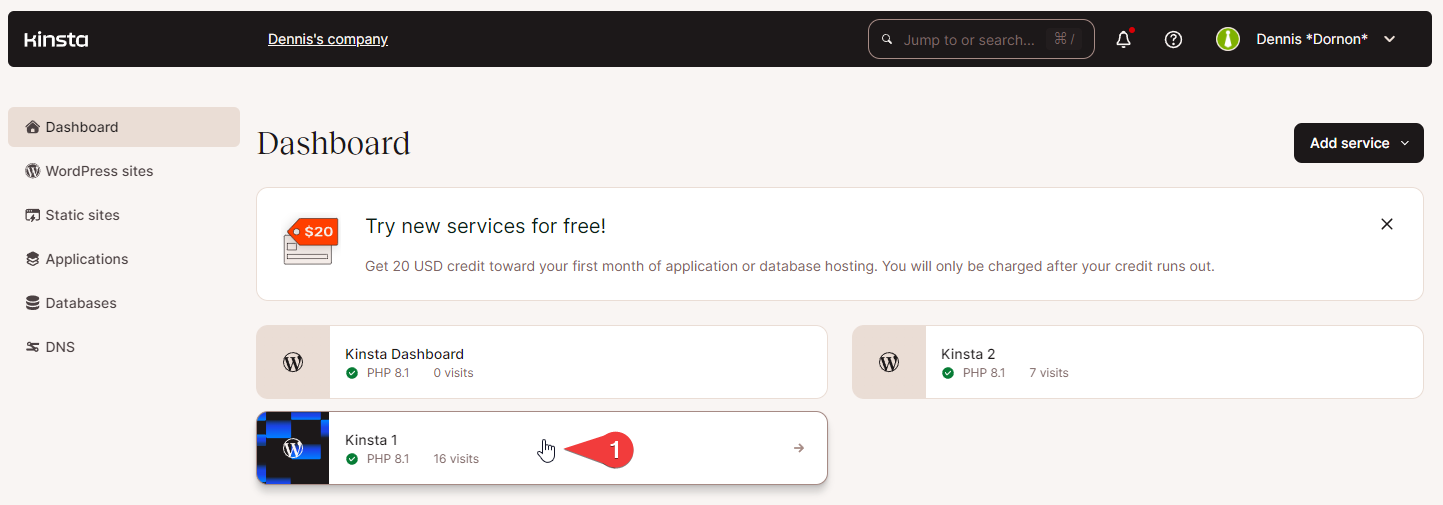
Click on a site, go to **Info**, and locate both IDs in the browser address bar.
### Configure Global Settings
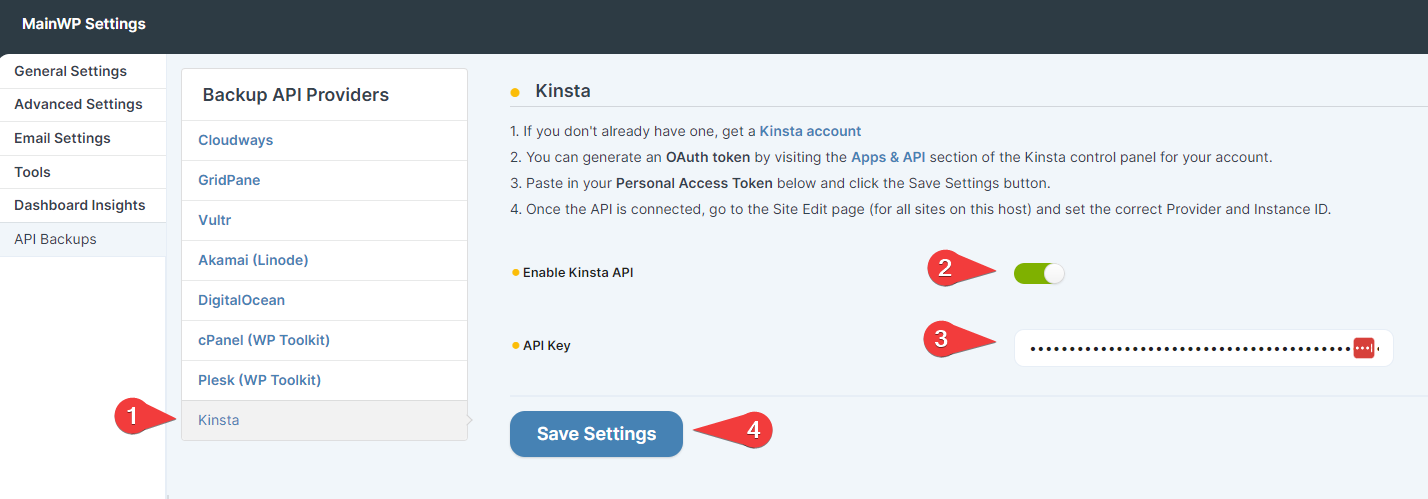
Navigate to **Sites > Backups > API Backups > Manage API Settings > Kinsta**.
Turn on **Enable Kinsta API**, enter your API Key, and click **Save**.
### Configure Individual Sites
Navigate to each child site's Edit page and scroll to the bottom. Select **Kinsta** from the provider dropdown and enter your Account Email, Company ID, and Environment ID. For sites using a different Kinsta account, enable **Overwrite Global Settings** and enter the alternate API Key.
### Use Kinsta Backups
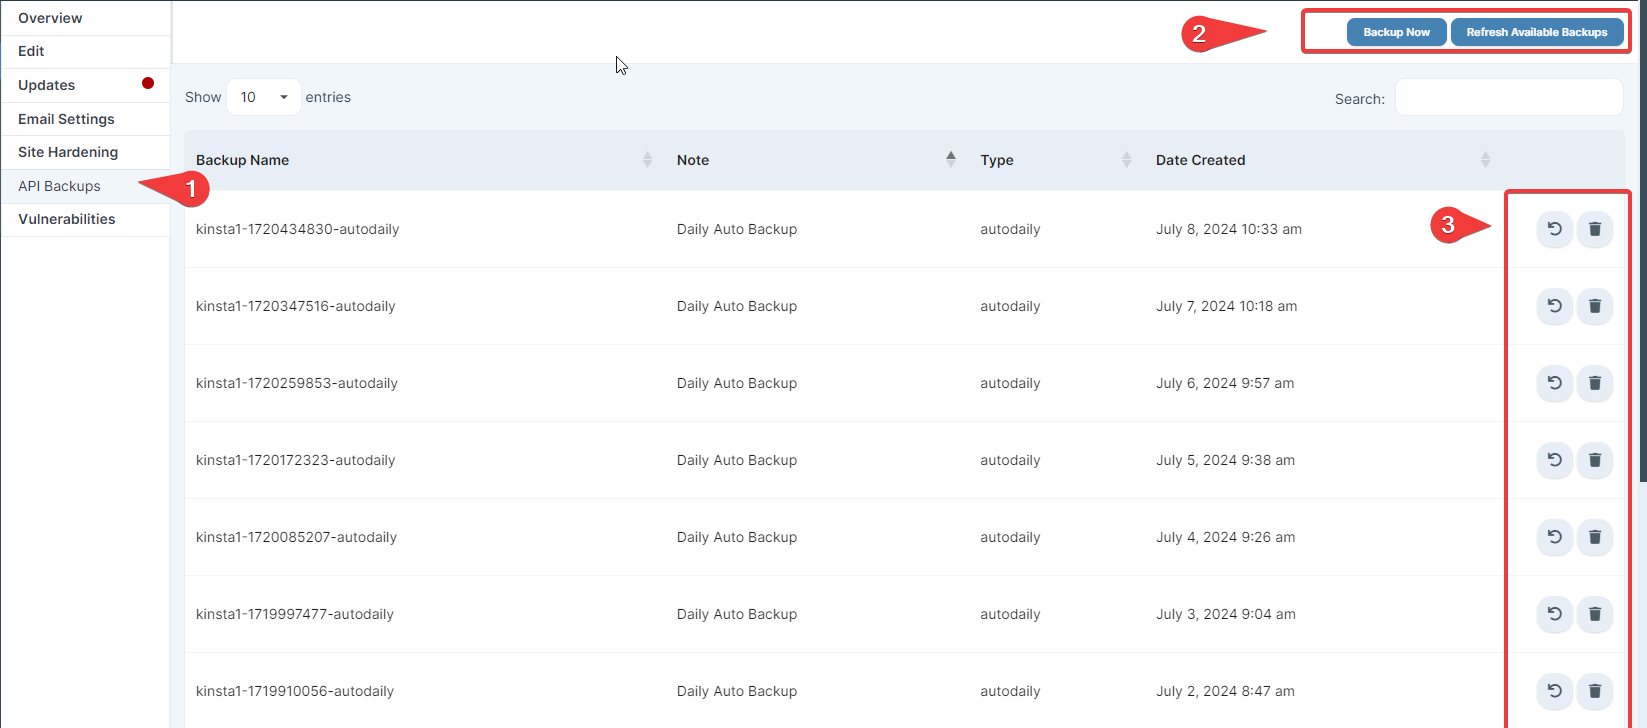
After configuration, the API Backups tab displays available backups for the selected account. Click **Refresh Available Backups** to update the list, or **Backup Now** to create a new backup.
***
## Create Backups
### Individual Site Backup
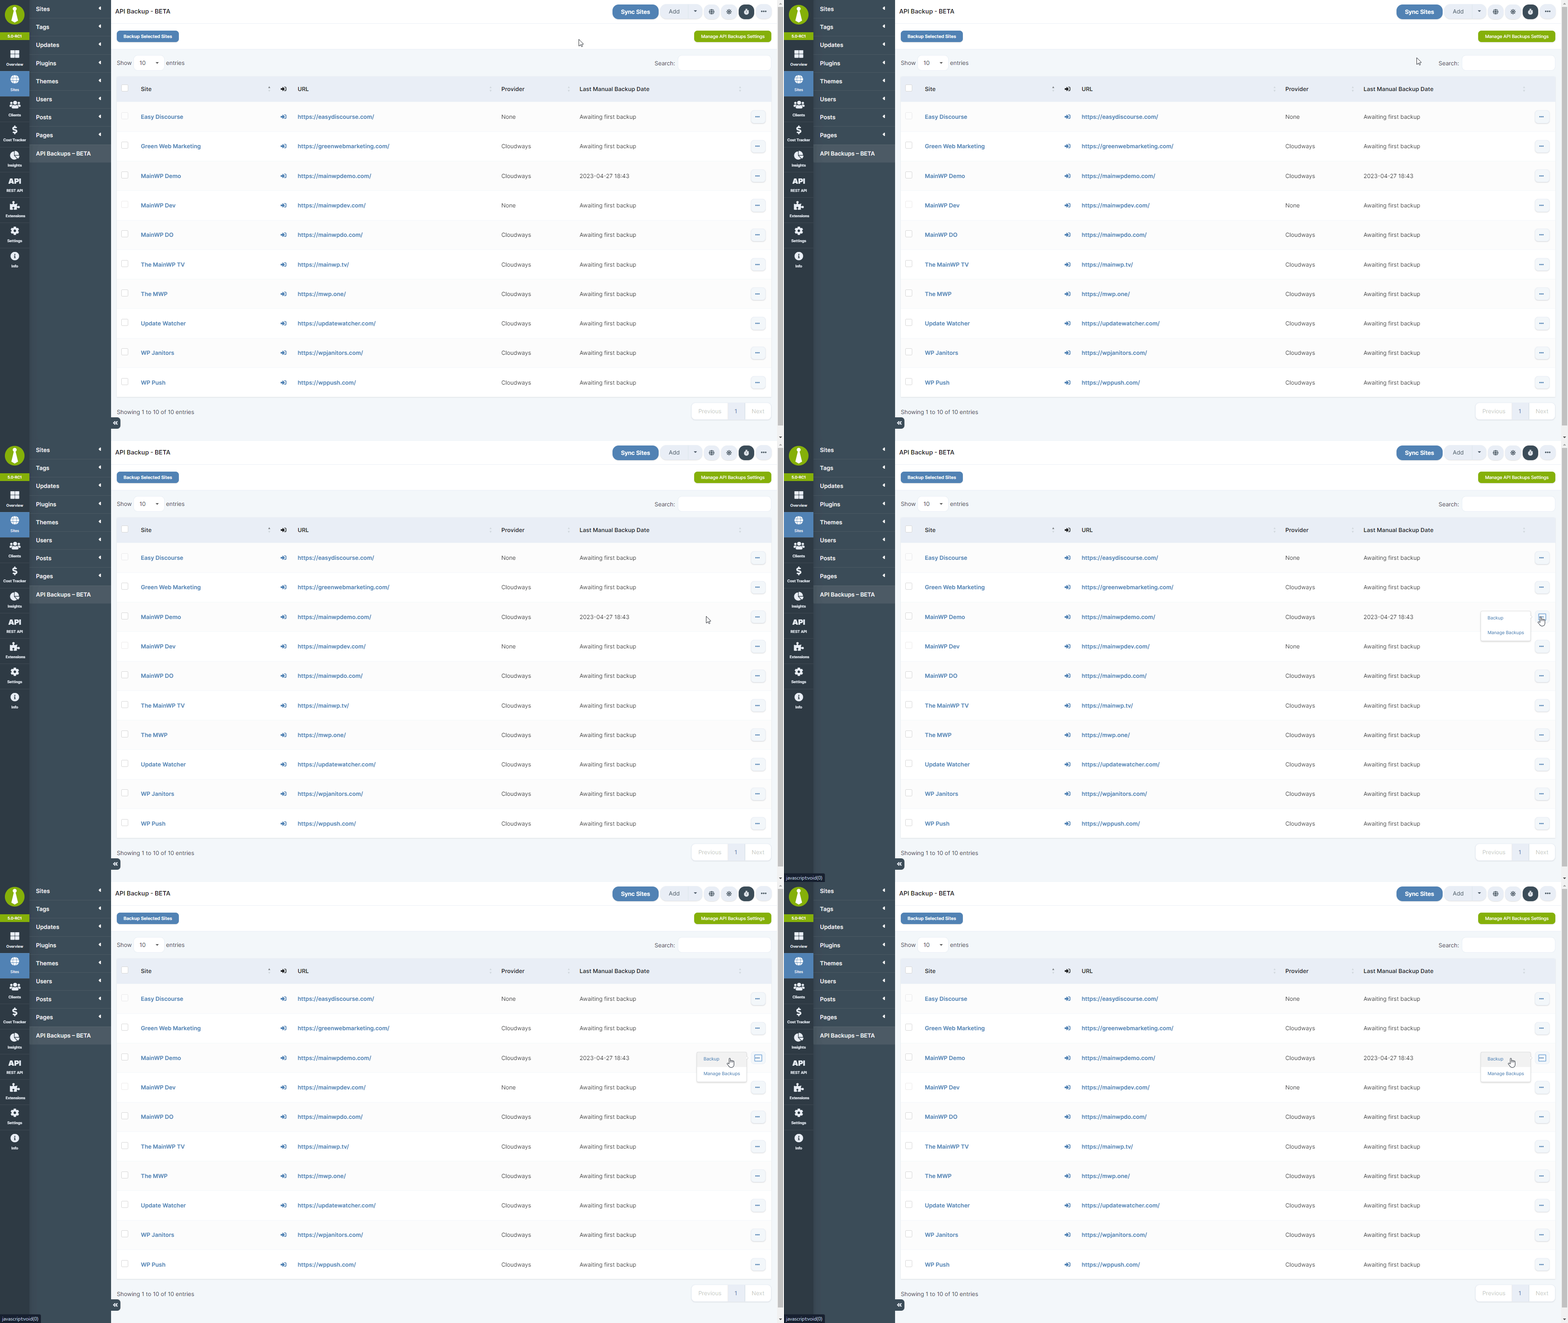
Go to **MainWP > Sites > API Backups**.
Locate the site and click **Backup** from the ellipsis menu.
Backup duration depends on site size and host speed.
### Multiple Sites Backup
Go to **MainWP > Sites > API Backups**.
Check the boxes next to desired sites and click **Backup Selected Sites**.
***
## Restore Backups
Go to **MainWP > Sites > API Backups**.
Locate the site and click **Manage Backups** from the ellipsis menu.
Find the desired backup and click **Restore Backup** from the ellipsis menu.
Restore duration depends on site size and host speed.
***
## Backup Storage Location
MainWP API Backups triggers backups through provider APIs. Your hosting provider handles storage according to their configured settings.
MainWP API Backups does not use custom storage locations. Backups are stored wherever your host or cloud manager has configured.
| Provider | Documentation |
| --------------- | -------------------------------------------------------------------------------------------------------------------- |
| GridPane | [Backup configuration](https://gridpane.com/kb/v2-backups-configuration-purging-exports/#location) |
| Cloudways | [Download backups](https://support.cloudways.com/en/articles/5123346-how-to-download-the-backup-of-your-application) |
| Vultr | [Automatic backups](https://www.vultr.com/docs/vps-automatic-backups/) |
| DigitalOcean | [Backups product](https://docs.digitalocean.com/products/images/backups/) |
| Akamai (Linode) | [Backup service](https://www.linode.com/docs/products/storage/backups/) |
| cPanel | [System backups](https://docs.cpanel.net/knowledge-base/backup/system-backups/) |
| Plesk | [WP Toolkit backups](https://www.plesk.com/kb/docs/wp-toolkit-backing-up-and-restoring-wordpress-installations/) |
**cPanel DB Backups:** Manual database backups are created via MySQLdump on the child site server and placed in `/wp-content/uploads/mainwp/api_db_backups/`.
***
## Troubleshooting
### Kinsta 404 Errors
If Kinsta API Backups fail to load or show a 404 error, the problem is usually an incorrect Environment ID or a temporary API issue.
**Example error from Custom Event Monitor:**
```text theme={null}
API Backups :: [Status] 404 :: [Action] kinsta_action_refresh_available_backups
API Backups :: [Response] {"status":404,"message":"The requested environment was not found!"}
```
The Environment ID appears in the URL of the container package, not elsewhere in the interface.
Confirm your Account Email, Company ID, and API Key are entered correctly.
Save settings and click **Refresh Available Backups**.
If the error persists with correct data, try again later as it may be a temporary Kinsta API issue.
### Plesk ID Confusion
Plesk API Backups may fail if you use the wrong ID during setup. Each WordPress installation in Plesk WP Toolkit has three IDs:
| ID Type | Description |
| --------- | ---------------------------------------------- |
| Site ID | Main identifier for the WordPress installation |
| Domain ID | Appears in Plesk URL (not correct for backups) |
| Owner ID | Account owner identifier |
**Solution:** Use the **Main Site ID** instead of the Domain ID when configuring your Plesk connection in MainWP. Re-save settings and retry the backup.
***
## Self-Check Checklist
* [ ] API credentials are entered and saved
* [ ] Child sites are assigned to the correct provider
* [ ] Test backup completes successfully
* [ ] Backups appear in the Manage Backups list
* [ ] Test restore works (on a staging site if possible)
***
## Related Resources
* [Why doesn't MainWP include backups](/sites/backups/why-doesnt-mainwp-include-backups-in-the-dashboard) - Backup philosophy explained
* [Backup Extensions](https://mainwp.com/mainwp-add-ons/add-on-category/backups/) - All backup extensions
 Enter a token name, set expiration to **No expire**, and select **Full Access**.

 ***
## Create Backups
### Individual Site Backup
***
## Create Backups
### Individual Site Backup