> ## Documentation Index
> Fetch the complete documentation index at: https://docs.mainwp.com/llms.txt
> Use this file to discover all available pages before exploring further.
# REST API Overview
> MainWP REST API v2 overview, authentication setup, key lifecycle guidance, and endpoint categories for sites, clients, tags, updates, costs, users, settings, monitoring, API keys, posts, pages, and batch operations.
The MainWP REST API lets you manage your MainWP Dashboard programmatically over HTTP.
The API follows REST conventions, returns JSON responses, and is designed for HTTPS requests.
Authentication options:
* Bearer token (recommended for `/mainwp/v2`)
* Consumer Key and Consumer Secret (legacy `/mainwp/v1`)
Use the [MainWP Postman collection](https://www.postman.com/mainwp/mainwp/collection/ujfddk4/mainwp-rest-api-v2-current) as the source of truth for request and response schemas.
Your MainWP Dashboard URL must be reachable from the system sending API requests. A local-only Dashboard is typically not reachable by external API clients.
## What You'll Learn
* How to authenticate with REST API keys
* How to create v2 API keys and optionally enable v1 compatibility in the UI
* How to manage key permissions and API access state
* Which endpoint category to use for each task
* How long-running update actions return responses
***
## Base URL
All v2 endpoints use:
```text theme={null}
https://your-dashboard.com/wp-json/mainwp/v2/
```
Use Bearer token authentication for v2:
```bash theme={null}
curl -H "Authorization: Bearer YOUR_API_KEY" \
"https://your-dashboard.com/wp-json/mainwp/v2/sites/basic"
```
***
## Set Up API Keys
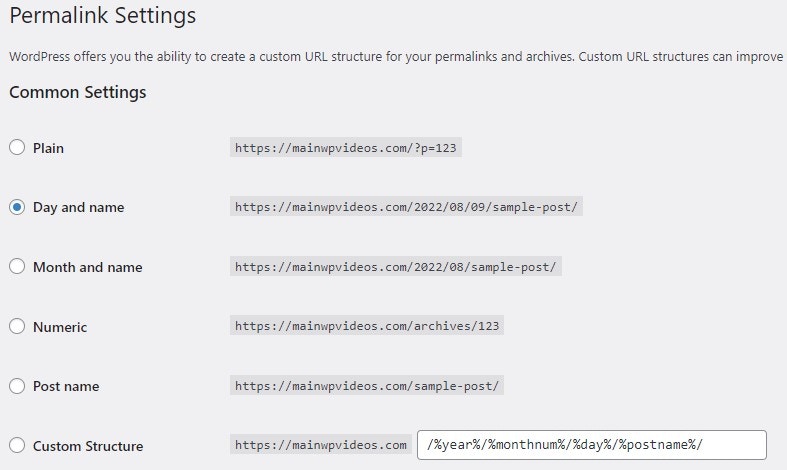
Go to **WP Admin > Settings > Permalinks** and choose any option except **Plain**.
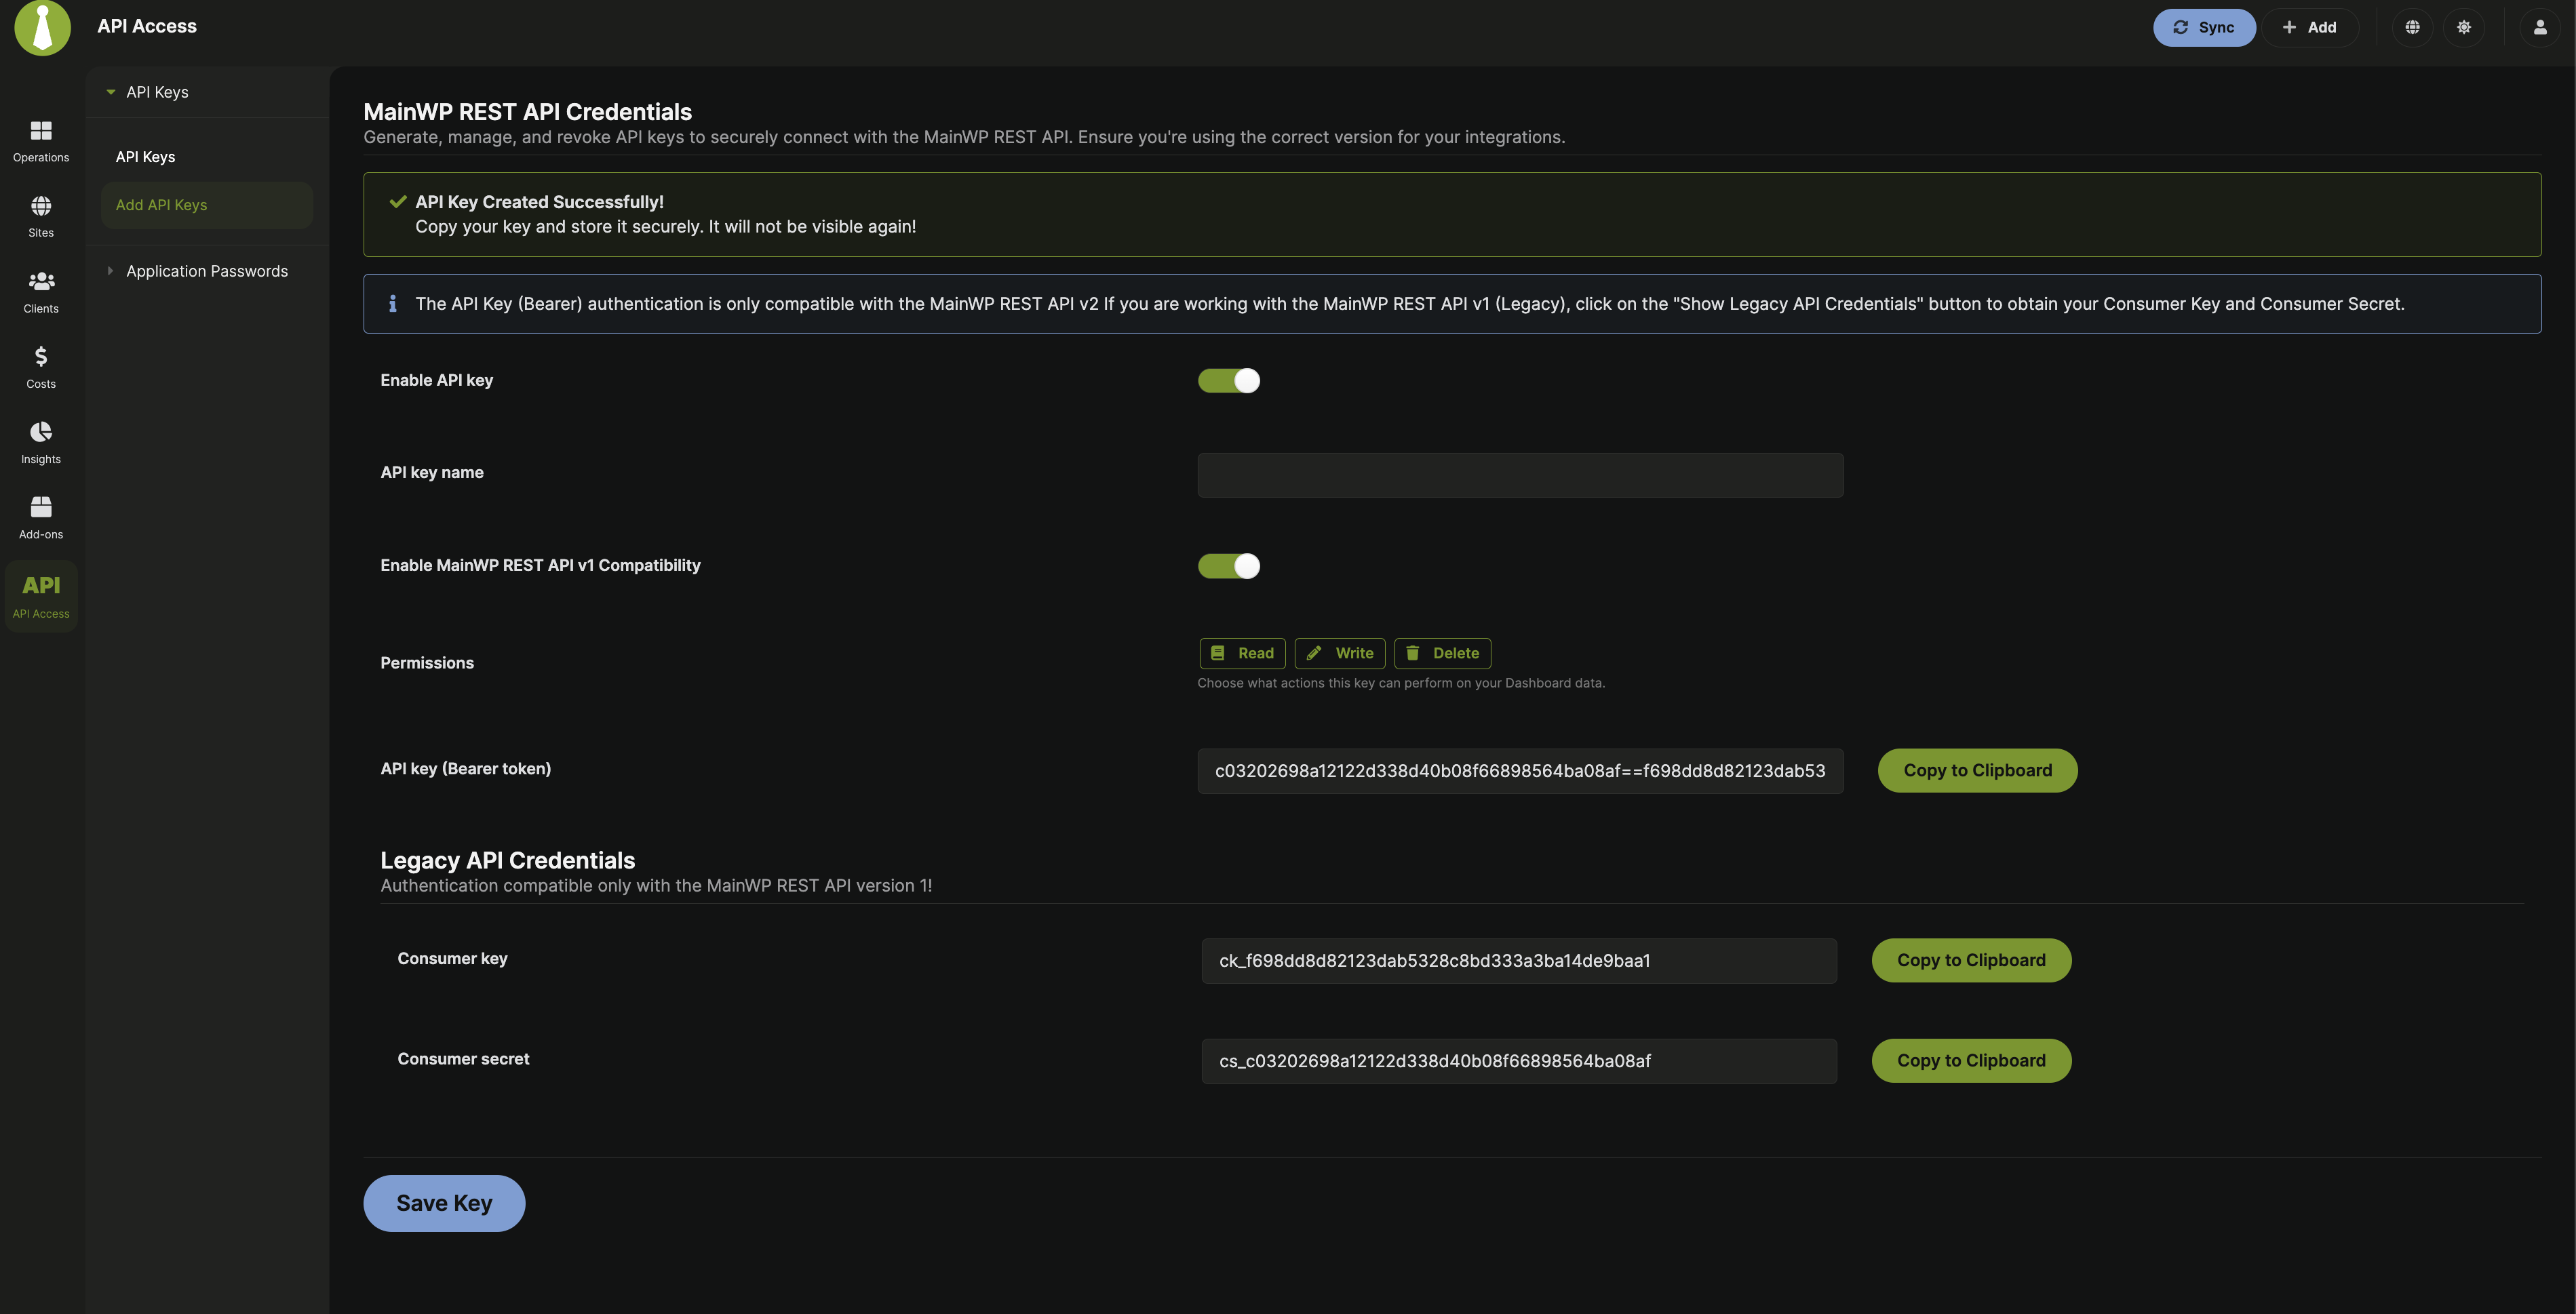
Go to **MainWP Dashboard > API Access > API Keys > Add API Keys** and enter a key name.
Choose one or more permissions based on the endpoints you plan to call.
* `Read` for `GET`
* `Write & Delete` for `POST`, `PUT`, `PATCH`, and `DELETE`
If your integration requires `/mainwp/v1`, enable **MainWP REST API v1 Compatibility** to generate legacy Consumer Key and Consumer Secret in the same creation flow.
Click **Save Key**, then copy the generated credentials and store them safely.
The API key (Bearer token) is shown once and cannot be revealed later. If you enable v1 compatibility, the Consumer Key and Consumer Secret are also shown once.
Send it in the `Authorization: Bearer ...` header for all v2 calls.
### Permission Scope
This table reflects v2 permission behavior.
| Permission | Methods | Purpose |
| -------------- | ------------------------ | ------------------------------------ |
| Read | GET | Fetch data |
| Write & Delete | POST, PUT, PATCH, DELETE | Create, update, and remove resources |
***
## Manage API Access State
MainWP REST API stays active while at least one API key is enabled.
* To disable API access, disable all enabled keys in **MainWP Dashboard > API Access > API Keys**.
* To delete keys, use **Delete** for single keys or bulk delete on the same page.
***
## Endpoint Categories
Site inventory, sync, plugins, themes, and site operations.
Client CRUD, client fields, and client-level site/cost endpoints.
Tag CRUD, plus related sites and clients.
Update listing, execution, and ignore management.
Cost tracker records, linked sites/clients, and batch operations.
User listing, create/edit/delete, CSV import, and admin password updates.
General, advanced, monitoring, email, tools, and other settings domains.
Uptime monitor list, incidents, heartbeat, and monitor settings.
REST API key list, create, edit, and delete endpoints.
Cross-site post listing and post CRUD actions.
Cross-site page listing and page CRUD actions.
Global `/batch` orchestration across multiple controllers.
For extension-specific endpoints, see [Extensions Endpoints](/api-reference/rest-api/extensions).
***
## Legacy v1 Compatibility
MainWP still supports legacy v1 endpoints (`/wp-json/mainwp/v1/`) for backward compatibility.
In the UI flow (**MainWP Dashboard > API Access > API Keys > Add API Keys**), you can enable **MainWP REST API v1 Compatibility** to generate legacy Consumer Key and Consumer Secret along with the v2 Bearer token.
The v2 API key endpoints create and manage v2 keys and do not create legacy v1 credentials.
```bash theme={null}
curl -u "CONSUMER_KEY:CONSUMER_SECRET" \
"https://your-dashboard.com/wp-json/mainwp/v1/sites"
```
Legacy v1 requests can also pass credentials using an `X-Api-Key` header payload that includes `consumer_key` and `consumer_secret`.
Build new integrations on v2 first. Use v1 only where an existing integration still requires it.
***
## Batch Update Response Handling
Some update endpoints start background work and return a start or queue confirmation immediately instead of waiting for completion.
```json theme={null}
{
"success": 1,
"message": "Batch updates all started successfully.",
"last_time_start_batch_updates": "2024-09-03T16:57:29"
}
```
Depending on your Dashboard version and execution mode, responses can also include fields such as `job_id` and `queued_count`.
After you receive a start or queued response, wait for the process to finish, then sync your Dashboard or recheck update endpoints.
***
## Related Resources
* [API Keys Endpoints](/api-reference/rest-api/api-keys)
* [Application Passwords](/api-reference/rest-api/application-passwords)
* [MainWP API Introduction](/api-reference/introduction)