> ## Documentation Index
> Fetch the complete documentation index at: https://docs.mainwp.com/llms.txt
> Use this file to discover all available pages before exploring further.
# Wordfence
> The Wordfence Extension combines the power of your MainWP Dashboard with the popular Wordfence Security Plugin (almost 3 million downloads). It allows you to scan your child sites for security issues, monitor live traffic and to manage Wordfence settings across your network and all from your Dashboard!
## What You'll Learn
* Installing the Wordfence extension and plugin on child sites
* Configuring global and per-site Wordfence settings
* Scanning child sites for security issues
* Monitoring live traffic across your network
***
**Integration Add-on** - This add-on extends MainWP to work with Wordfence. Requires Wordfence to be installed on your child sites.
Installation of the MainWP Wordfence Extension requires two important steps:
* Installing the Extension itself
* Installing the Wordfence plugin on Child Sites.
### 1. Installing the Extension
MainWP Wordfence Extension is a WordPress plugin, and the installation process is the same as any other WordPress plugin. **Follow the steps below in your MainWP Dashboard site, not child sites:**
Locate the **mainwp-wordfence-extension.zip** file and click the **“Install Now”** button.
That is it. The extension is ready for use. **If you prefer, you can install MainWP Extension by uploading it to the server with your favorite FTP client. You need to extract the MainWP Extension file to yourdomain.com/wp-content/plugins**
### 2. Installing the Wordfence Plugin
For the proper use of the MainWP Wordfence Extension, you need to install the Wordfence Plugin on your child sites. To do that,
When you get **Search Results**, locate the plugin and click the **Install Now** link.
Now, your MainWP Wordfence Extension is ready for use!
## WordFence Settings
### Global Settings
The Wordfence Settings tab enables you to control the Wordfence options across all your child sites. It allows you to set:
* Scan Schedule
* Basic Settings
* Alerts
* Live Traffic View
* Scans to Include
* Firewall Rules
* Login Security Options
* Other Options
### Saving the Wordfence options will overwrite options on your child sites.
**If you add the Wordfence plugin on more child sites, after setting Wordfence options, you will need to re-save settings to apply on newly added child sites.**
### Individual Site Settings
The extension enables you to set Wordfence options individually on a per-site basis. To do this,
## Wordfence Dashboard
From the **MainWP > Add-ons > Wordfence > Overview page**\*\*,\*\* you can monitor all of your child sites where you have the Wordfence plugin installed. In the sites list, you will be notified if the plugin has an update available or if the plugin is deactivated.
* In case the plugin is not activated, the **Activate** action will appear in the corresponding site row
* In case there is a new version of the plugin, the **Update** action will appear in the corresponding site row
### Available Actions
From the **MainWP > Add-ons > Wordfence > Overview page**\*\*,\*\* you can **hide/unhide** the Wordfence plugin on your child sites, quickly **access** the plugin settings on a child site or the WP Admin section. Actions are provided in the actions menu.
#### Important Notes
If you know that you have the plugin installed on a child site, but the child site doesn't appear in the list, try to re-sync your sites.
## How to Scan Child Sites With the MainWP WordFence Extension
The Wordfence extension enables you to trigger the scanning process on child sites directly from your dashboard. To do this,
Locate the site you want to scan and click the **Scan Site** action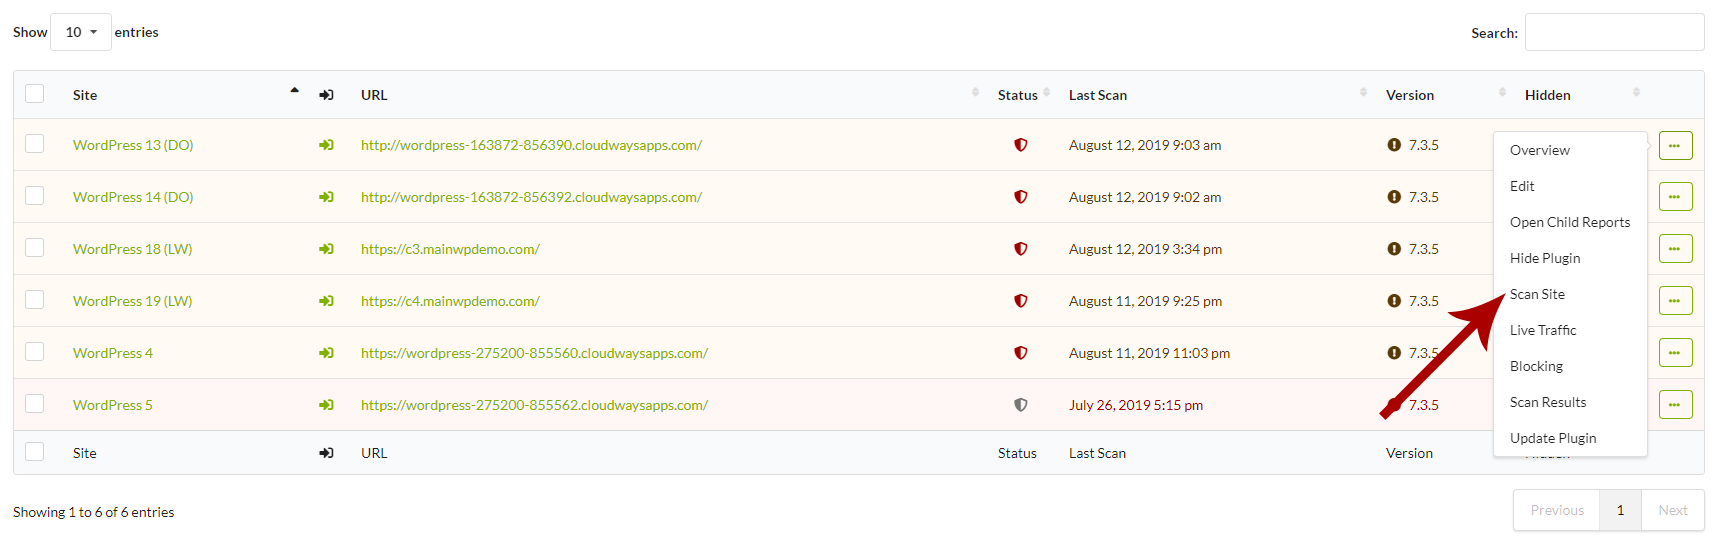 ## Monitor Child Sites Live Traffic
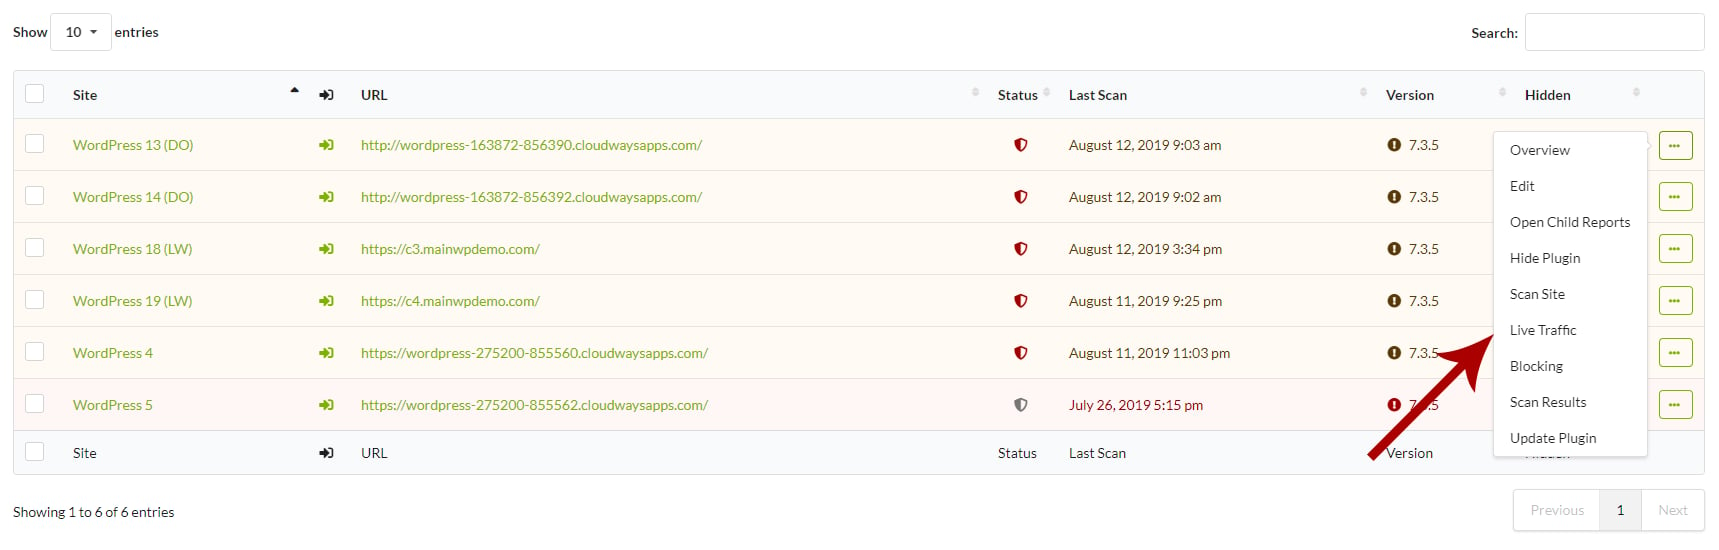
If you want to monitor live traffic on your child sites directly from your dashboard, you can do that by clicking the Live Traffic action on the Wordfence Dashboard page.
* Locate the wanted child site in the list
* Click the Live Traffic action in the menu
* The live traffic tab will be opened
## Monitor Child Sites Live Traffic
If you want to monitor live traffic on your child sites directly from your dashboard, you can do that by clicking the Live Traffic action on the Wordfence Dashboard page.
* Locate the wanted child site in the list
* Click the Live Traffic action in the menu
* The live traffic tab will be opened
 If the Live Traffic feature is disabled, you need to enable it. You can do that in the Wordfence Settings tab.
* Locate the Basic Settings box.
* Find the Enable Live Traffic View option and check the checkbox
* Click the Save Settings button
* Click the Sync Data button
## Monitor Network Live Traffic
If you want to monitor live traffic across your network directly from your dashboard, you can do that by clicking the Network Live Traffic tab.
If the Live Traffic feature is disabled, you need to enable it. You can do that in the Wordfence Settings tab.
* Locate the Basic Settings box.
* Find the Enable Live Traffic View option and check the checkbox
* Click the Save Settings button
* Click the Sync Data button
## Monitor Network Live Traffic
If you want to monitor live traffic across your network directly from your dashboard, you can do that by clicking the Network Live Traffic tab.  It will show you traffic (hits) from all your child sites in the same window.
***
## Related Resources
* [Security Add-ons](/add-ons/security) - Browse all security tools
* [Vulnerability Checker Extension](/add-ons/security/vulnerability-checker-extension) - Scan for known vulnerabilities
* [Sucuri Extension](/add-ons/security/sucuri-extension) - Alternative security integration
It will show you traffic (hits) from all your child sites in the same window.
***
## Related Resources
* [Security Add-ons](/add-ons/security) - Browse all security tools
* [Vulnerability Checker Extension](/add-ons/security/vulnerability-checker-extension) - Scan for known vulnerabilities
* [Sucuri Extension](/add-ons/security/sucuri-extension) - Alternative security integration