> ## Documentation Index
> Fetch the complete documentation index at: https://docs.mainwp.com/llms.txt
> Use this file to discover all available pages before exploring further.
# Virusdie
> MainWP Virusdie Extension uses Virusdie, a powerful, user-friendly, and professional-grade WordPress virus scanner for your websites. It helps you monitor all your sites directly from your MainWP Dashboard.
## What You'll Learn
* Creating a Virusdie account and connecting the API
* Adding child sites to Virusdie for malware scanning
* Running manual and automated security scans
* Troubleshooting sync file upload errors
***
**Integration Add-on** - This add-on extends MainWP to work with Virusdie. It requires a Virusdie account with API access and uploads the Virusdie synchronization file to connected child sites.
Check out our other security extensions:
* [Jetpack Protect](/add-ons/security/jetpack-protect-extension)
* [Jetpack Scan](/add-ons/security/jetpack-scan-extension)
* [Solid Security](/add-ons/security/solid-security-extension)
* [Sucuri](/add-ons/security/sucuri-extension)
* [Vulnerability Checker](/add-ons/security/vulnerability-checker-extension)
* [Wordfence](/add-ons/security/wordfence-extension)
## Virusdie
The [MainWP Virusdie Extension](https://mainwp.com/extension/virusdie/) uses Virusdie to scan your sites. Virusdie features an incredibly extensive database and a stack of technologies to detect viruses and threats. Virusdie detects both viruses and website vulnerabilities, which distinguishes it from other antivirus or defender products.
MainWP Virusdie Extension includes the Virusdie freemium model by default. You can use some Virusdie features for free and purchase a Premium license for additional options.
Included free features:
* Unlimited sites
* Automated weekly scans
* Email Notifications
## Remove Child Sites from the Virusdie
To remove a child site from your Virusdie dashboard,
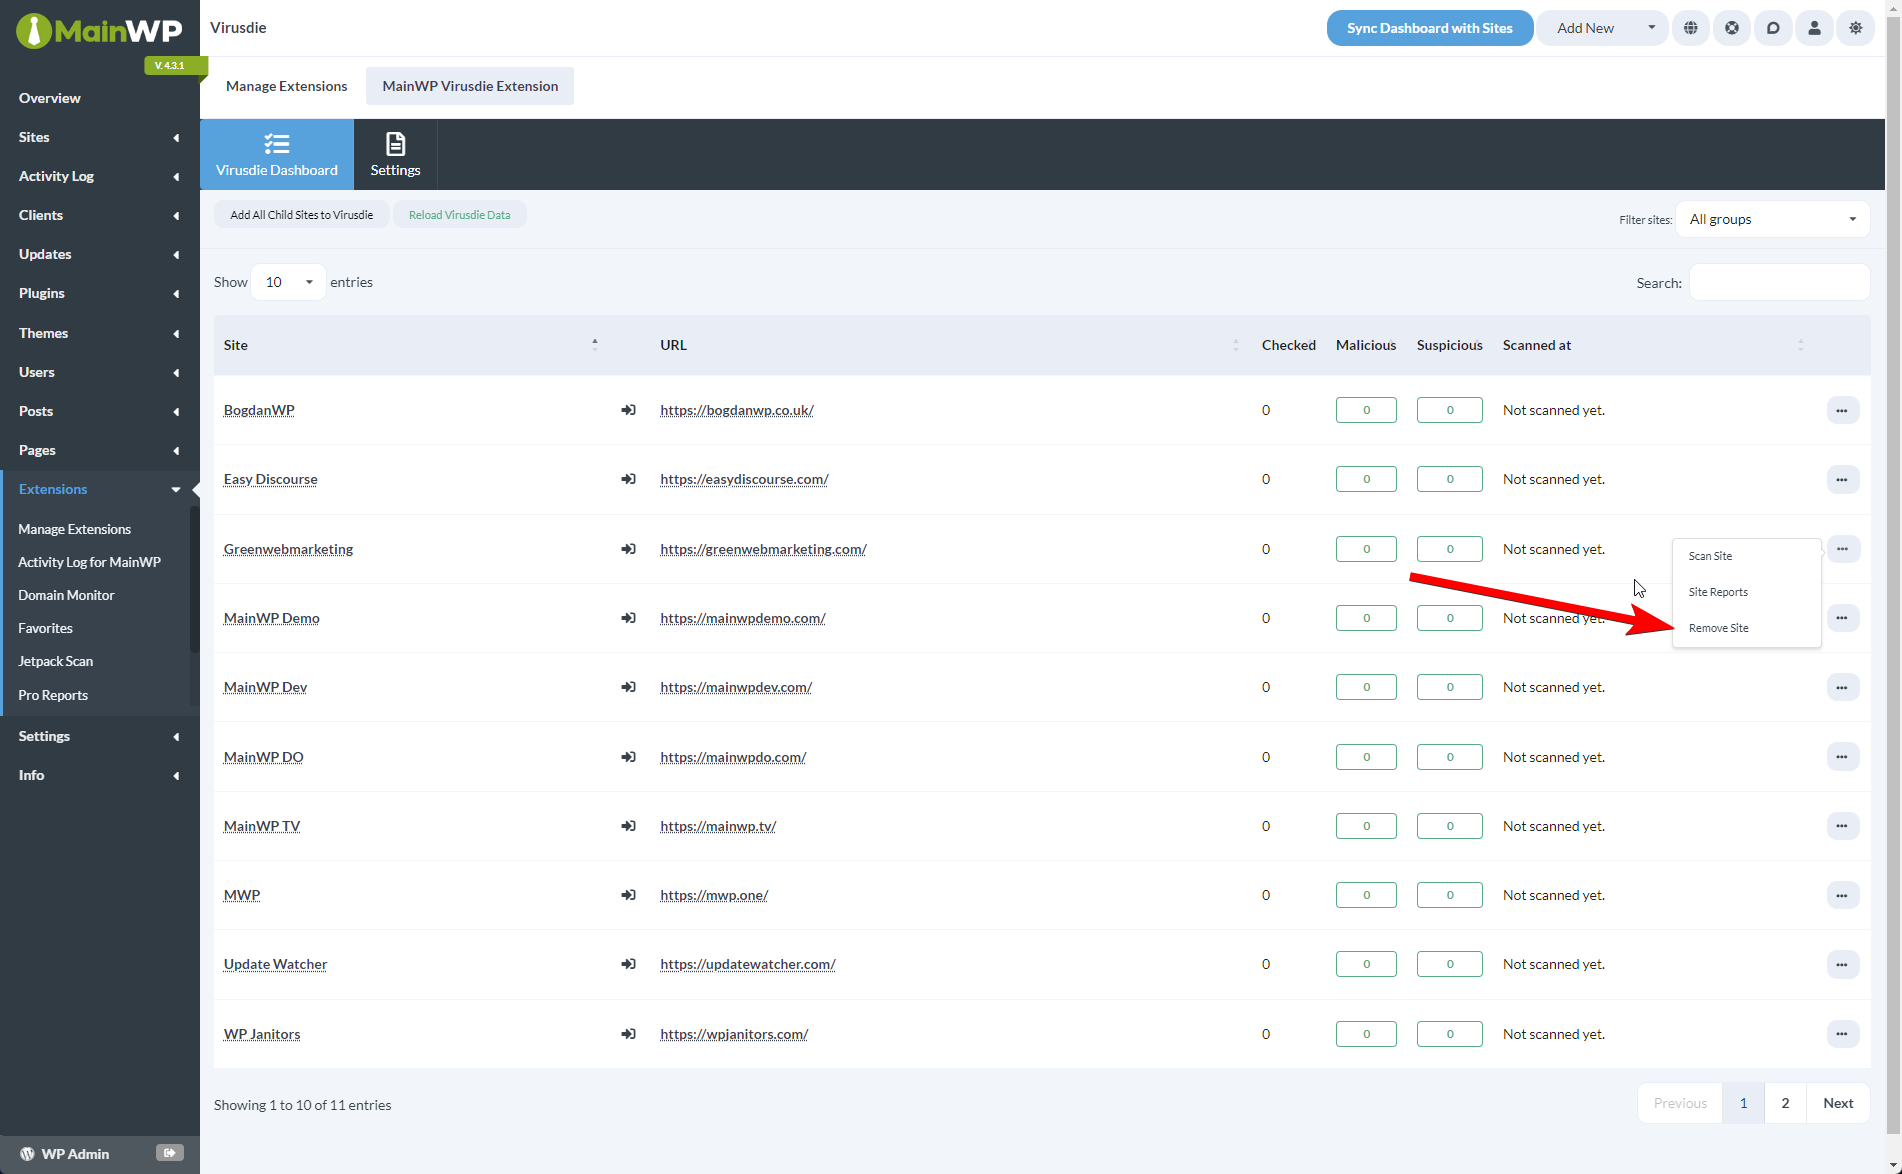 **Important Notes:**
After removing a site from the Virusdie, you need to **MANUALLY** delete your unique sync file from the Site Root via (S)FTP.
## Scan Child Sites With Virusdie
The on-demand scan feature requires a paid Virusdie plan. By default, Virusdie scans your sites automatically once per week on the free plan. If any problem is found, you will get a notification from the Virusdie service. If you wish to scan sites more frequently or on demand, an upgrade to a paid Virusdie plan is required.
To request the Scan process manually:
**Important Notes:**
After removing a site from the Virusdie, you need to **MANUALLY** delete your unique sync file from the Site Root via (S)FTP.
## Scan Child Sites With Virusdie
The on-demand scan feature requires a paid Virusdie plan. By default, Virusdie scans your sites automatically once per week on the free plan. If any problem is found, you will get a notification from the Virusdie service. If you wish to scan sites more frequently or on demand, an upgrade to a paid Virusdie plan is required.
To request the Scan process manually:
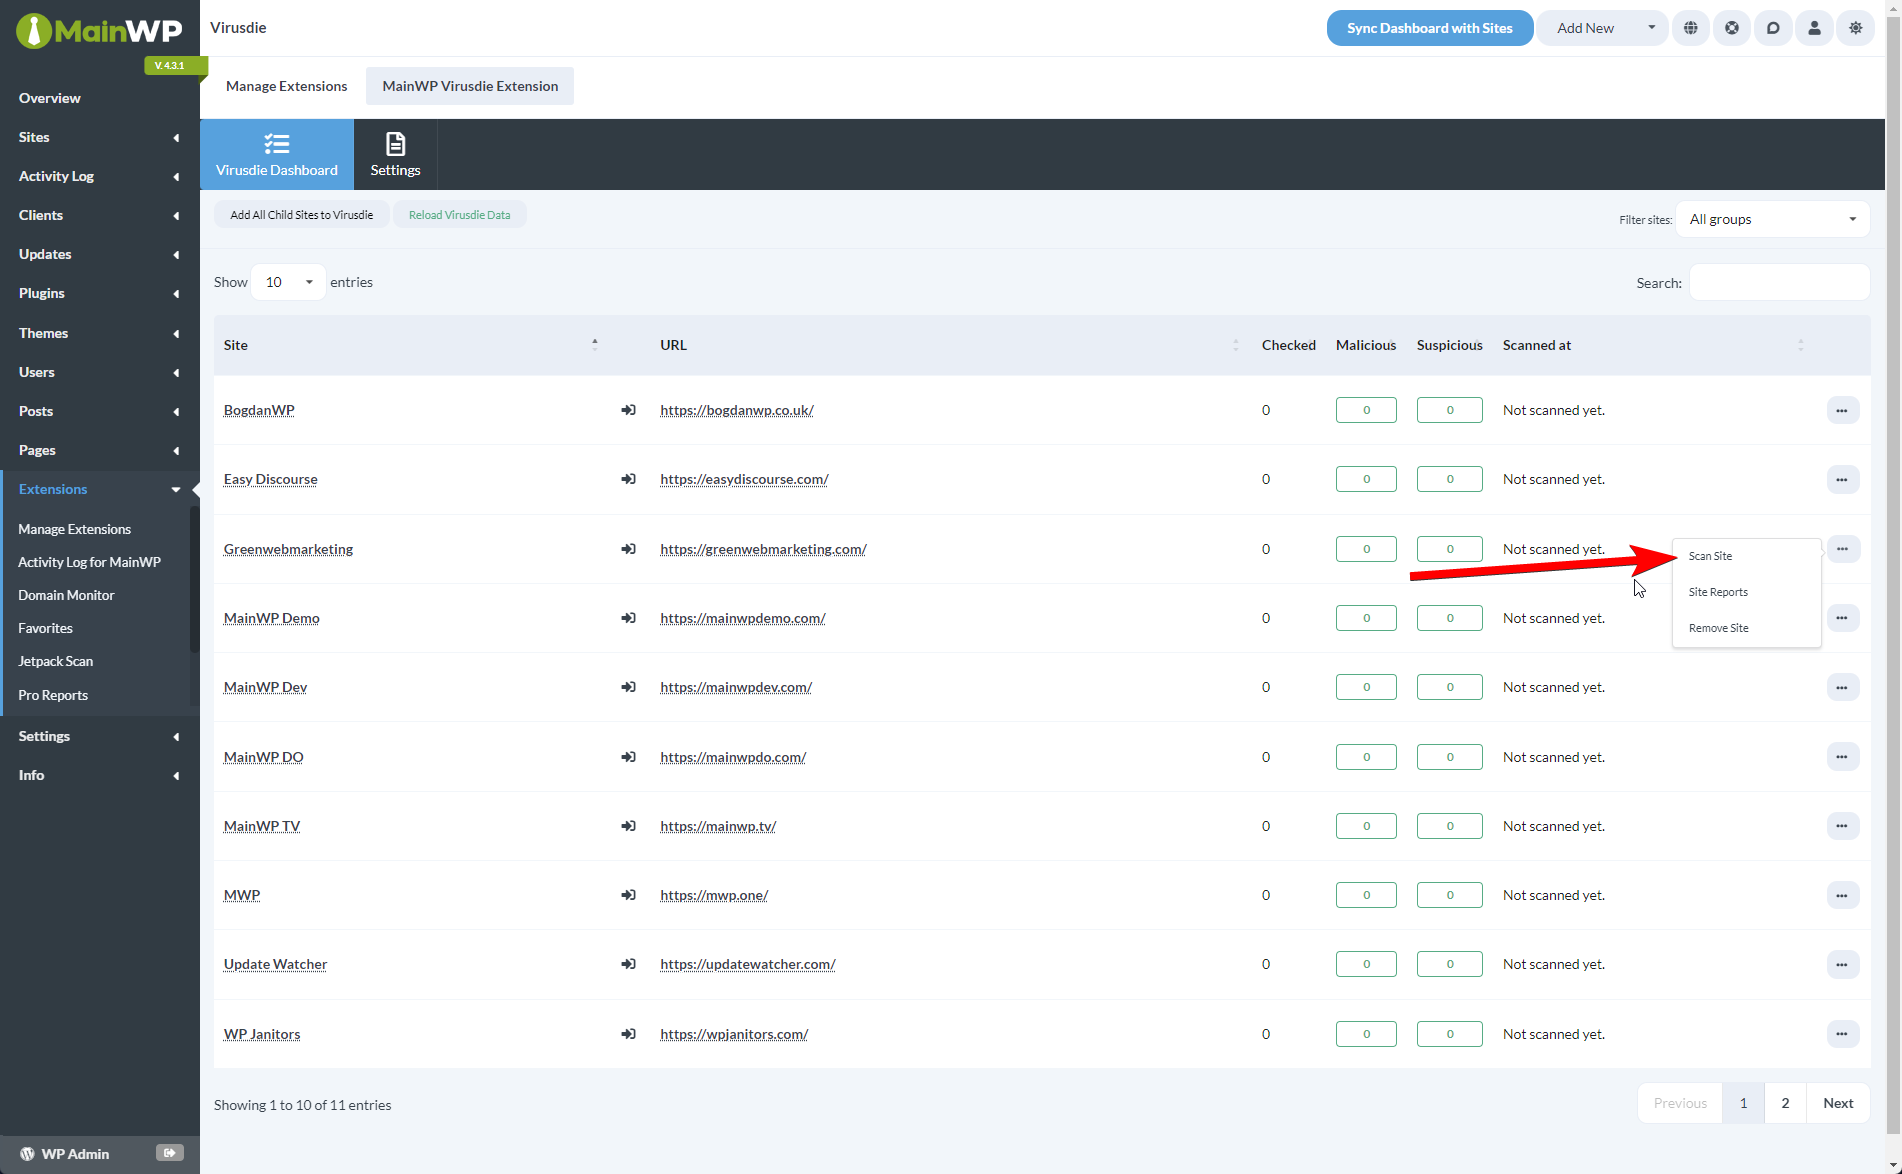 ### Scan via WP CLI Command
```bash theme={null}
wp mainwp-virusdie scan
```
Replace `` with the actual child site ID.
### Scan via REST API
**URI**
`/wp-json/mainwp/v1/virusdie/scan`
**Method**
GET
**Required Parameters**
* `site_id` - (INT) ID of the child site
**Example Request**
[https://example.com/wp-json/mainwp/v1/virusdie/scan?site\_id=25\&consumer\_key=ck\_b587c54fa39976a2ad47b8faf260de84beb70f5d\&consumer\_secret=cs\_75f7a905fa7ae1243570425ede6be026f4731f9c](https://example.com/wp-json/mainwp/v1/virusdie/scan?site_id=25\&consumer_key=ck_b587c54fa39976a2ad47b8faf260de84beb70f5d\&consumer_secret=cs_75f7a905fa7ae1243570425ede6be026f4731f9c)
## Set up the MainWP Virusdie Extension
**If you have an existing Virusdie account:** Due to limitations in Virusdie's API, existing accounts created without MainWP Virusdie Extension do not have the required permissions to manage connected sites. Use this extension only if you plan to create a new Virusdie account through the extension Sign-Up form.
To properly set up the MainWP Virusdie Extension:
Locate the Create a free Virusdie account section, enter your email address and click the **Sign-Up** button
### Scan via WP CLI Command
```bash theme={null}
wp mainwp-virusdie scan
```
Replace `` with the actual child site ID.
### Scan via REST API
**URI**
`/wp-json/mainwp/v1/virusdie/scan`
**Method**
GET
**Required Parameters**
* `site_id` - (INT) ID of the child site
**Example Request**
[https://example.com/wp-json/mainwp/v1/virusdie/scan?site\_id=25\&consumer\_key=ck\_b587c54fa39976a2ad47b8faf260de84beb70f5d\&consumer\_secret=cs\_75f7a905fa7ae1243570425ede6be026f4731f9c](https://example.com/wp-json/mainwp/v1/virusdie/scan?site_id=25\&consumer_key=ck_b587c54fa39976a2ad47b8faf260de84beb70f5d\&consumer_secret=cs_75f7a905fa7ae1243570425ede6be026f4731f9c)
## Set up the MainWP Virusdie Extension
**If you have an existing Virusdie account:** Due to limitations in Virusdie's API, existing accounts created without MainWP Virusdie Extension do not have the required permissions to manage connected sites. Use this extension only if you plan to create a new Virusdie account through the extension Sign-Up form.
To properly set up the MainWP Virusdie Extension:
Locate the Create a free Virusdie account section, enter your email address and click the **Sign-Up** button This will automatically create an account for you, and you will get an email with a one-time password in a few minutes.
After getting the email, go to the **Log in to your Virusdie account** section, enter your **email address and the password** you got, and click the **Sign In** button.
This will automatically create an account for you, and you will get an email with a one-time password in a few minutes.
After getting the email, go to the **Log in to your Virusdie account** section, enter your **email address and the password** you got, and click the **Sign In** button. Upon successful login, the MainWP Virusdie Extension will automatically get your API Credentials, and the extension is ready to go.
Now, you are ready to start adding your sites to your Virusdie account.
### Sign Out
If you need to disconnect the extension from your Virusdie account or reset stored credentials (for example, before connecting a different account or recovering from a failed sign-in), use the **Sign Out** button.
When to use it:
* You want to switch to a different Virusdie account
* The extension is stuck with stale or invalid API credentials
* You're following the recovery steps in [the sync file error guide](/add-ons/security/mainwp-virusdie-extension#error-unique-sync-file-could-not-be-uploaded-when-adding-a-website-to-virusdie) and need to remove existing credentials before signing in again
To sign out and clear stored connection data:
The button is shown after the extension is signed in. Clicking it signs the extension out of Virusdie and removes the stored email, API key, and HMAC key from your MainWP Dashboard.
After clearing the data, you can create a new Virusdie account through the Sign-Up form or sign in to an existing account that has API access.
Signing out only removes credentials stored in your MainWP Dashboard. It does not delete your Virusdie account or remove any sites already connected to it.
## Add Sites To Virusdie Dashboard
After creating a Virusdie account and connecting the API, you can start adding your sites to your Virusdie dashboard.
### Adding Sites Automatically
Locate the **Add All Child Sites to Virusdie** button and click it
Upon successful login, the MainWP Virusdie Extension will automatically get your API Credentials, and the extension is ready to go.
Now, you are ready to start adding your sites to your Virusdie account.
### Sign Out
If you need to disconnect the extension from your Virusdie account or reset stored credentials (for example, before connecting a different account or recovering from a failed sign-in), use the **Sign Out** button.
When to use it:
* You want to switch to a different Virusdie account
* The extension is stuck with stale or invalid API credentials
* You're following the recovery steps in [the sync file error guide](/add-ons/security/mainwp-virusdie-extension#error-unique-sync-file-could-not-be-uploaded-when-adding-a-website-to-virusdie) and need to remove existing credentials before signing in again
To sign out and clear stored connection data:
The button is shown after the extension is signed in. Clicking it signs the extension out of Virusdie and removes the stored email, API key, and HMAC key from your MainWP Dashboard.
After clearing the data, you can create a new Virusdie account through the Sign-Up form or sign in to an existing account that has API access.
Signing out only removes credentials stored in your MainWP Dashboard. It does not delete your Virusdie account or remove any sites already connected to it.
## Add Sites To Virusdie Dashboard
After creating a Virusdie account and connecting the API, you can start adding your sites to your Virusdie dashboard.
### Adding Sites Automatically
Locate the **Add All Child Sites to Virusdie** button and click it 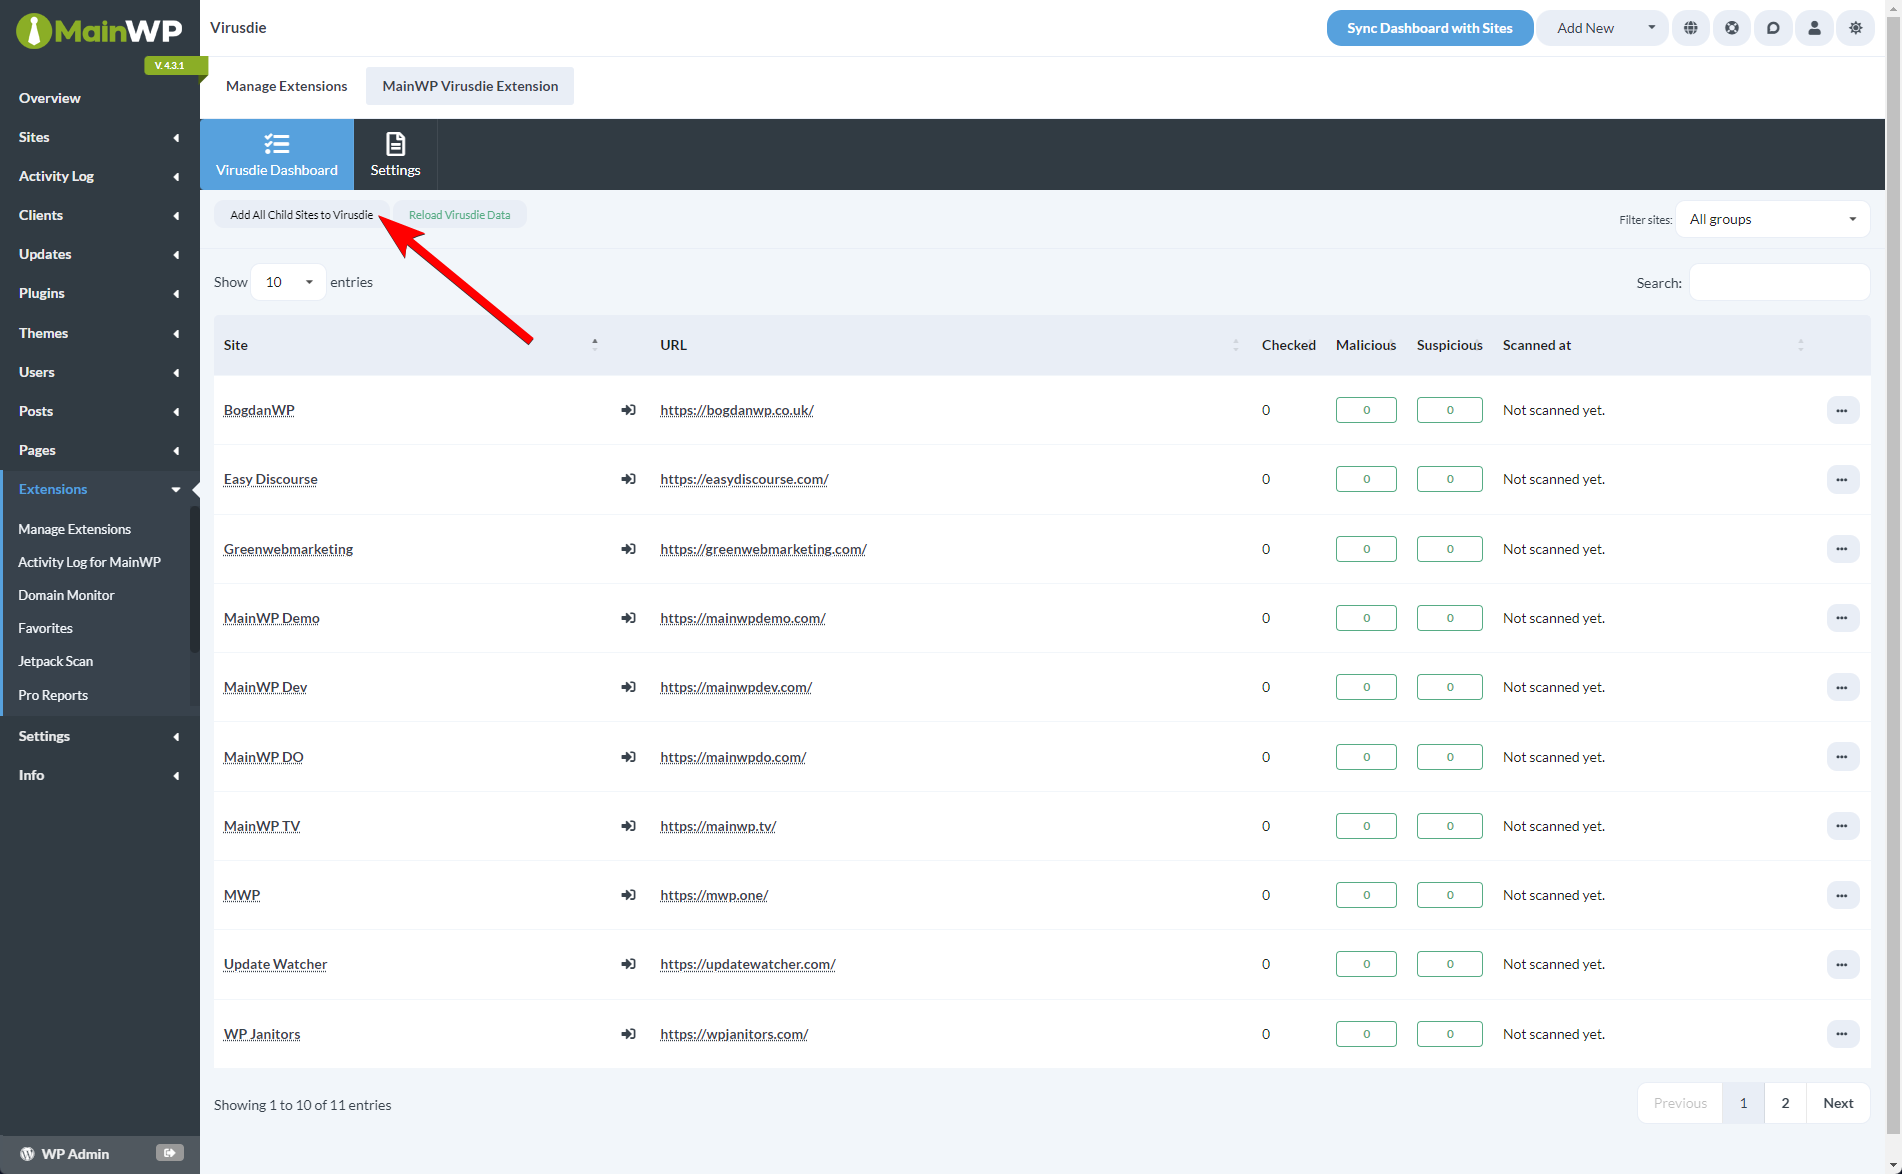 This process will connect all your child sites to your Virusdie account. This includes downloading and adding your unique sync file to the root directory of your child sites and making the API call that will connect all your sites to the Dashboard.
Alternatively, if you want to add just some of your sites separately, you can use the **Add To Virusdie** action for all sites that are not found in your Virusdie account.
Now you are ready to start [scanning your sites](/add-ons/security/mainwp-virusdie-extension#scan-child-sites-with-virusdie). In case of an error message "Unique sync file could not be uploaded.", please refer to [this article](/add-ons/security/mainwp-virusdie-extension#error-unique-sync-file-could-not-be-uploaded-when-adding-a-website-to-virusdie) on how to resolve the issue.
### Adding Sites Manually
Adding sites to the Virusdie account manually, required 3 easy steps:
Full process documentation can be found in this [help document](https://virusdie.com/faq/add/).
## Virusdie Extension API Compatibility
### New Virusdie Users
To use the MainWP Virusdie Extension, it is required to have API access. For new users that don't have a Virusdie account, the process of getting the keys is fairly simple. You can use the Signup field, and after getting the email with the one-time password and signing in, the extension will automatically load the keys. With the free account created through the MainWP Virusdie Extension, you can add your sites to the Virusdie dashboard to run weekly automated scans and get email notifications. If needed, you can upgrade your account to use premium features at Virusdie.com.
### Existing Virusdie Premium Users
If you already have a Premium Account with Virusdie created without the MainWP Virusdie Extension, the connection won't be possible due to restrictions in Virusdie's API. Existing accounts created without MainWP Virusdie Extension do not have the required permissions to manage connected sites. **After confirming with Virusdie, not all accounts have access to their API. If you have an older account, you will want to verify with Virusdie support. Unfortunately, this is out of MainWP control.**
## Error: Unique sync file could not be uploaded when adding a website to Virusdie
This process will connect all your child sites to your Virusdie account. This includes downloading and adding your unique sync file to the root directory of your child sites and making the API call that will connect all your sites to the Dashboard.
Alternatively, if you want to add just some of your sites separately, you can use the **Add To Virusdie** action for all sites that are not found in your Virusdie account.
Now you are ready to start [scanning your sites](/add-ons/security/mainwp-virusdie-extension#scan-child-sites-with-virusdie). In case of an error message "Unique sync file could not be uploaded.", please refer to [this article](/add-ons/security/mainwp-virusdie-extension#error-unique-sync-file-could-not-be-uploaded-when-adding-a-website-to-virusdie) on how to resolve the issue.
### Adding Sites Manually
Adding sites to the Virusdie account manually, required 3 easy steps:
Full process documentation can be found in this [help document](https://virusdie.com/faq/add/).
## Virusdie Extension API Compatibility
### New Virusdie Users
To use the MainWP Virusdie Extension, it is required to have API access. For new users that don't have a Virusdie account, the process of getting the keys is fairly simple. You can use the Signup field, and after getting the email with the one-time password and signing in, the extension will automatically load the keys. With the free account created through the MainWP Virusdie Extension, you can add your sites to the Virusdie dashboard to run weekly automated scans and get email notifications. If needed, you can upgrade your account to use premium features at Virusdie.com.
### Existing Virusdie Premium Users
If you already have a Premium Account with Virusdie created without the MainWP Virusdie Extension, the connection won't be possible due to restrictions in Virusdie's API. Existing accounts created without MainWP Virusdie Extension do not have the required permissions to manage connected sites. **After confirming with Virusdie, not all accounts have access to their API. If you have an older account, you will want to verify with Virusdie support. Unfortunately, this is out of MainWP control.**
## Error: Unique sync file could not be uploaded when adding a website to Virusdie
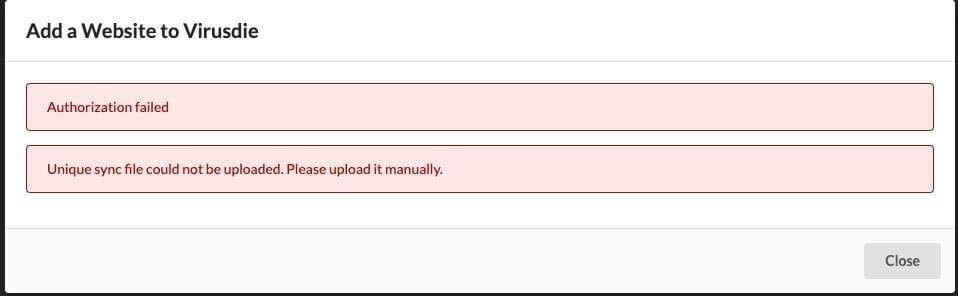 The issue occurs because authentication with the Virusdie API server is failing, and MainWP Dashboard can't download the sync file. Therefore it can not upload the sync file to the Child site. Authentication with the VD API server can fail due to multiple reasons:
* Incorrect Virusdie email address or one-time password
* Incompatible account type since Virusdie has some limitations specifically for MainWP users
### Steps to try to resolve the problem:
1. In the Virusdie extension settings, use the [Sign Out](/add-ons/security/mainwp-virusdie-extension#sign-out) button to remove current credentials
2. Use the Sign Up function, but use the same email address that is already registered with Virusdie
3. This will trigger the One-Time Password email so that the user will get a new Password
4. Use the Sign In form to sign in with the email address signed up in step 2 and the new password from the email (**Note**: Do not change the password in Virusdie account)
5. After the successful sign-in process, try to add sites again
6. If it fails again, contact the Virusdie team to check the account compatibility or if something else is causing issues with the authentication process
***
## Related Resources
* [Security Add-ons](/add-ons/security) - Browse all security tools
* [Sucuri Extension](/add-ons/security/sucuri-extension) - Alternative malware scanning
* [Vulnerability Checker Extension](/add-ons/security/vulnerability-checker-extension) - Scan for known vulnerabilities
The issue occurs because authentication with the Virusdie API server is failing, and MainWP Dashboard can't download the sync file. Therefore it can not upload the sync file to the Child site. Authentication with the VD API server can fail due to multiple reasons:
* Incorrect Virusdie email address or one-time password
* Incompatible account type since Virusdie has some limitations specifically for MainWP users
### Steps to try to resolve the problem:
1. In the Virusdie extension settings, use the [Sign Out](/add-ons/security/mainwp-virusdie-extension#sign-out) button to remove current credentials
2. Use the Sign Up function, but use the same email address that is already registered with Virusdie
3. This will trigger the One-Time Password email so that the user will get a new Password
4. Use the Sign In form to sign in with the email address signed up in step 2 and the new password from the email (**Note**: Do not change the password in Virusdie account)
5. After the successful sign-in process, try to add sites again
6. If it fails again, contact the Virusdie team to check the account compatibility or if something else is causing issues with the authentication process
***
## Related Resources
* [Security Add-ons](/add-ons/security) - Browse all security tools
* [Sucuri Extension](/add-ons/security/sucuri-extension) - Alternative malware scanning
* [Vulnerability Checker Extension](/add-ons/security/vulnerability-checker-extension) - Scan for known vulnerabilities