> ## Documentation Index
> Fetch the complete documentation index at: https://docs.mainwp.com/llms.txt
> Use this file to discover all available pages before exploring further.
# Jetpack Scan
> The Jetpack Scan Extension effectively detects vulnerabilities and provides detailed information about them, along with one-click solutions to fix issues in WordPress, plugins, and themes.
## What You'll Learn
* Installing and connecting Jetpack Scan extension
* Requesting malware scans for single or multiple sites
* Managing and fixing detected threats
* Claiming discounted Jetpack Scan subscriptions
***
**Integration Add-on** - This add-on extends MainWP to work with Jetpack Scan. Requires Jetpack Scan to be installed on your child sites.
The "Jetpack Scan" Extension allows you to effortlessly scan all your Child Sites for potential vulnerabilities, get detailed information about each vulnerability, and take advantage of the one-click solution for most issues.
The extension requires a [Jetpack Protect plugin](https://wordpress.org/plugins/jetpack-protect/) on your Child Sites and a [Jetpack Scan subscription](https://jetpack.com/upgrade/scan/) that you can get at a discounted price from within the MainWP Dashboard. [Jetpack plugin](https://wordpress.org/plugins/jetpack/) will also work; however, unless you need other Jetpack modules, the Jetpack Protect plugin is preferred.
## Installing the extension
The first step is to install Jetpack Protect plugin and activate the Jetpack Scan feature. Please follow [Jetpack's help article](https://jetpack.com/support/activate-a-jetpack-product-via-license-key/) for details on how to do so. After that, follow these steps to install the MainWP Jetpack Protect extension.
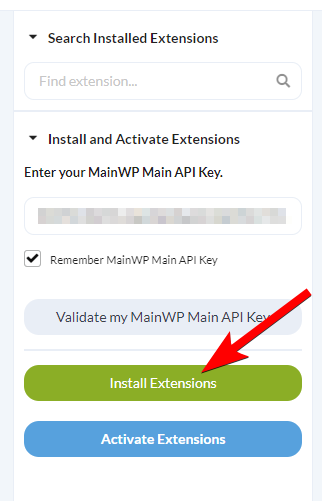
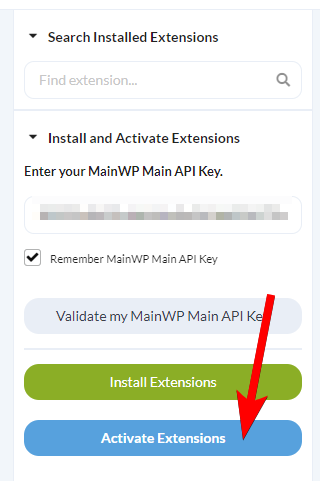
Click the **Install Add-ons** button
Once the installation process is complete, click the **Activate Add-ons** button.
## Connect extension to Jetpack App
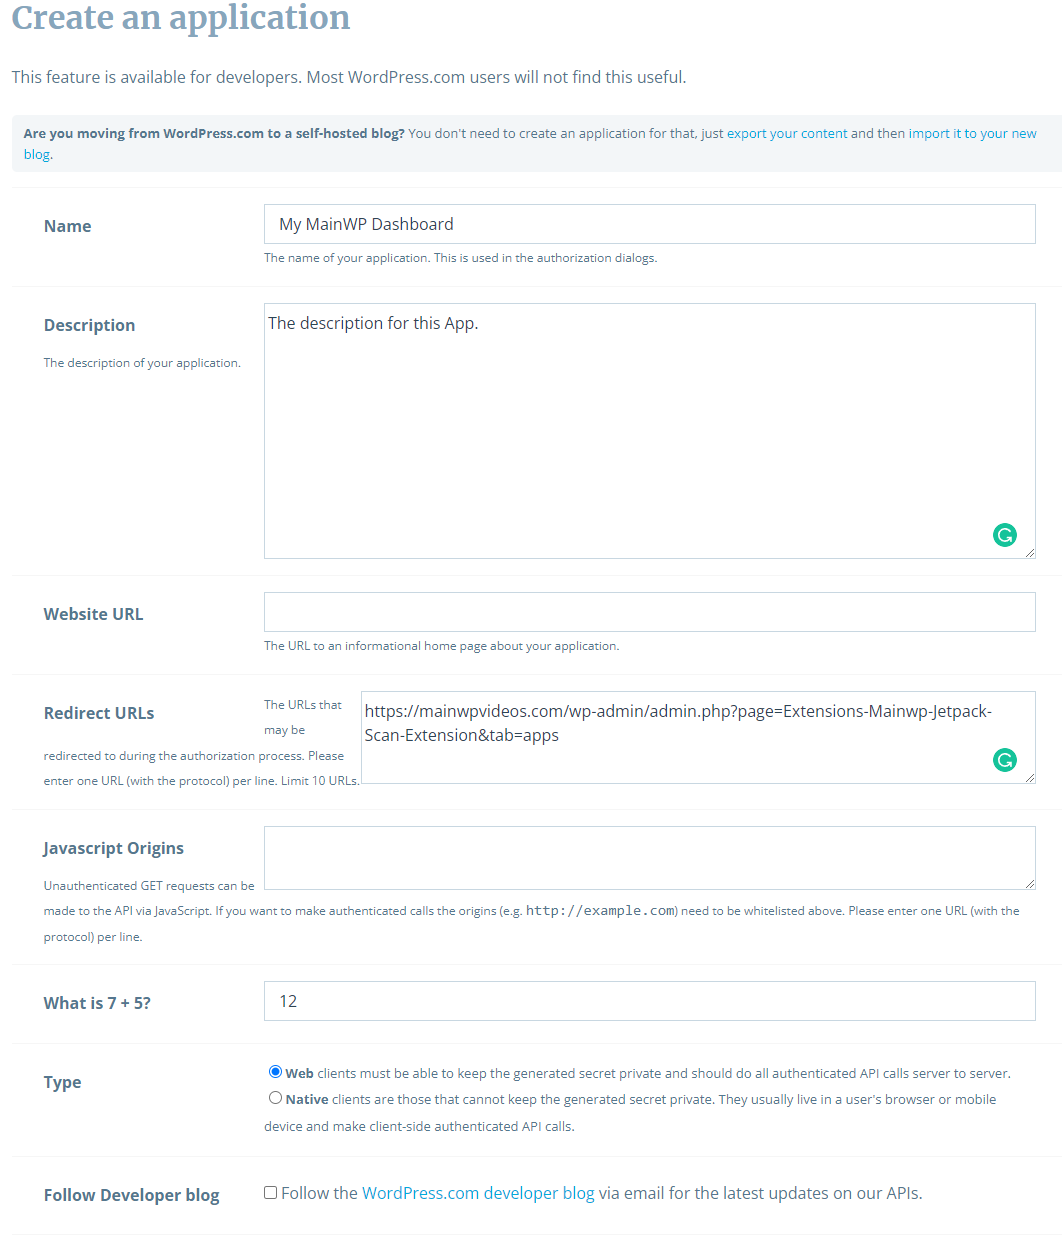
[Access your WordPress.com Developer account](https://developer.wordpress.com/apps/new/) and fill in the form in order to create an application.
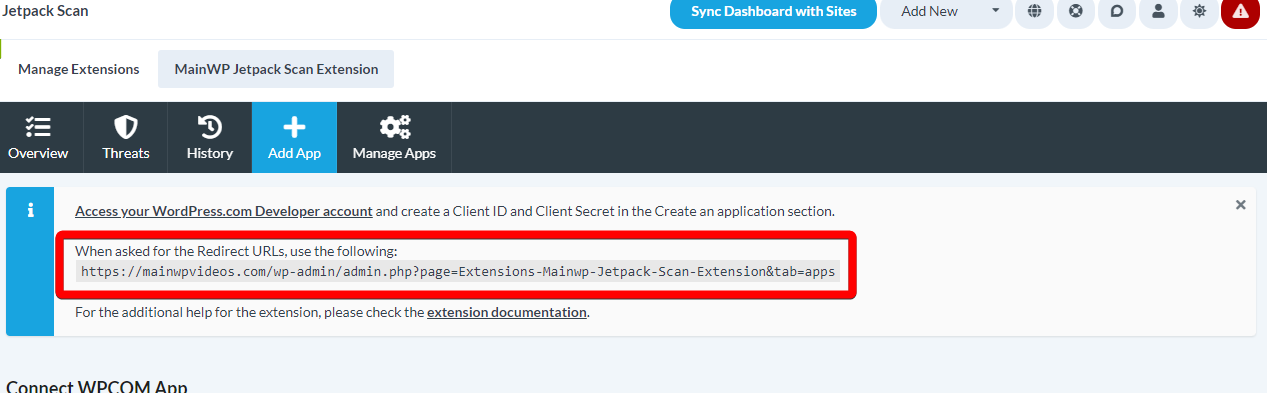
The value for the Redirect URL field can be found on the **Dashboard > Add-ons > Jetpack Scan > Add App** page.
## Manage multiple apps
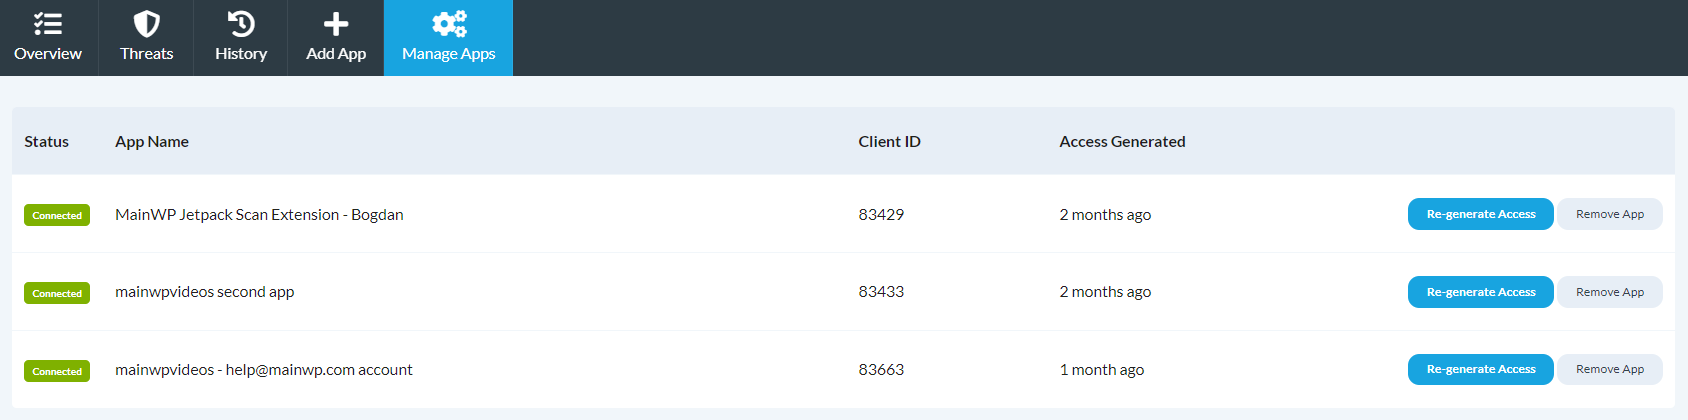
To add multiple apps, simply repeat the process on the **Add App** page. All added apps can be managed on the Manage Apps page.
From here, Access to the account can be requested again, or the App can be removed from the extension.
## Overview page
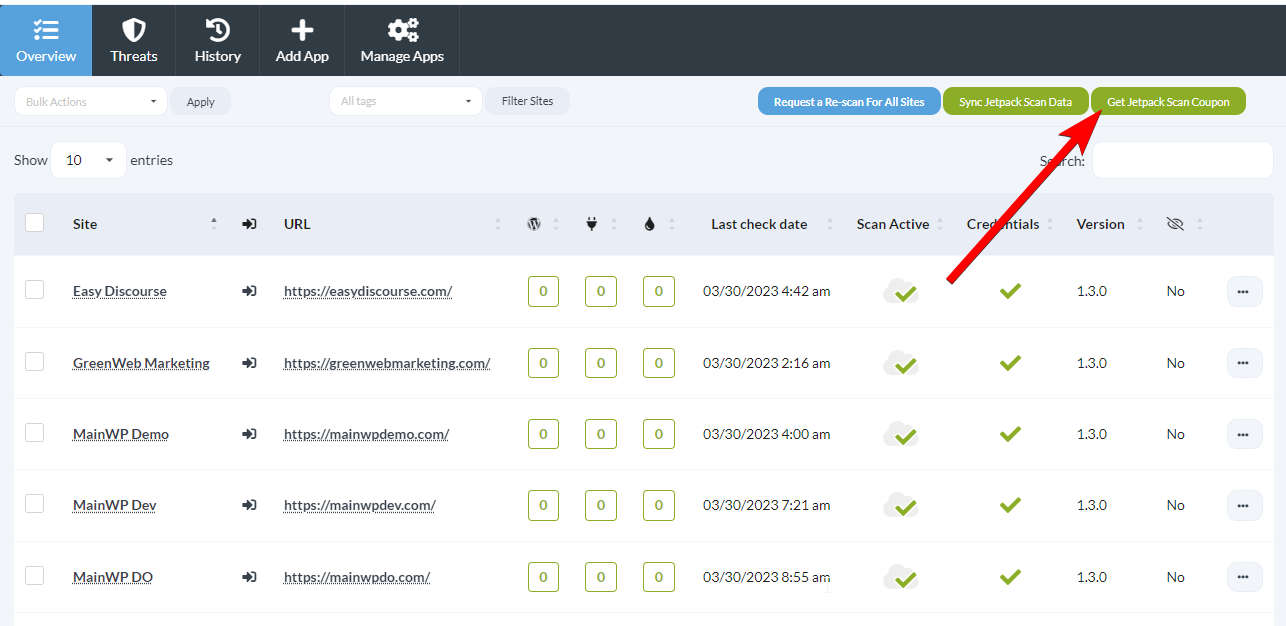
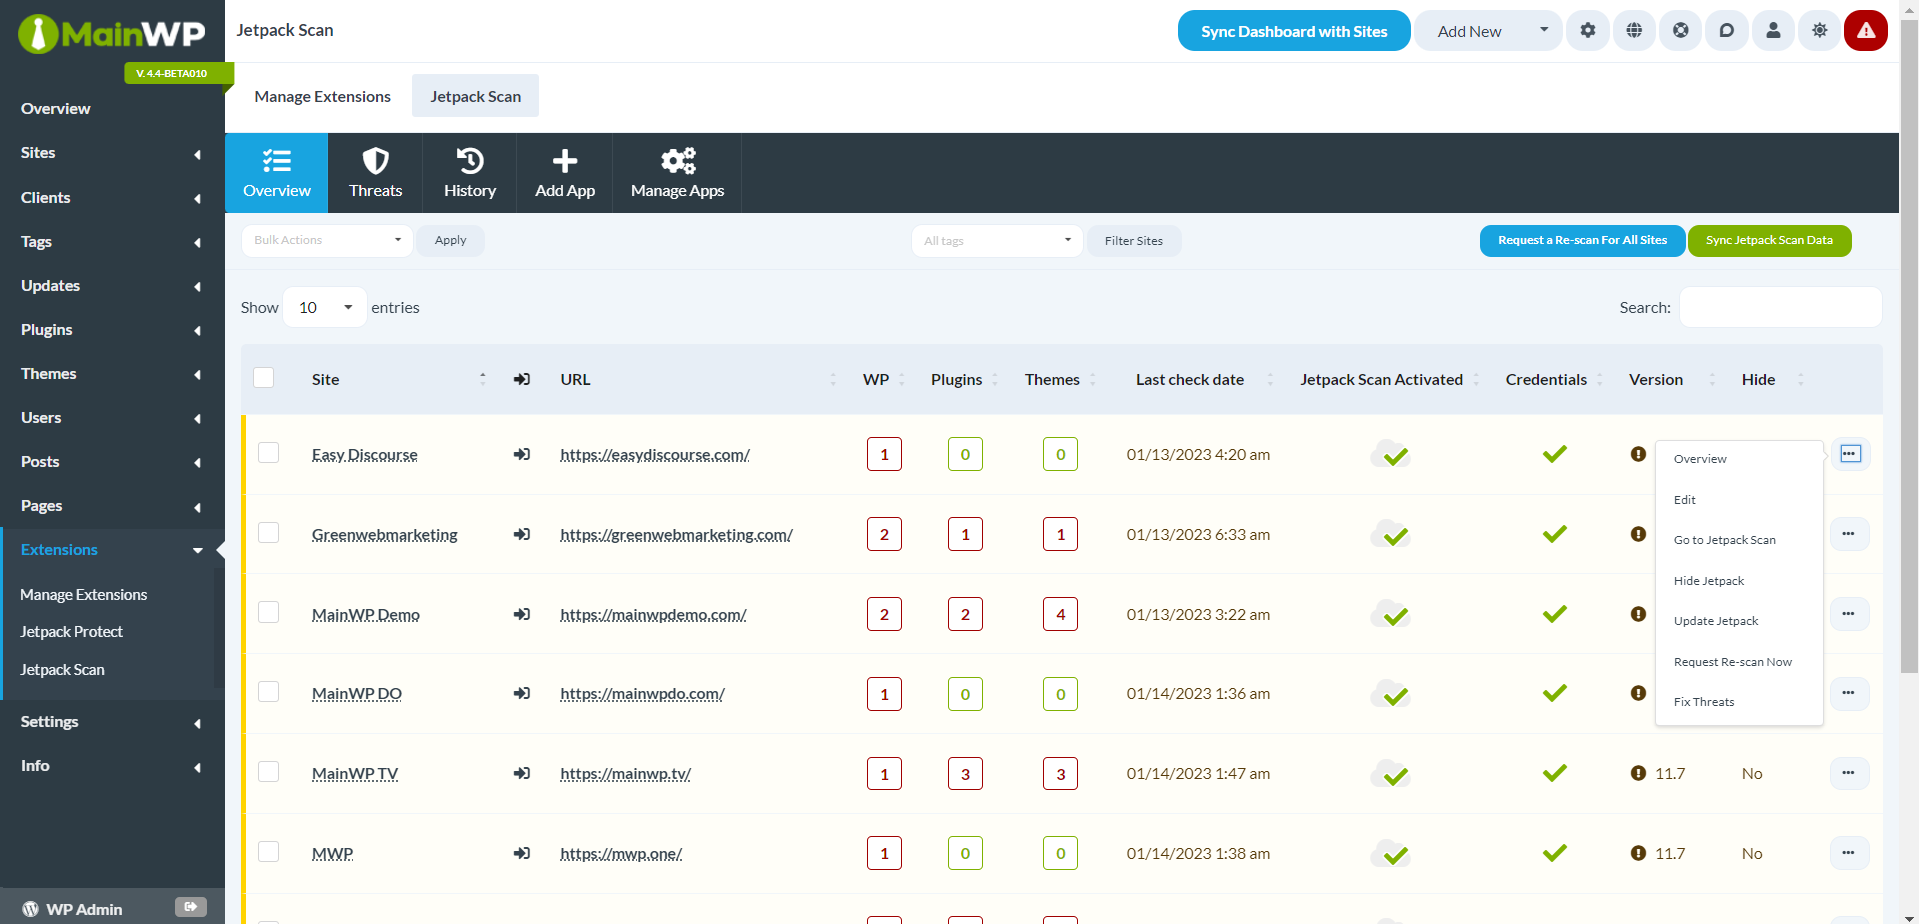
The table on the overview page displays all the sites on which the Jetpack Scan is active. The **WP, Plugins and Themes** columns show the number of vulnerabilities found in the respective categories.
The **ellipsis menu** reveals additional actions, such as the ability to hide the Jetpack plugin on the child site and the ability to update the Jetpack plugin. The **Bulk Actions** menu provides the same actions for multiple child sites at once.
## Request a scan
### For a single-site
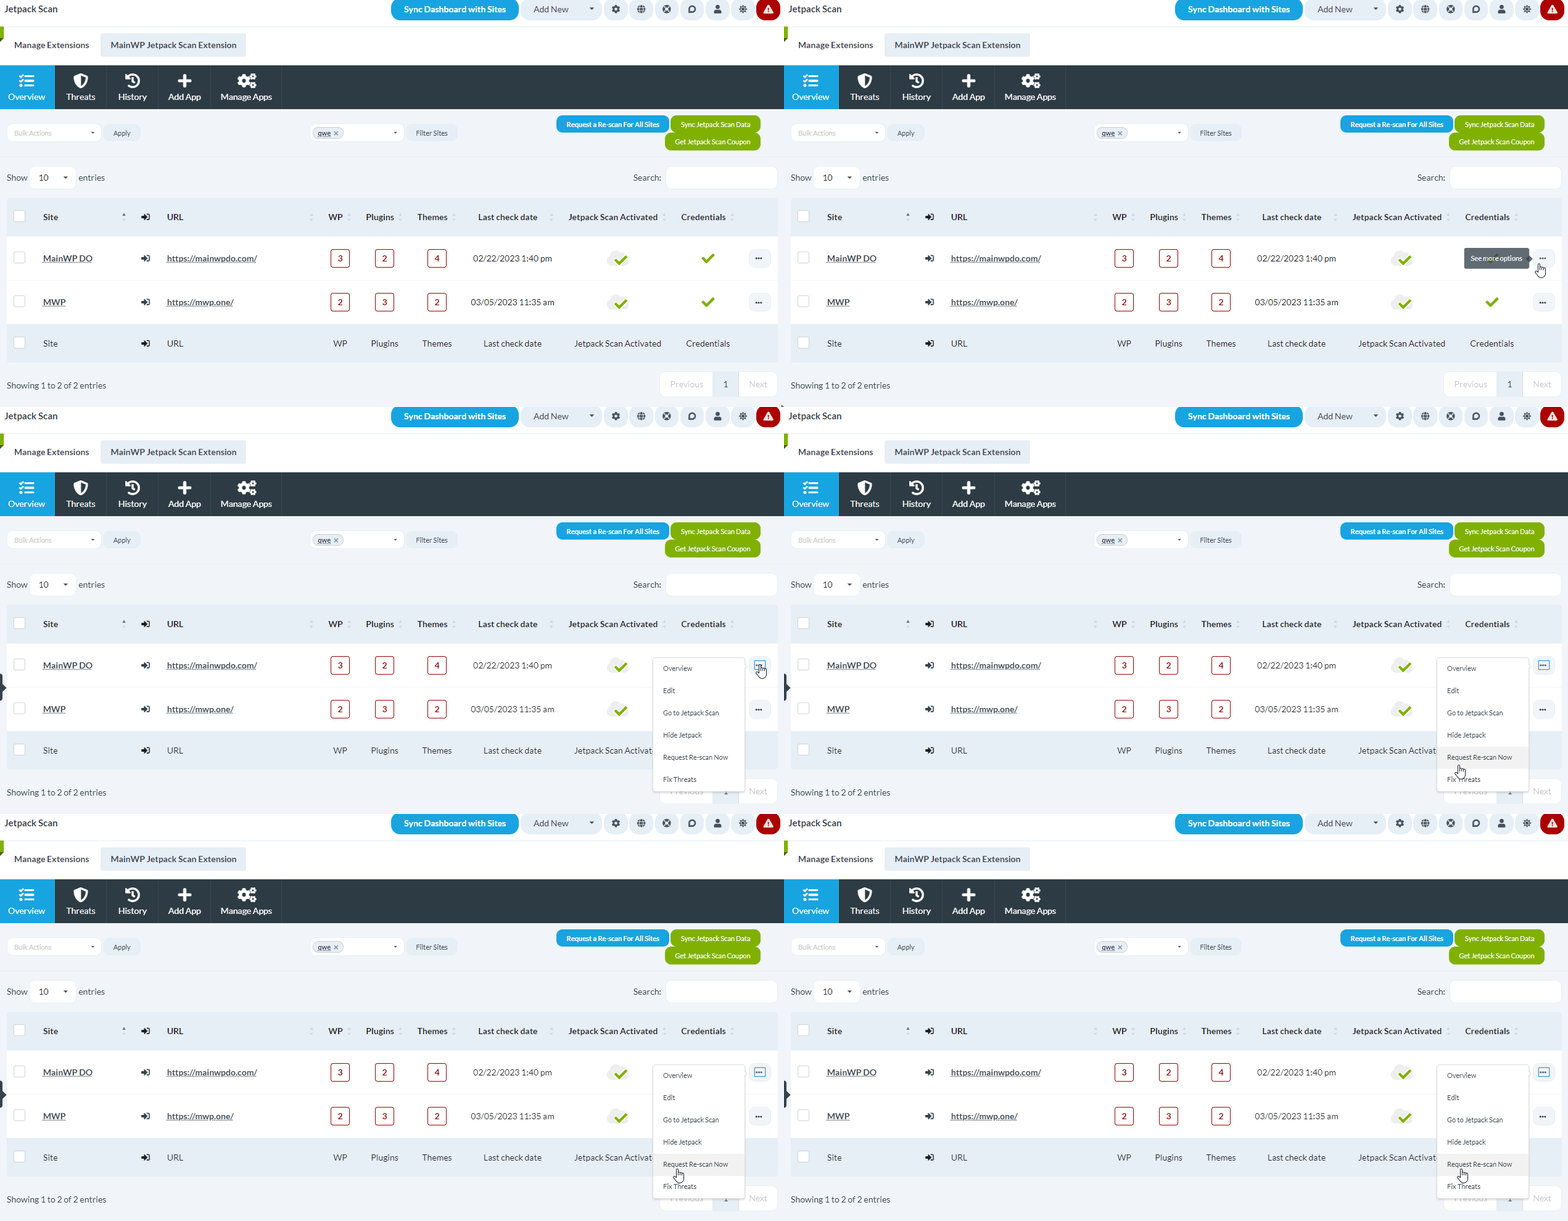
Locate the desired child site in the table, and select the **Request Re-scan Now** action from the ellipsis menu.
### For multiple sites
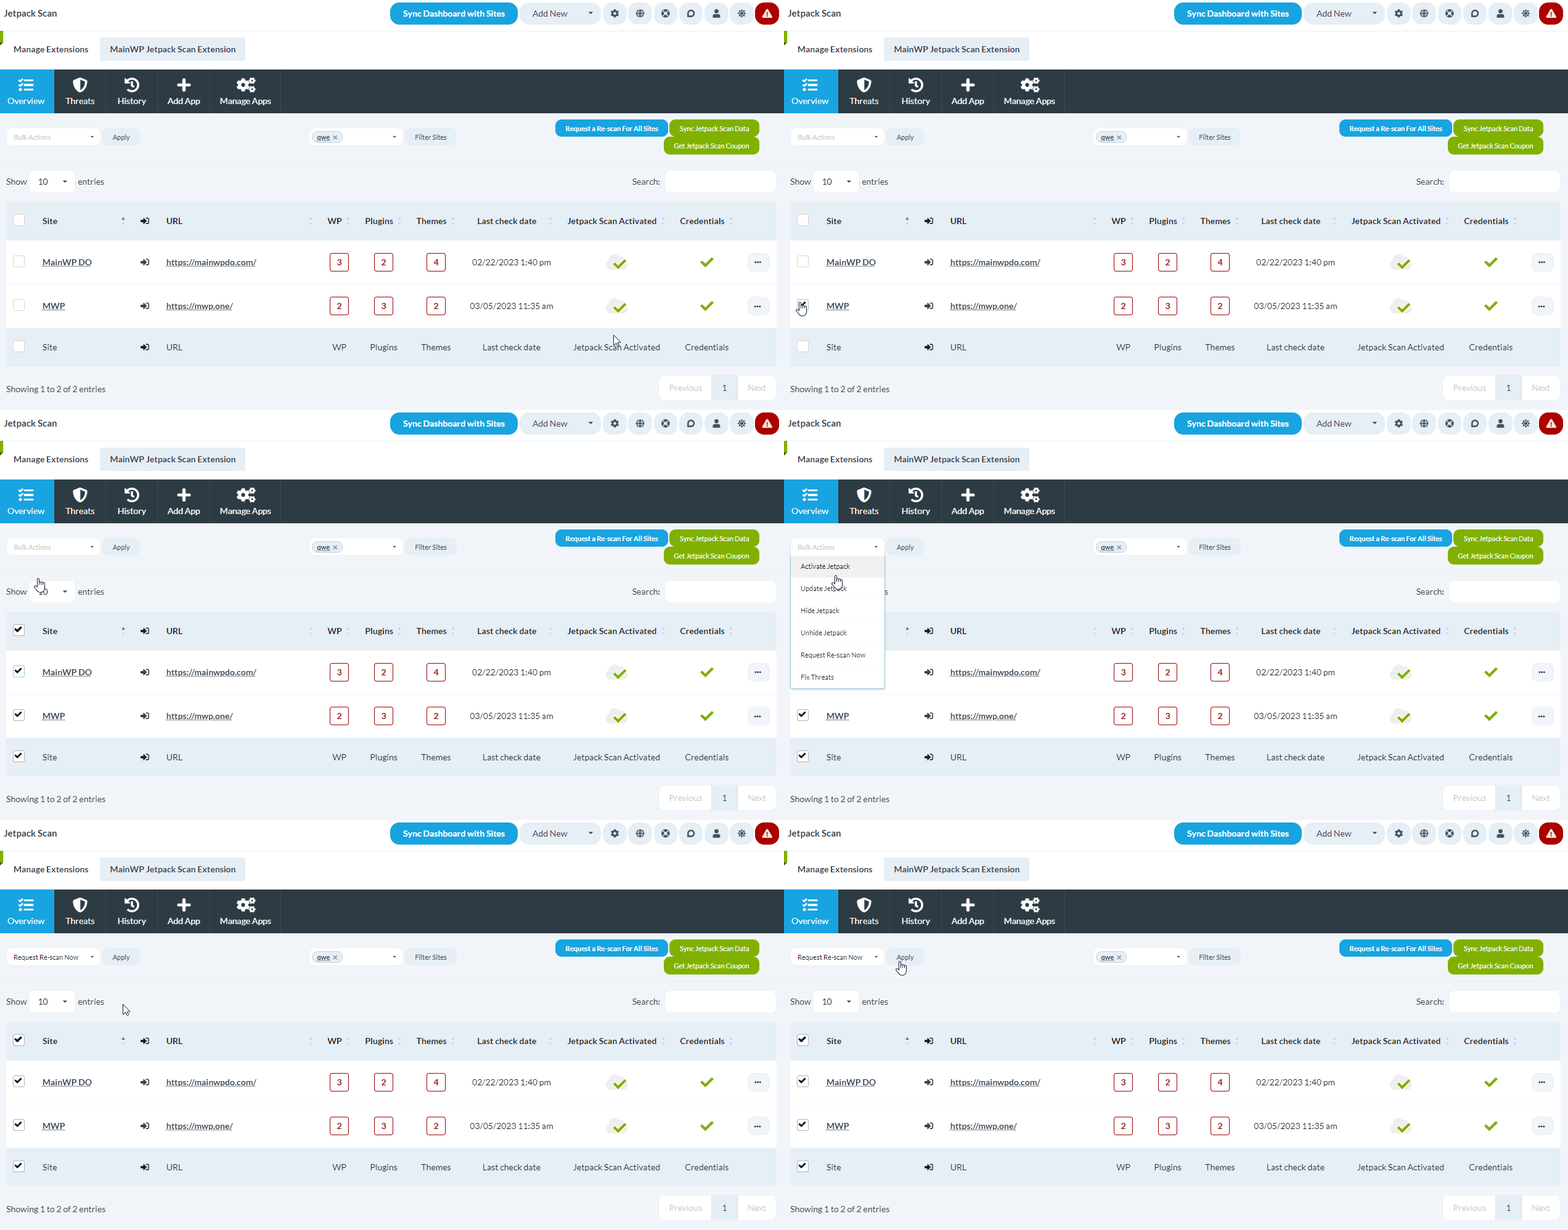
Locate the desired child sites in the table and mark their checkboxes, then select **Request Re-scan Now** from the Bulk Actions menu, and click Apply.
### For all sites
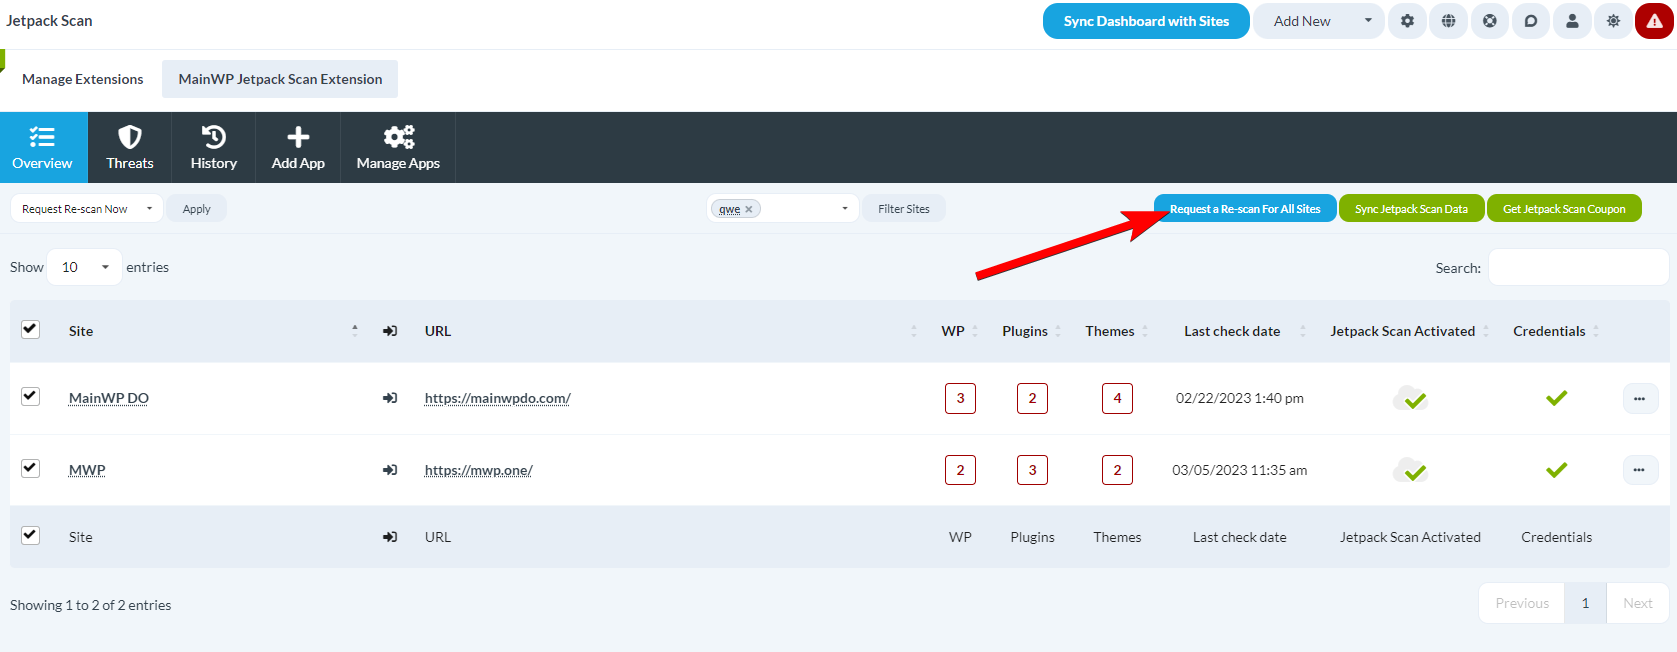
Click the **Request Re-scan For All Sites** button.
## Remote server credentials
Before Jetpack Scan can attempt to fix threats on a child site, it needs to have SSH, SFTP, or FTP server credentials for that child site. This will be indicated by the red X or green checkmark icon in the **Credentials column** in the table on the **Overview page**.
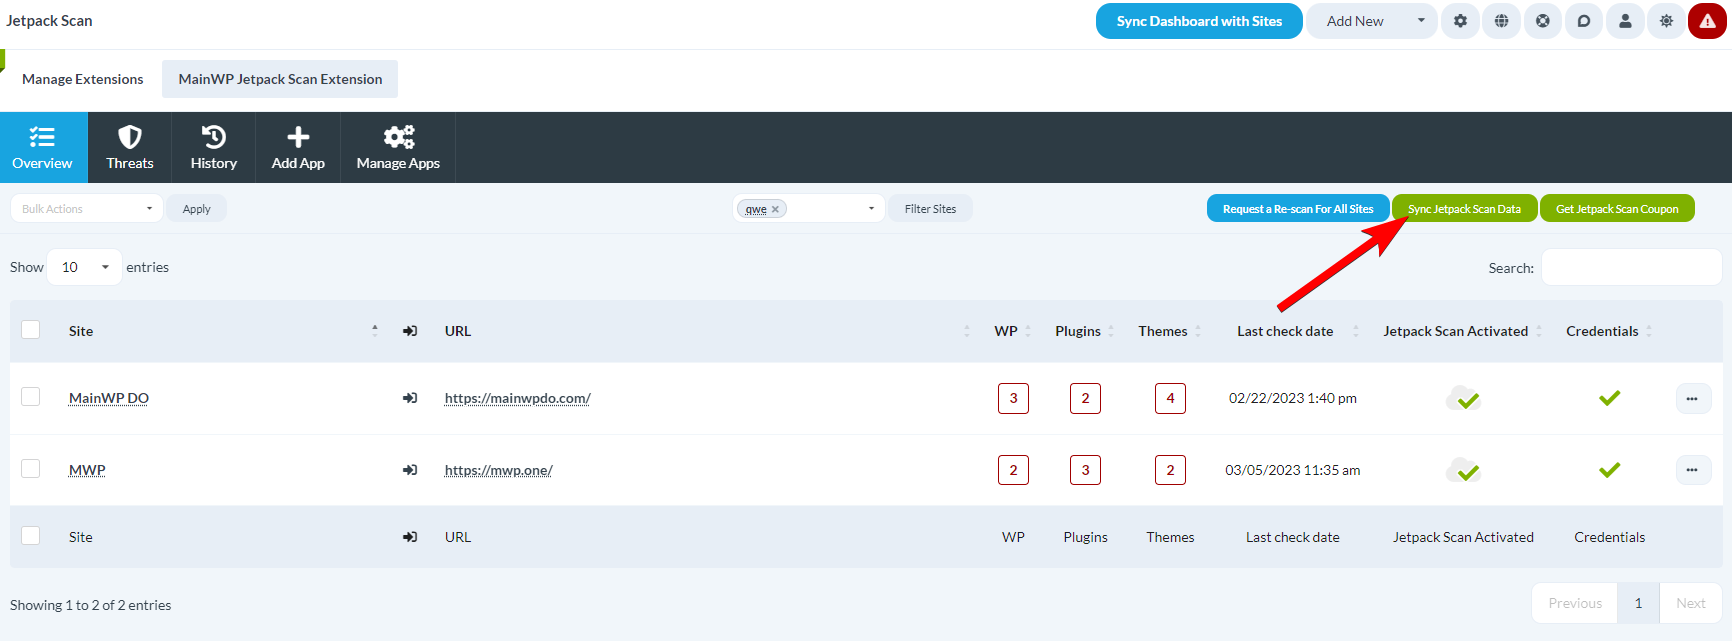
To add SSH, SFTP or FTP server credentials for child sites, please follow the steps outlined in this [help article](https://jetpack.com/support/backup/backups-via-the-jetpack-plugin/adding-credentials-to-jetpack/). After doing so, click the **Sync Jetpack Scan Data** button to fetch the latest Jetpack Scan data.
## Manage Threats
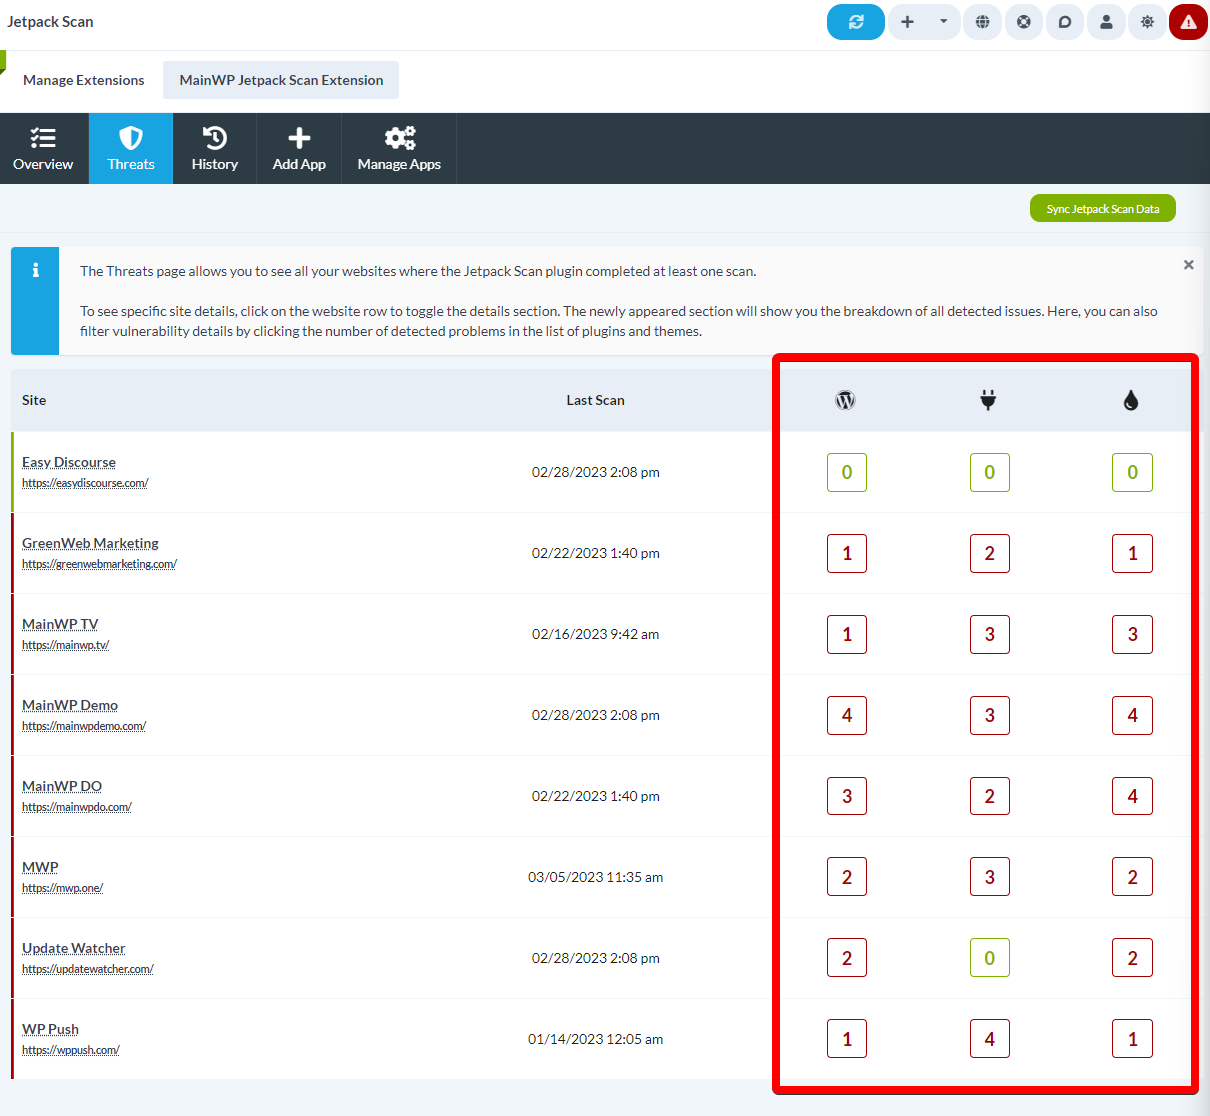
Threats are managed on the **Threats** page. The page will list all of your sites that have Jetpack Scan active, and the vulnerabilities for WP Core, Plugins and Themes will be shown in the last three columns.
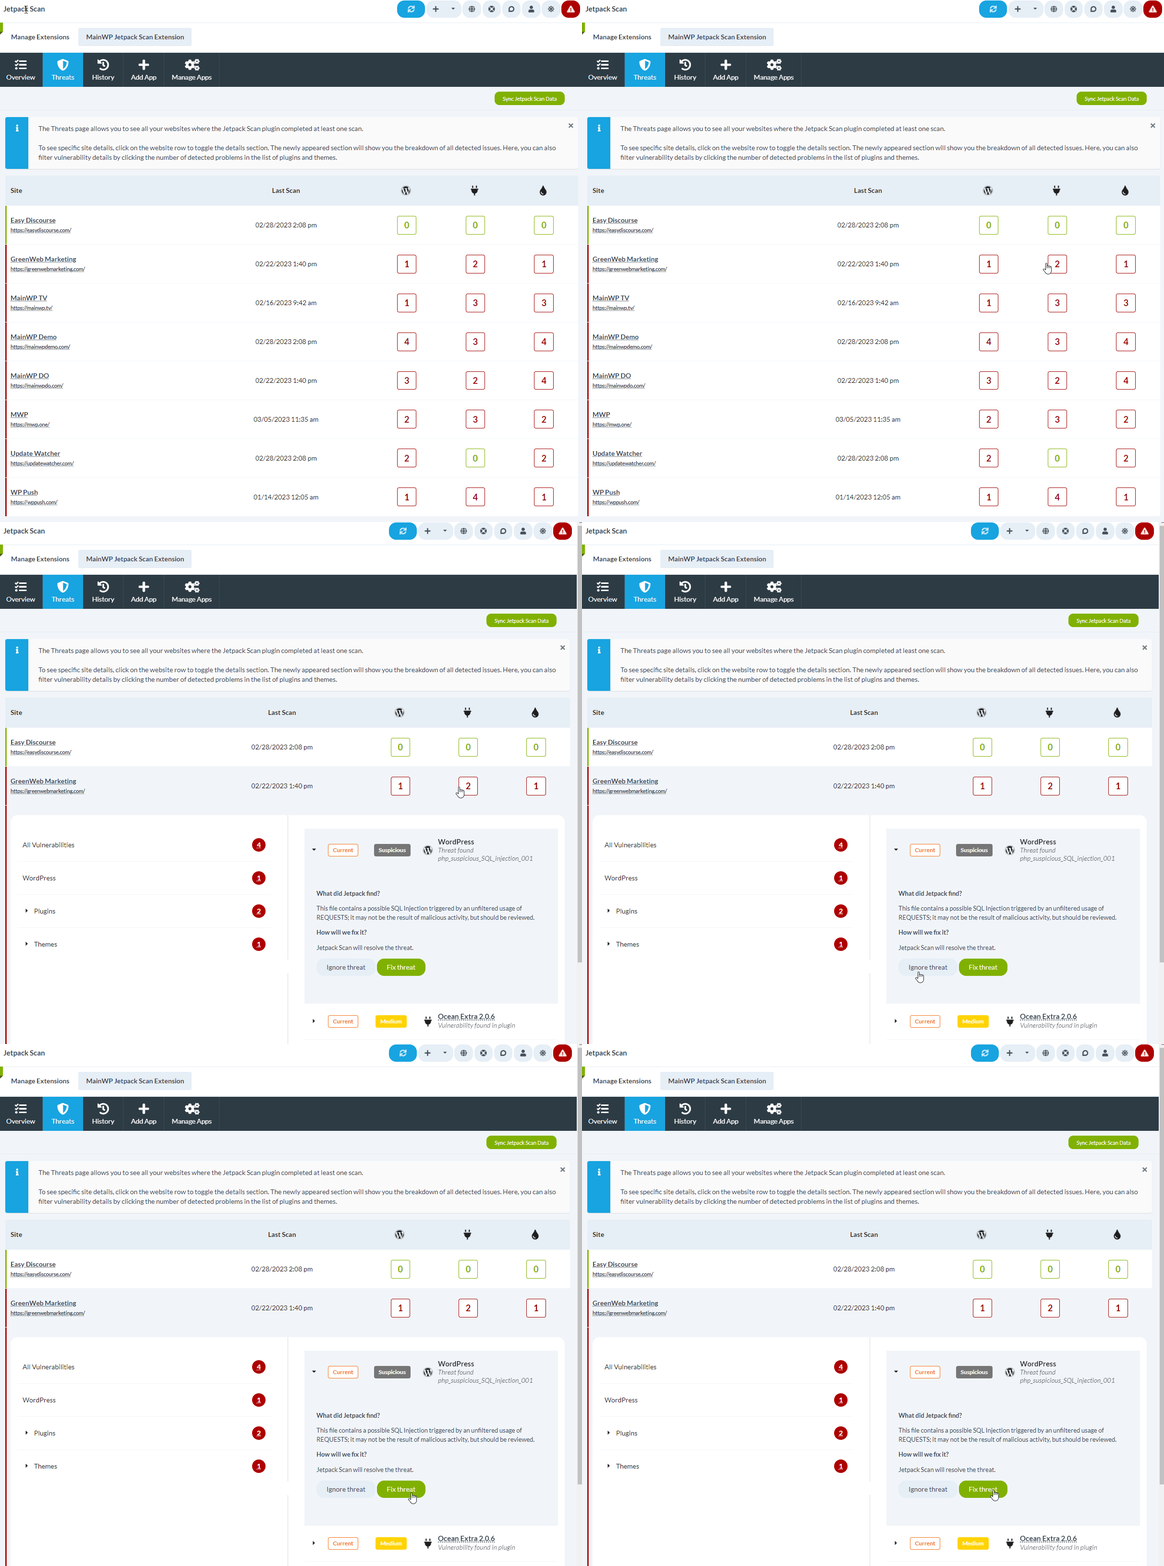
To manage threats, click on any vulnerability count in the table, expand the specific threat, and then choose to either **Ignore threat** or **Fix threat.**
Fixing a threat relies on the Jetpack API and may take multiple minutes to complete. You can leave this page and come back at a later time. Depending on the Jetpack products active on a child site, a Backup may also be performed before an attempted fix, and the process can take several minutes to complete.
## History page
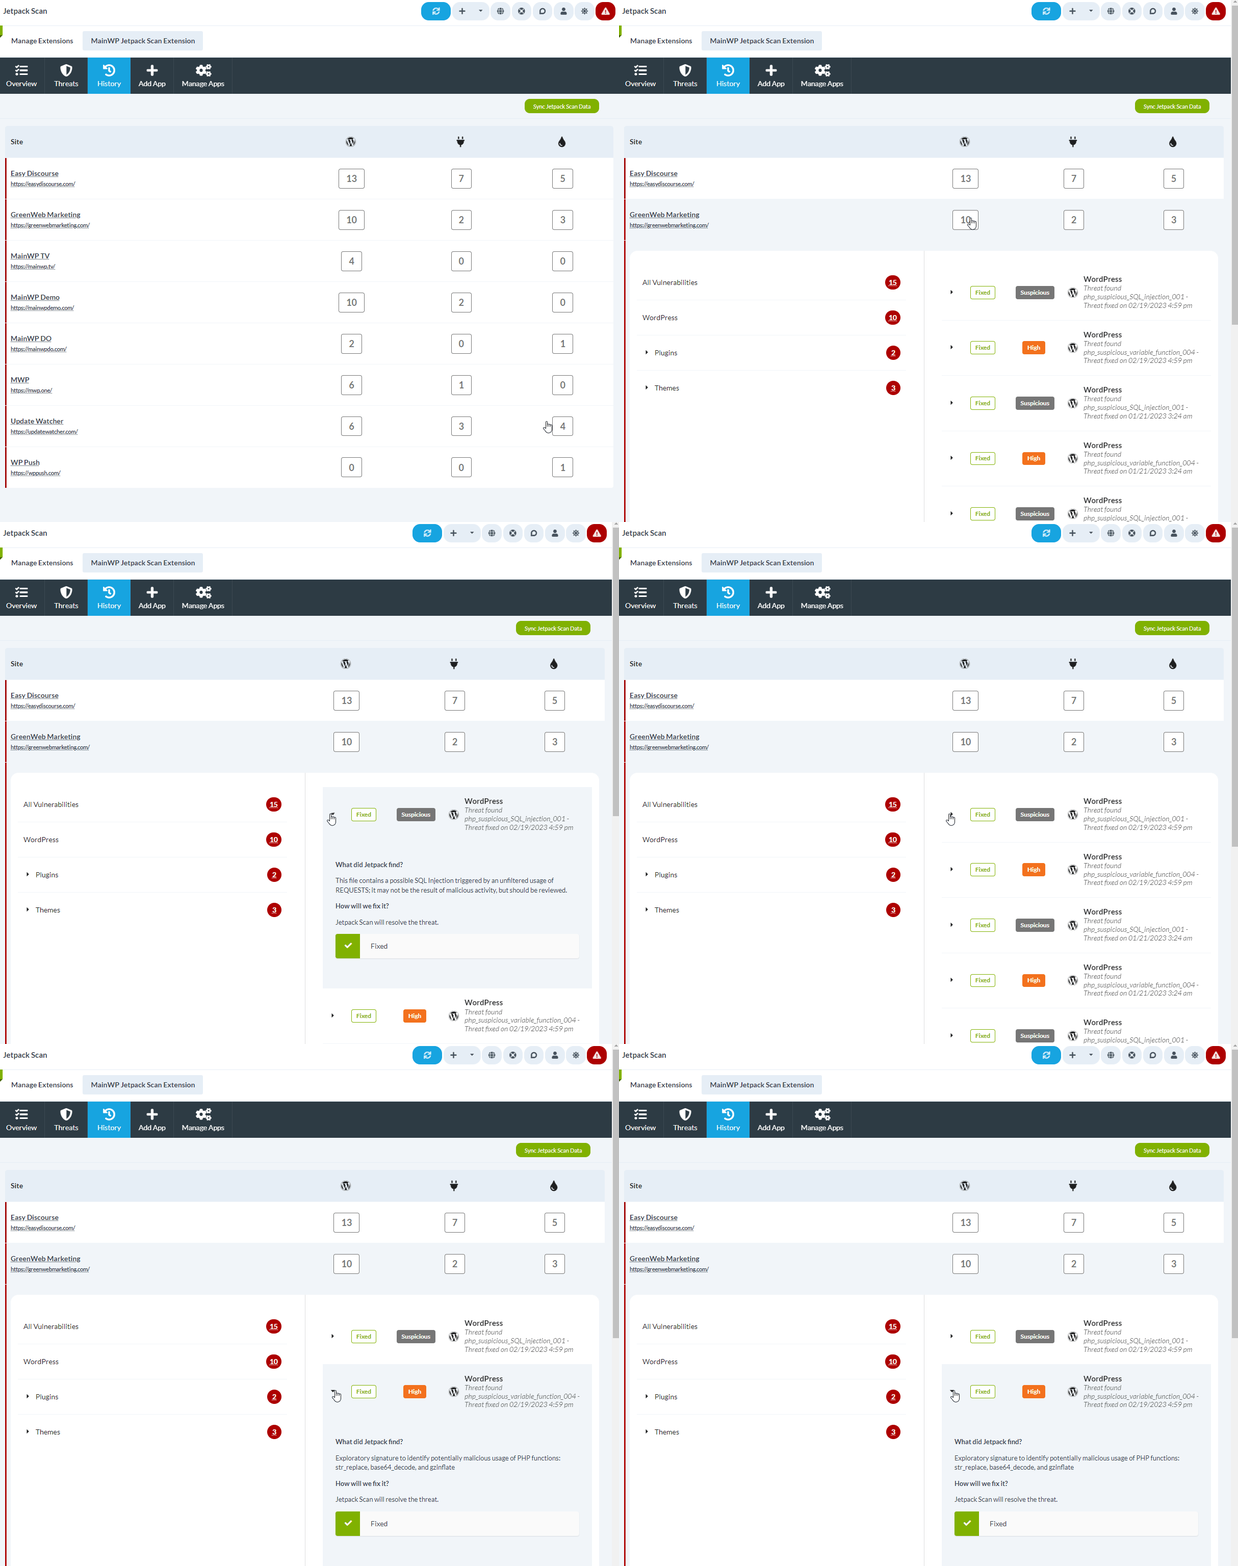
After you've either ignored or fixed a threat, the threat will be visible on the **History page**. The layout of the page is identical to the **Threats page,** so simply click on a vulnerability count of a desired child site to see the history of threat management.
## Get a Jetpack Scan Coupon
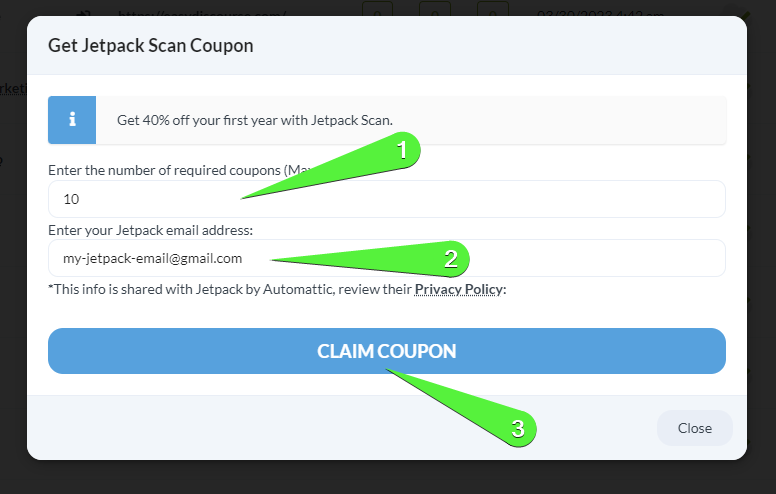
Through the extension, you can request a Jetpack Scan Coupon, which will give you 40% off for your first year of a Jetpack Scan subscription. The maximum number of coupons you can request is equal to the number of child sites on your MainWP Dashboard.
Version 4.0.3. of the Jetpack Scan extension is required to request the coupons.
Type in the number of required coupons.
The maximum number is going to be the current number of child sites on your Dashboard.
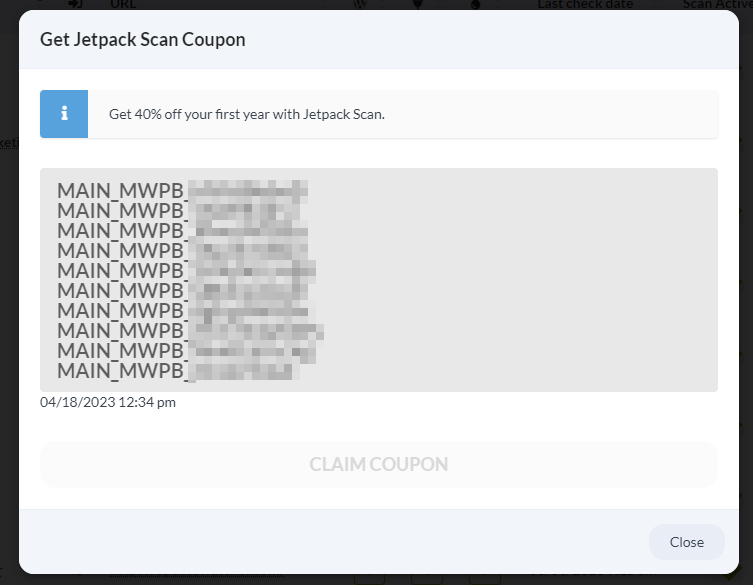
You will be presented with the coupons. This list of coupons can be displayed again by pressing the **Get Jetpack Scan Coupon** button.
## Jetpack Scan REST API
All MainWP REST API calls, including full documentation, and examples, are now publicly available on [Postman](https://www.postman.com/mainwp/workspace/mainwp/overview). Please refer to our [REST API documentation](/api-reference/rest-api/overview) for more details on enabling REST API and managing Keys.
***
## Related Resources
* [Security Add-ons](/add-ons/security) - Browse all security tools
* [Jetpack Protect Extension](/add-ons/security/jetpack-protect-extension) - Free vulnerability scanning
* [Vulnerability Checker Extension](/add-ons/security/vulnerability-checker-extension) - Alternative vulnerability scanning
 The value for the Redirect URL field can be found on the **Dashboard > Add-ons > Jetpack Scan > Add App** page.
## Manage multiple apps
The value for the Redirect URL field can be found on the **Dashboard > Add-ons > Jetpack Scan > Add App** page.
## Manage multiple apps
 To add multiple apps, simply repeat the process on the **Add App** page. All added apps can be managed on the Manage Apps page.
 From here, Access to the account can be requested again, or the App can be removed from the extension.
## Overview page
The table on the overview page displays all the sites on which the Jetpack Scan is active. The **WP, Plugins and Themes** columns show the number of vulnerabilities found in the respective categories.
The **ellipsis menu** reveals additional actions, such as the ability to hide the Jetpack plugin on the child site and the ability to update the Jetpack plugin. The **Bulk Actions** menu provides the same actions for multiple child sites at once.
From here, Access to the account can be requested again, or the App can be removed from the extension.
## Overview page
The table on the overview page displays all the sites on which the Jetpack Scan is active. The **WP, Plugins and Themes** columns show the number of vulnerabilities found in the respective categories.
The **ellipsis menu** reveals additional actions, such as the ability to hide the Jetpack plugin on the child site and the ability to update the Jetpack plugin. The **Bulk Actions** menu provides the same actions for multiple child sites at once.
 ## Request a scan
### For a single-site
Locate the desired child site in the table, and select the **Request Re-scan Now** action from the ellipsis menu.
## Request a scan
### For a single-site
Locate the desired child site in the table, and select the **Request Re-scan Now** action from the ellipsis menu.
 ### For multiple sites
Locate the desired child sites in the table and mark their checkboxes, then select **Request Re-scan Now** from the Bulk Actions menu, and click Apply.
### For multiple sites
Locate the desired child sites in the table and mark their checkboxes, then select **Request Re-scan Now** from the Bulk Actions menu, and click Apply.
 ### For all sites
Click the **Request Re-scan For All Sites** button.
### For all sites
Click the **Request Re-scan For All Sites** button.
 ## Remote server credentials
Before Jetpack Scan can attempt to fix threats on a child site, it needs to have SSH, SFTP, or FTP server credentials for that child site. This will be indicated by the red X or green checkmark icon in the **Credentials column** in the table on the **Overview page**.
## Remote server credentials
Before Jetpack Scan can attempt to fix threats on a child site, it needs to have SSH, SFTP, or FTP server credentials for that child site. This will be indicated by the red X or green checkmark icon in the **Credentials column** in the table on the **Overview page**.
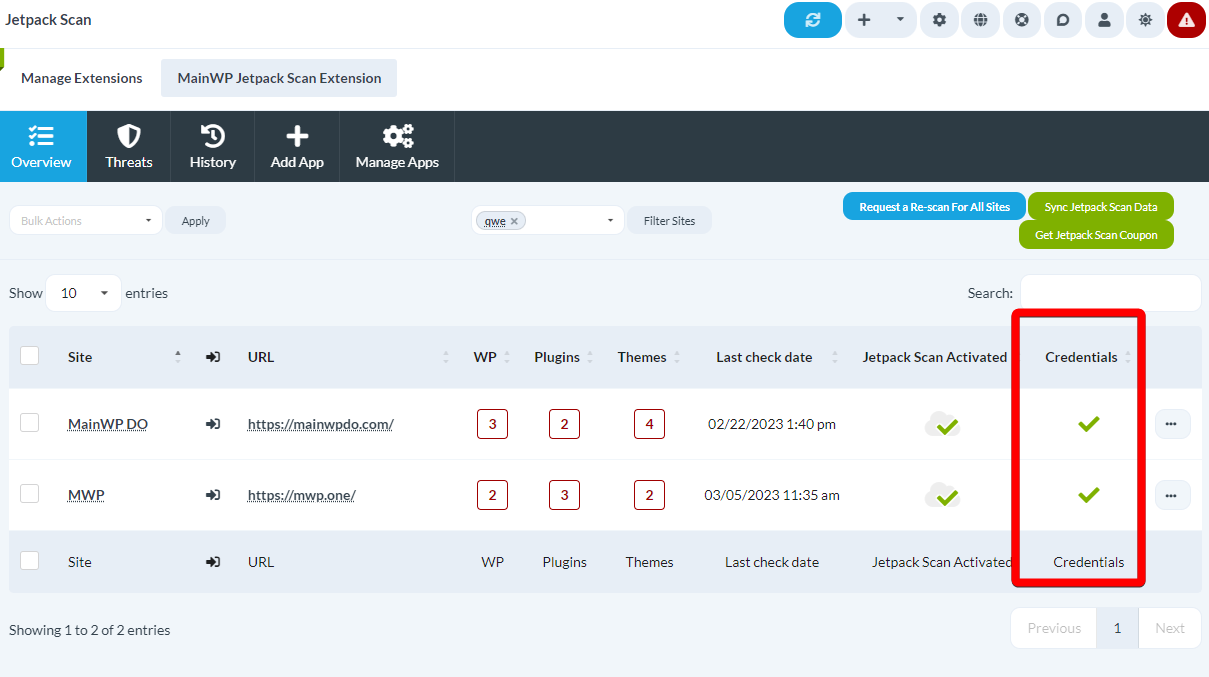 To add SSH, SFTP or FTP server credentials for child sites, please follow the steps outlined in this [help article](https://jetpack.com/support/backup/backups-via-the-jetpack-plugin/adding-credentials-to-jetpack/). After doing so, click the **Sync Jetpack Scan Data** button to fetch the latest Jetpack Scan data.
 ## Manage Threats
Threats are managed on the **Threats** page. The page will list all of your sites that have Jetpack Scan active, and the vulnerabilities for WP Core, Plugins and Themes will be shown in the last three columns.
## Manage Threats
Threats are managed on the **Threats** page. The page will list all of your sites that have Jetpack Scan active, and the vulnerabilities for WP Core, Plugins and Themes will be shown in the last three columns.
 To manage threats, click on any vulnerability count in the table, expand the specific threat, and then choose to either **Ignore threat** or **Fix threat.**
 ## History page
After you've either ignored or fixed a threat, the threat will be visible on the **History page**. The layout of the page is identical to the **Threats page,** so simply click on a vulnerability count of a desired child site to see the history of threat management.
## History page
After you've either ignored or fixed a threat, the threat will be visible on the **History page**. The layout of the page is identical to the **Threats page,** so simply click on a vulnerability count of a desired child site to see the history of threat management.
 ## Get a Jetpack Scan Coupon
Through the extension, you can request a Jetpack Scan Coupon, which will give you 40% off for your first year of a Jetpack Scan subscription. The maximum number of coupons you can request is equal to the number of child sites on your MainWP Dashboard.
## Get a Jetpack Scan Coupon
Through the extension, you can request a Jetpack Scan Coupon, which will give you 40% off for your first year of a Jetpack Scan subscription. The maximum number of coupons you can request is equal to the number of child sites on your MainWP Dashboard.