> ## Documentation Index
> Fetch the complete documentation index at: https://docs.mainwp.com/llms.txt
> Use this file to discover all available pages before exploring further.
# Post Plus
> MainWP Post Plus extension allows you to randomize meta data for your content giving the appearance of multiple active bloggers. Also, it allows you to save your posts as drafts in your dashboard.
## What You'll Learn
* Saving post and page drafts on your Dashboard
* Publishing and editing saved drafts
* Randomizing authors, categories, and dates
* Using the Post Plus randomizer options
***
**Extension Add-on** - This add-on provides standalone functionality within MainWP Dashboard. No third-party plugins required.
MainWP Post Plus Extension provides two important features:
1. Ability to save post and page drafts on your MainWP Dashboard
2. Ability to set random metadata for your posts and pages
## Drafts
Extending your MainWP Dashboard with this tool gives you the ability to save drafts while creating new posts and pages. A quick one-button click will save your work in progress without worrying about losing your current work.
## Post Plus Randomizer
This addition to your Add New Post/Page screen is the Post Plus meta box. This will allow you to randomize metadata for your content giving the appearance of multiple active bloggers. Simply selecting options to randomize, you can have random authors for your posts or pages, assign posts to random categories, and have randomly picked publishing dates. You can also narrow the randomized data to specific user roles and a date range.
## Save Draft
### Save Post Draft
Start [creating a new post](/sites/content/manage-posts)
Click the **Save as Draft** button when you want to save your current progress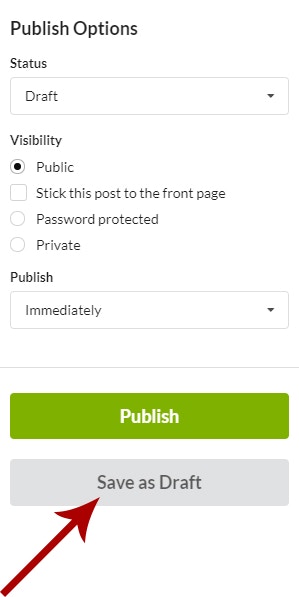 ### Save Page Draft
Start [creating a new page](/sites/content/manage-pages)
## Publish Draft
Drafts can be published in 2 ways.
* Directly from the Drafts page
* From the Draft Edit mode
### Publish Post Draft from the Drafts page
### Publish Page Draft from the Drafts page
### Publish Post Draft from the edit mode
### Publish Page Draft from the edit mode
## Edit Draft
### Edit Post Draft
Edit wanted fields
* If you want to save draft updates, click the **Save as Draft** button
* if you want to publish the post, click the **Publish** button
### Edit Page Draft
Edit wanted fields
* If you want to save draft updates, click the **Save as Draft** button
* if you want to publish the page, click the **Publish** button
## Delete Draft
### Delete Post Draft
### Delete Page Draft
## Set Random Metadata
If you want to use a random Author or Publishing date for your Posts or Pages, you can do it by using the options in the Post Plus section. Random Category is available for posts.
### Save Page Draft
Start [creating a new page](/sites/content/manage-pages)
## Publish Draft
Drafts can be published in 2 ways.
* Directly from the Drafts page
* From the Draft Edit mode
### Publish Post Draft from the Drafts page
### Publish Page Draft from the Drafts page
### Publish Post Draft from the edit mode
### Publish Page Draft from the edit mode
## Edit Draft
### Edit Post Draft
Edit wanted fields
* If you want to save draft updates, click the **Save as Draft** button
* if you want to publish the post, click the **Publish** button
### Edit Page Draft
Edit wanted fields
* If you want to save draft updates, click the **Save as Draft** button
* if you want to publish the page, click the **Publish** button
## Delete Draft
### Delete Post Draft
### Delete Page Draft
## Set Random Metadata
If you want to use a random Author or Publishing date for your Posts or Pages, you can do it by using the options in the Post Plus section. Random Category is available for posts.  The Extension adds this section to both:
* **Sites > Content Operations > Add New** page for posts
* **Sites > Content Operations > Add New** page for pages
### Set Random Author
If you want to assign a random author for a post or page,
The Extension adds this section to both:
* **Sites > Content Operations > Add New** page for posts
* **Sites > Content Operations > Add New** page for pages
### Set Random Author
If you want to assign a random author for a post or page,
 The Post Plus Extension will set random **(existing)** users from the selected role(s) from your child site and assign the post. As a result, the article will have a different author on each of your child sites.
### Set Random Category
If you want to set a random category, select the **Set random category** option.
The Post Plus Extension will set random **(existing)** users from the selected role(s) from your child site and assign the post. As a result, the article will have a different author on each of your child sites.
### Set Random Category
If you want to set a random category, select the **Set random category** option.  The Extension will pick one of the existing categories from your child site and assign the post.
### Set Random Publishing Date
To set a random publishing date,
The Extension will pick one of the existing categories from your child site and assign the post.
### Set Random Publishing Date
To set a random publishing date,
 If you set a specific date range, the Extension will pick a random date from the range. If you leave the range blank, the Extension will pick a random date between now and seven days from now. As a result, the article will have different publishing dates on each of your child sites.
***
## Related Resources
* [Posts/Pages Add-ons](/add-ons/posts-pages) - Browse all content tools
* [Manage Posts](/sites/content/manage-posts) - Post management guide
* [Boilerplate Extension](/add-ons/posts-pages/boilerplate-extension) - Reusable content templates
If you set a specific date range, the Extension will pick a random date from the range. If you leave the range blank, the Extension will pick a random date between now and seven days from now. As a result, the article will have different publishing dates on each of your child sites.
***
## Related Resources
* [Posts/Pages Add-ons](/add-ons/posts-pages) - Browse all content tools
* [Manage Posts](/sites/content/manage-posts) - Post management guide
* [Boilerplate Extension](/add-ons/posts-pages/boilerplate-extension) - Reusable content templates