> ## Documentation Index
> Fetch the complete documentation index at: https://docs.mainwp.com/llms.txt
> Use this file to discover all available pages before exploring further.
# Pressable
> MainWP Pressable Extension simplifies your Pressable hosting management experience, such as creating, disabling, and deleting websites, enabling or disabling CDN, managing backups, and more without the need to log in to your Pressable account.
## What You'll Learn
* Connecting your Pressable account to MainWP
* Creating new Pressable sites from the Dashboard
* Managing CDN, backups, and site state
* Understanding the Dashboard page features
***
**Integration Add-on** - This add-on extends MainWP to work with Pressable. Requires a Pressable account and Pressable-hosted sites added to your MainWP Dashboard as child sites.
MainWP Pressable extension provides access to the most important Pressable management features. It allows you to quickly **create new Pressable sites** directly in the extension and at a glance, gives quick insight into the **State, Environment** and **Data Center** of the Pressable site and **Visitor Analytics**, and provides **Backup** and **CDN management**.
## Installing the extension
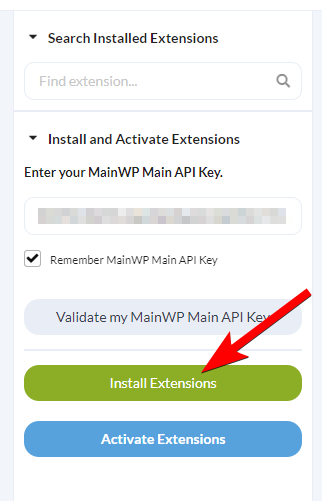
Follow these steps to install the Pressable extension.
Click the **Install Add-ons** button [ ](/images/add-ons/install-domain-monitor.png)
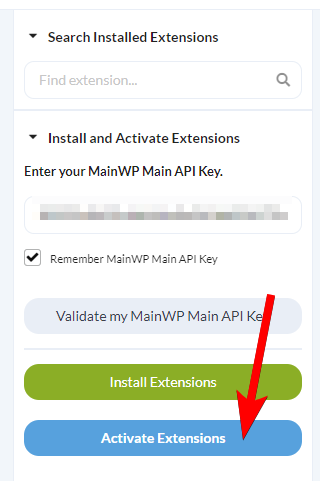
Once the installation process is complete, click the **Activate Add-ons** button. [ ](/images/add-ons/activate-domain-monitor.png)
## Connect extension to your Pressable account
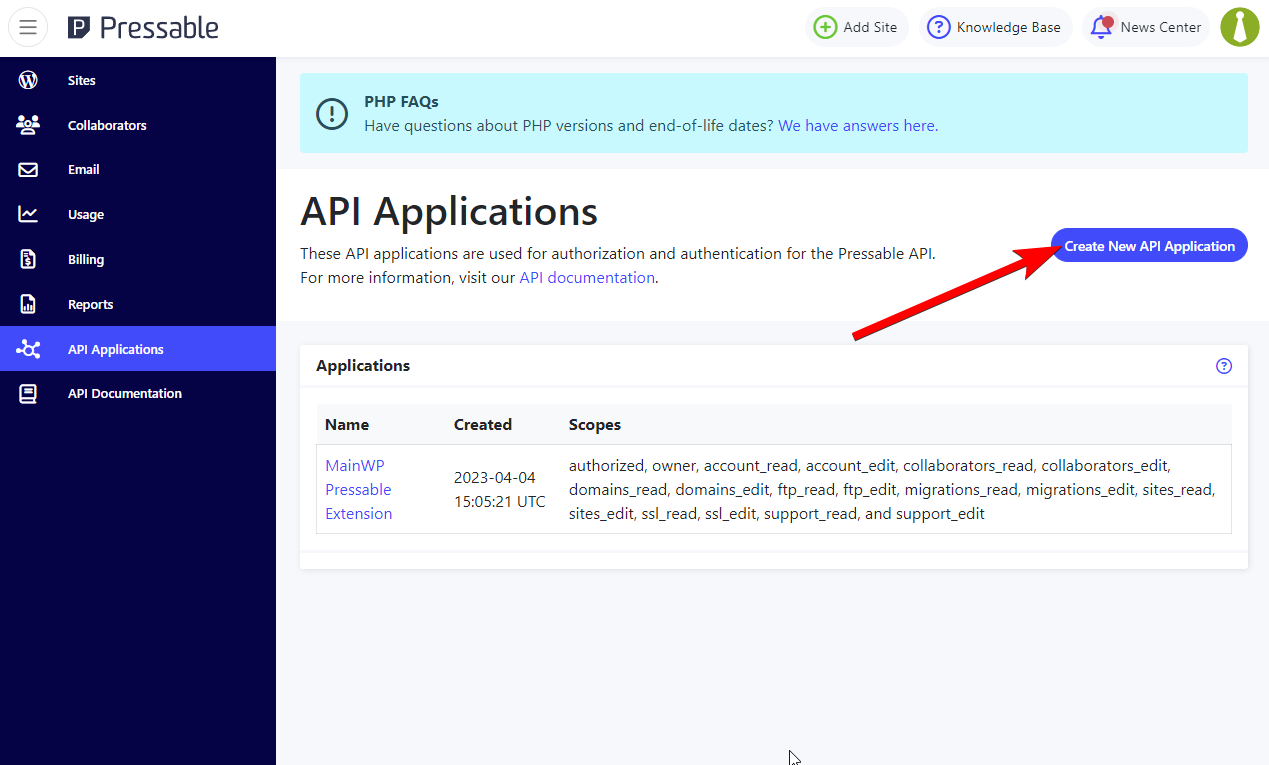
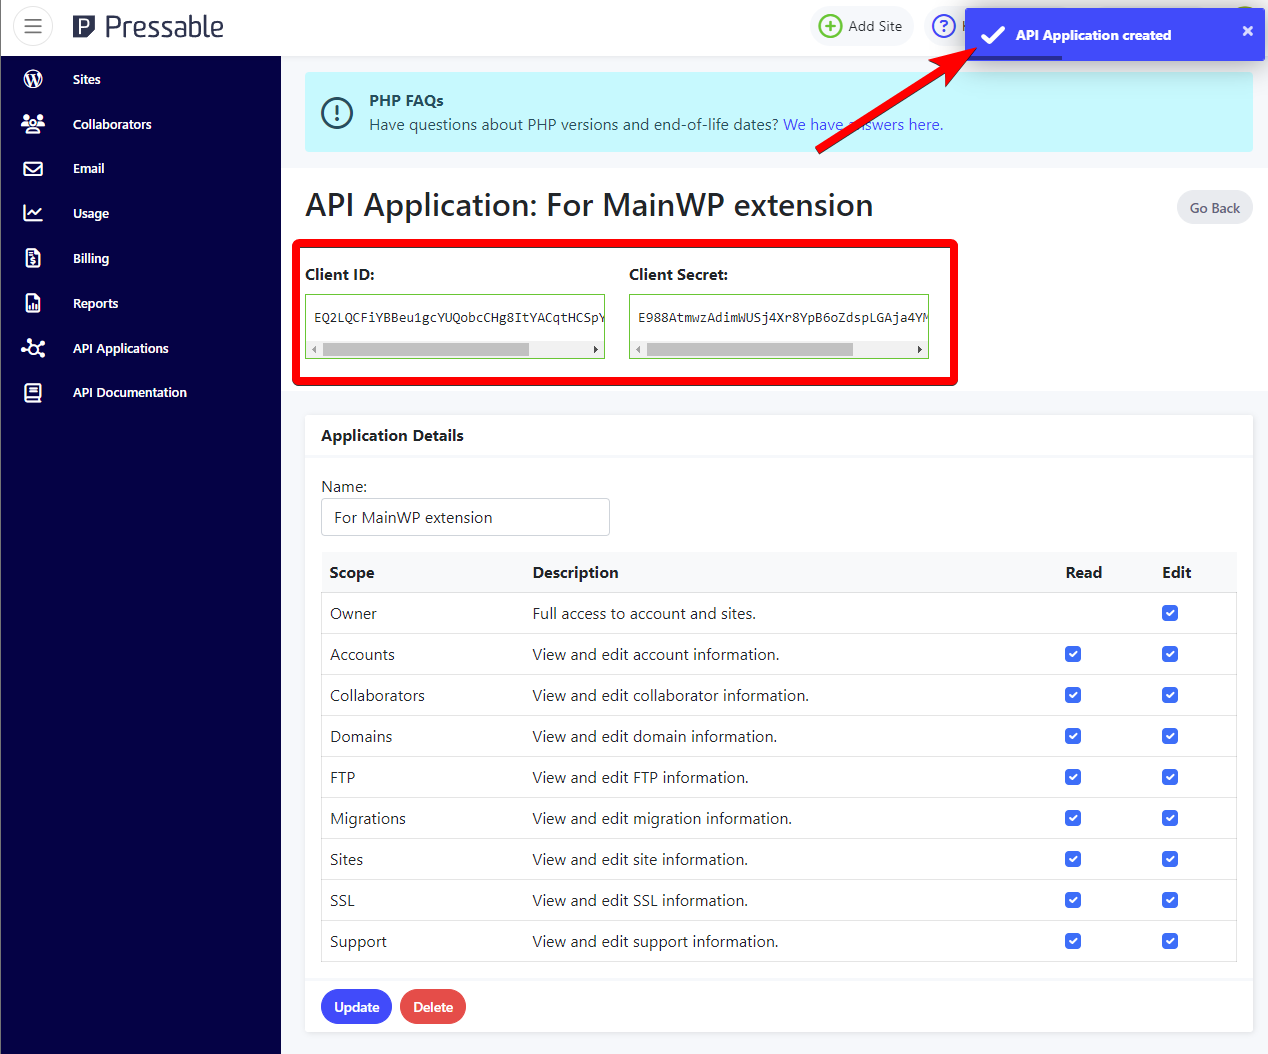
Navigate to your Pressable account and open the [API Application](https://my.pressable.com/api/applications) page
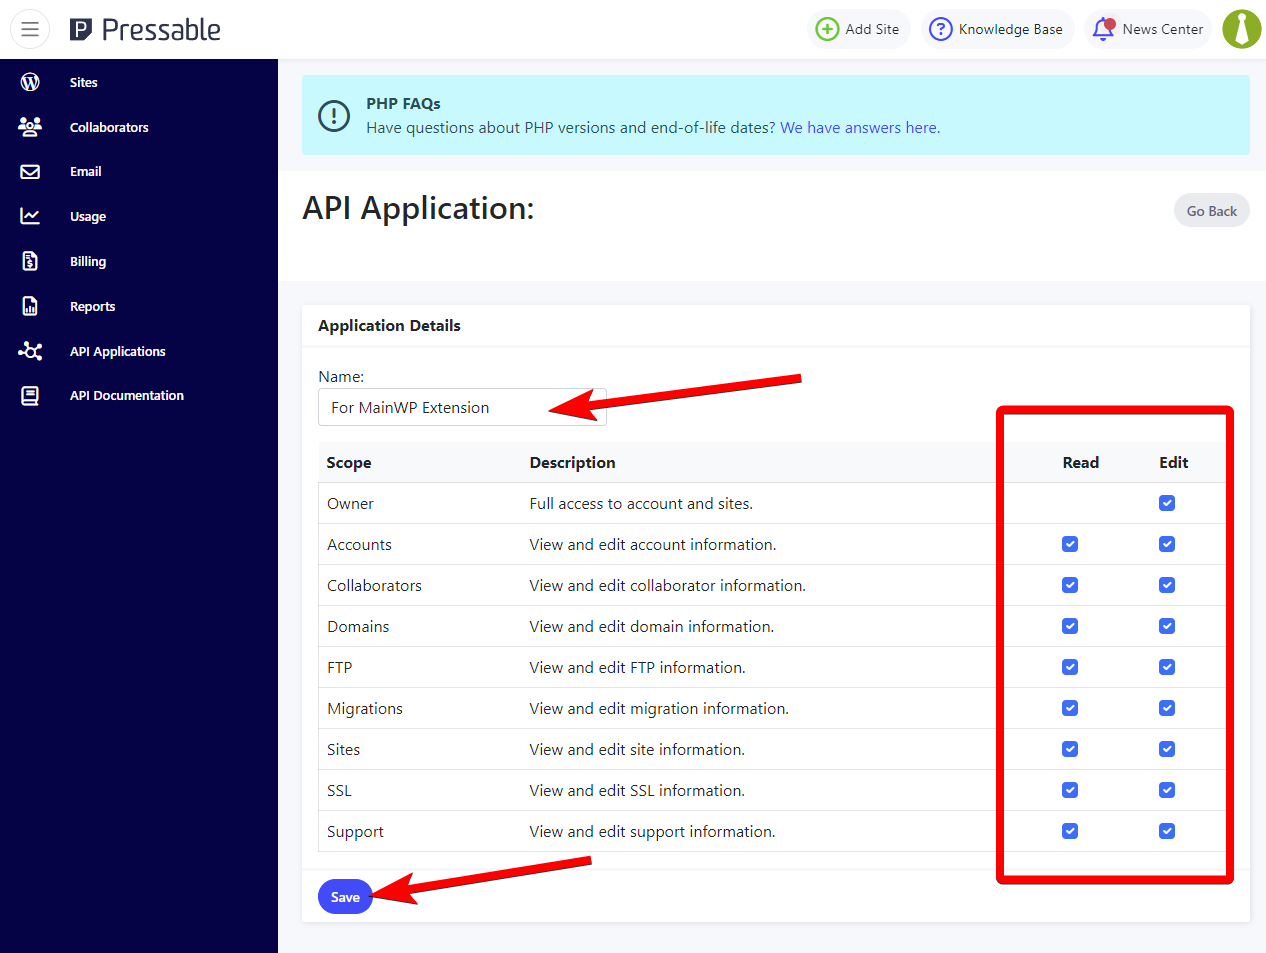
Enter a desired name for the API Application, give the application all permissions, and click the **Save** button
You will be presented with a Client ID and Client Secret. We will use these to connect the extension, so copy them somewhere or leave this browser tab open
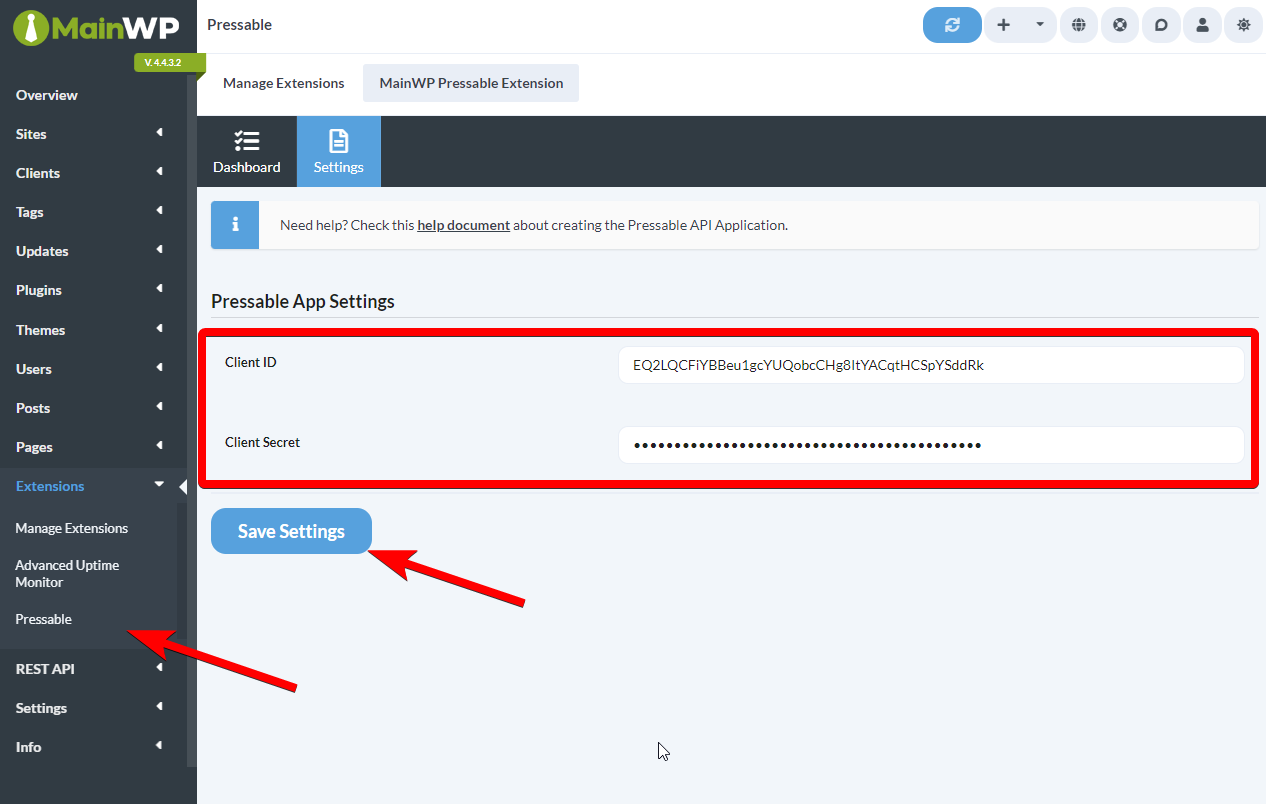
Now navigate to your **MainWP Dashboard > Add-ons > Administrative > Pressable** page, and open the Settings tab
Enter the Client ID and Client Secret and click the **Save Settings** button
## Team Control compatibility
The Pressable extension respects access restrictions configured by the [Team Control extension](/add-ons/agency/team-control-extension). Only team members whose role grants access to the Pressable extension will see the Pressable menu and be able to perform Pressable actions. If a user does not have permission, the extension UI and bulk actions are hidden for them.
## Clearing Pressable credentials
To disconnect the extension from your Pressable account, open the **Settings** tab, clear both the **Client ID** and **Client Secret** fields, and click **Save Settings**. Saving empty values removes the stored credentials and the cached access token. The Dashboard tab then shows an empty-state placeholder prompting you to add credentials again.
## Empty-state placeholders
The Dashboard tab shows contextual placeholders when there is nothing to display:
* **No credentials saved** — a *Pressable API Credentials Required* placeholder links you to the Settings tab to add a Client ID and Client Secret.
* **Credentials saved but no sites found** — a *No Pressable Sites Found* placeholder prompts you to create a site in Pressable or reload Pressable API data to sync sites.
These replace the previous empty table so the next step is always clear.
## Site matching by primary URL and custom domains
The extension matches Pressable sites to MainWP child sites using both the Pressable primary URL and any custom domains configured on the Pressable site. If a child site's URL matches any domain assigned to a Pressable site, it is linked automatically — no manual mapping is required when you point a child site at a custom domain instead of the default `*.mystagingwebsite.com` URL.
Reload Pressable API data from the Dashboard tab to refresh the mapping after adding or changing custom domains in Pressable.
## Dashboard page of the extension
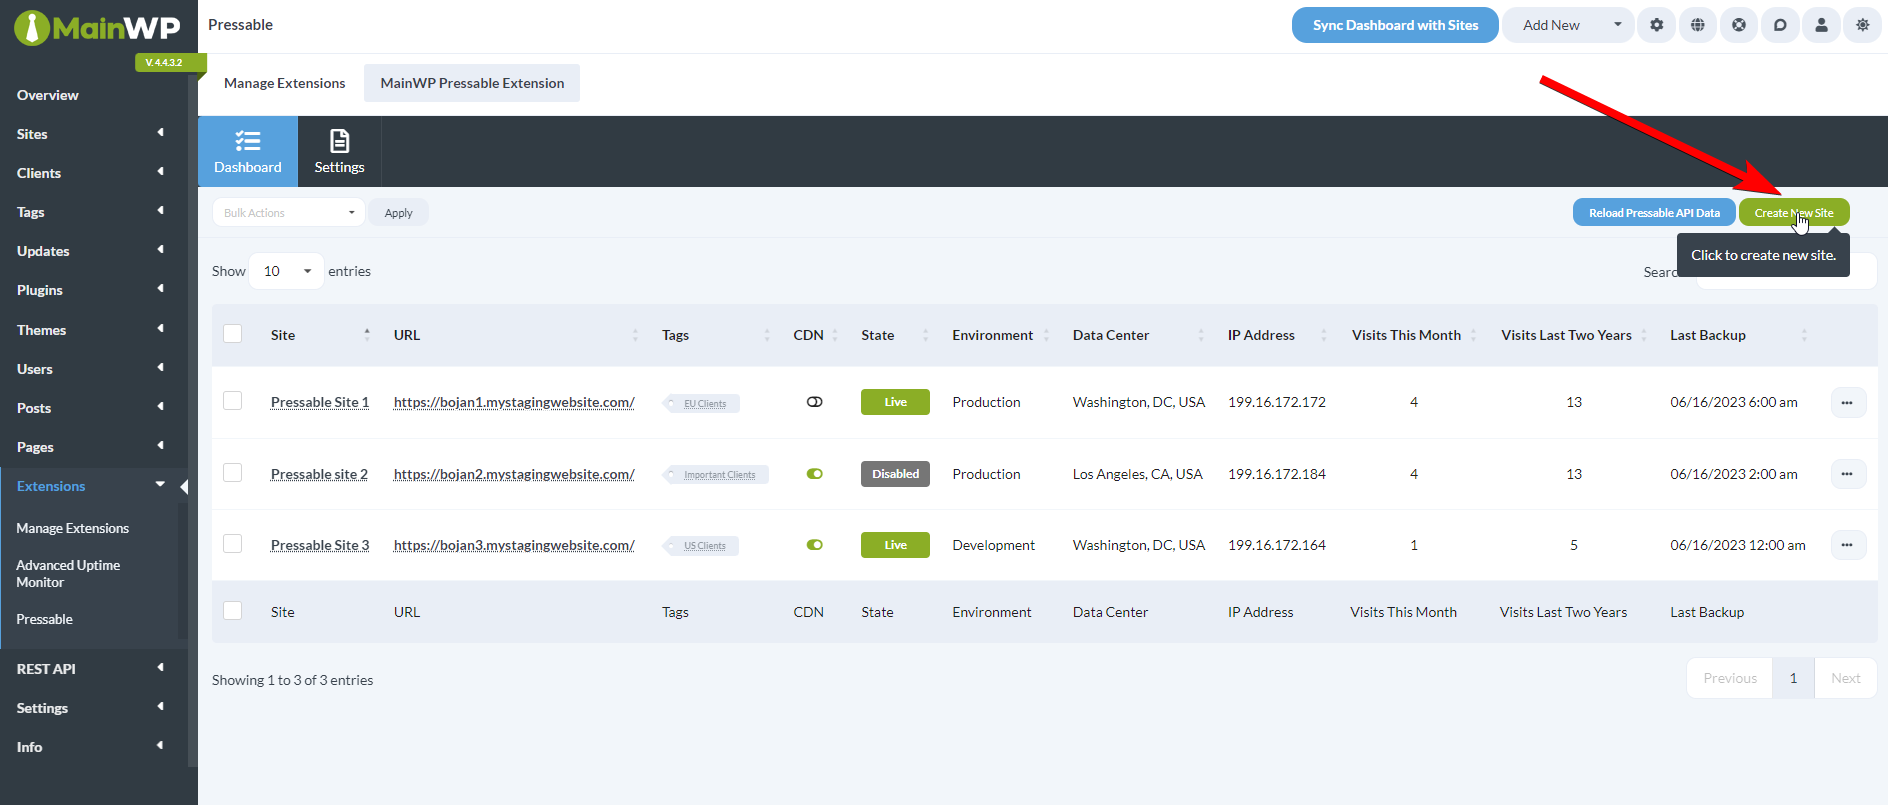
This page contains all of the features or shortcuts to the features of the Pressable extension. This table will contain all sites from the Pressable account you connected in the extension Settings that are also added to this MainWP Dashboard. Sites from the Pressable account that are not added to the MainWP Dashboard as child sites will NOT be shown here.
Backup and creation timestamps in the table show a human-readable elapsed time (for example, *2 days ago*) on hover, and sort by their underlying date.
The columns of the table that are specific to the Pressable extension are as follows:
* **CDN**: Shows a graphical indicator of whether the Pressable CDN is enabled on the child site
* **State**: Displays the status of the child site, either Live or Disabled
* **Environment:** Displays the environment type, either Staging, Development or Production
* **Data Center:** Displays the location of the Pressable data center where the child site is hosted at
* **IP Address:** Displays the IP Address of the Pressable data center where the child site is hosted at
* **Visits This Month:** Displays the number of visits for this child site for this month, as logged by Pressable
* **Visits Last Two Years:** Displays the number of visits for this child site for the last two years, as logged by Pressable
* **Last Backup:** Displays the date and time of the last performed Pressable backup
## Create a new Pressable site
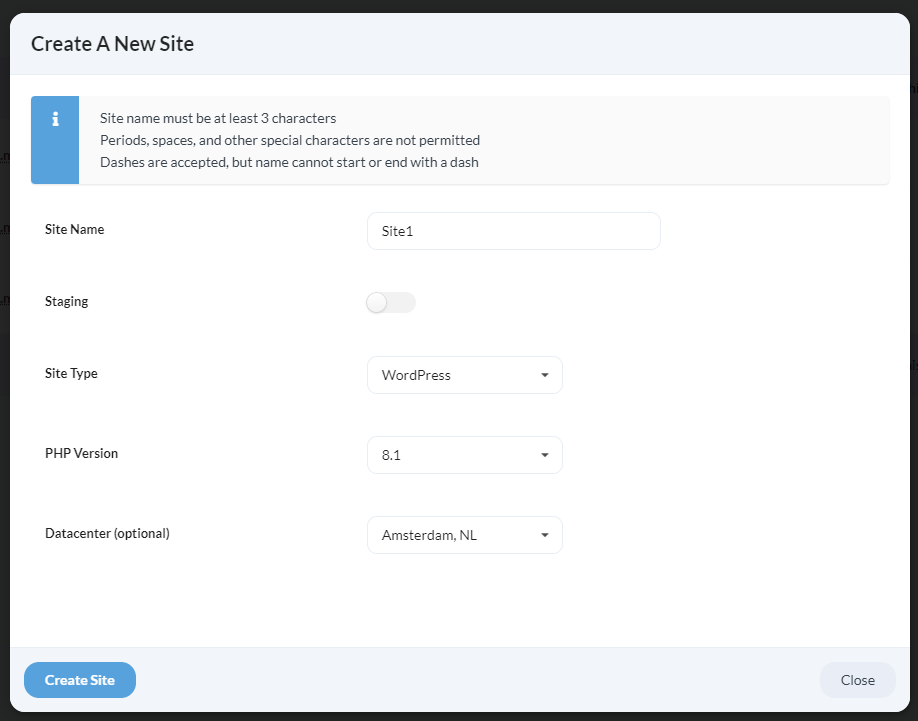
1. Enter the desired **Site Name** **NOTE:** Periods, spaces, and other special characters are not permitted in site names. Dashes are fine, but the name cannot start or end with a dash. The name must be at least 3 characters in length.
2\. Choose whether the site should be **Staging** or not
3\. From the **Site Type** dropdown, select either WordPress or WooCommerce
4\. From the **PHP Version** dropdown, select the available PHP version
5\. From the **Datacenter** dropdown, optionally select the location of the data center
## Available Actions for Child Sites
Available actions you can perform on the child sites are located in the ellipsis menu. Hosting actions are also available in the Bulk Actions menu: Enable Sites, Disable Sites, Delete Sites, Convert Live to Staging, Convert Staging to Live, Enable CDN, Disable CDN, and Go to phpMyAdmin.
* **Sync Data:** Synchronizes the child site through the MainWP Dashboard site sync
* **Overview**: Opens the Child Site Overview on the MainWP Dashboard
* **Edit**: Opens the Child Site Edit page on the MainWP Dashboard
* **Enable/Disable Site**: Changes the State of the site in the Pressable hosting account to either Live or Disabled
* **Delete Site:** Deletes the site from the Pressable hosting account
* **Convert to Staging** / **Staging to Live:** Converts the site either from Staging to Live, or from Live to Staging
* **Enable/Disable CDN:** Either enables or disables the CDN feature on the Pressable hosting account
* **Go to phpMyAdmin:** Opens the phpMyAdmin page for that child site on the Pressable hosting account
* **Manage Backups:** Opens the Pressable Backups page for that Child Site. You can either initialize a Site Restore or download one of the existing backup files.
***
## Related Resources
* [Development Add-ons](/add-ons/development) - Browse all development tools
* [Hosting Compatibility](/advanced/miscellaneous/hosting-compatibility) - Hosting provider information
* [Manage Child Sites](/sites/management/manage-child-sites) - Site management guide
 ](/images/add-ons/install-domain-monitor.png)
 ](/images/add-ons/activate-domain-monitor.png)
 This table will contain all sites from the Pressable account you connected in the extension Settings that are also added to this MainWP Dashboard. Sites from the Pressable account that are not added to the MainWP Dashboard as child sites will NOT be shown here.
Backup and creation timestamps in the table show a human-readable elapsed time (for example, *2 days ago*) on hover, and sort by their underlying date.
The columns of the table that are specific to the Pressable extension are as follows:
* **CDN**: Shows a graphical indicator of whether the Pressable CDN is enabled on the child site
* **State**: Displays the status of the child site, either Live or Disabled
* **Environment:** Displays the environment type, either Staging, Development or Production
* **Data Center:** Displays the location of the Pressable data center where the child site is hosted at
* **IP Address:** Displays the IP Address of the Pressable data center where the child site is hosted at
* **Visits This Month:** Displays the number of visits for this child site for this month, as logged by Pressable
* **Visits Last Two Years:** Displays the number of visits for this child site for the last two years, as logged by Pressable
* **Last Backup:** Displays the date and time of the last performed Pressable backup
## Create a new Pressable site
This table will contain all sites from the Pressable account you connected in the extension Settings that are also added to this MainWP Dashboard. Sites from the Pressable account that are not added to the MainWP Dashboard as child sites will NOT be shown here.
Backup and creation timestamps in the table show a human-readable elapsed time (for example, *2 days ago*) on hover, and sort by their underlying date.
The columns of the table that are specific to the Pressable extension are as follows:
* **CDN**: Shows a graphical indicator of whether the Pressable CDN is enabled on the child site
* **State**: Displays the status of the child site, either Live or Disabled
* **Environment:** Displays the environment type, either Staging, Development or Production
* **Data Center:** Displays the location of the Pressable data center where the child site is hosted at
* **IP Address:** Displays the IP Address of the Pressable data center where the child site is hosted at
* **Visits This Month:** Displays the number of visits for this child site for this month, as logged by Pressable
* **Visits Last Two Years:** Displays the number of visits for this child site for the last two years, as logged by Pressable
* **Last Backup:** Displays the date and time of the last performed Pressable backup
## Create a new Pressable site
 1. Enter the desired **Site Name** **NOTE:** Periods, spaces, and other special characters are not permitted in site names. Dashes are fine, but the name cannot start or end with a dash. The name must be at least 3 characters in length.
2\. Choose whether the site should be **Staging** or not
3\. From the **Site Type** dropdown, select either WordPress or WooCommerce
4\. From the **PHP Version** dropdown, select the available PHP version
5\. From the **Datacenter** dropdown, optionally select the location of the data center
1. Enter the desired **Site Name** **NOTE:** Periods, spaces, and other special characters are not permitted in site names. Dashes are fine, but the name cannot start or end with a dash. The name must be at least 3 characters in length.
2\. Choose whether the site should be **Staging** or not
3\. From the **Site Type** dropdown, select either WordPress or WooCommerce
4\. From the **PHP Version** dropdown, select the available PHP version
5\. From the **Datacenter** dropdown, optionally select the location of the data center
 * **Sync Data:** Synchronizes the child site through the MainWP Dashboard site sync
* **Overview**: Opens the Child Site Overview on the MainWP Dashboard
* **Edit**: Opens the Child Site Edit page on the MainWP Dashboard
* **Enable/Disable Site**: Changes the State of the site in the Pressable hosting account to either Live or Disabled
* **Delete Site:** Deletes the site from the Pressable hosting account
* **Convert to Staging** / **Staging to Live:** Converts the site either from Staging to Live, or from Live to Staging
* **Enable/Disable CDN:** Either enables or disables the CDN feature on the Pressable hosting account
* **Go to phpMyAdmin:** Opens the phpMyAdmin page for that child site on the Pressable hosting account
* **Manage Backups:** Opens the Pressable Backups page for that Child Site. You can either initialize a Site Restore or download one of the existing backup files.
* **Sync Data:** Synchronizes the child site through the MainWP Dashboard site sync
* **Overview**: Opens the Child Site Overview on the MainWP Dashboard
* **Edit**: Opens the Child Site Edit page on the MainWP Dashboard
* **Enable/Disable Site**: Changes the State of the site in the Pressable hosting account to either Live or Disabled
* **Delete Site:** Deletes the site from the Pressable hosting account
* **Convert to Staging** / **Staging to Live:** Converts the site either from Staging to Live, or from Live to Staging
* **Enable/Disable CDN:** Either enables or disables the CDN feature on the Pressable hosting account
* **Go to phpMyAdmin:** Opens the phpMyAdmin page for that child site on the Pressable hosting account
* **Manage Backups:** Opens the Pressable Backups page for that Child Site. You can either initialize a Site Restore or download one of the existing backup files. 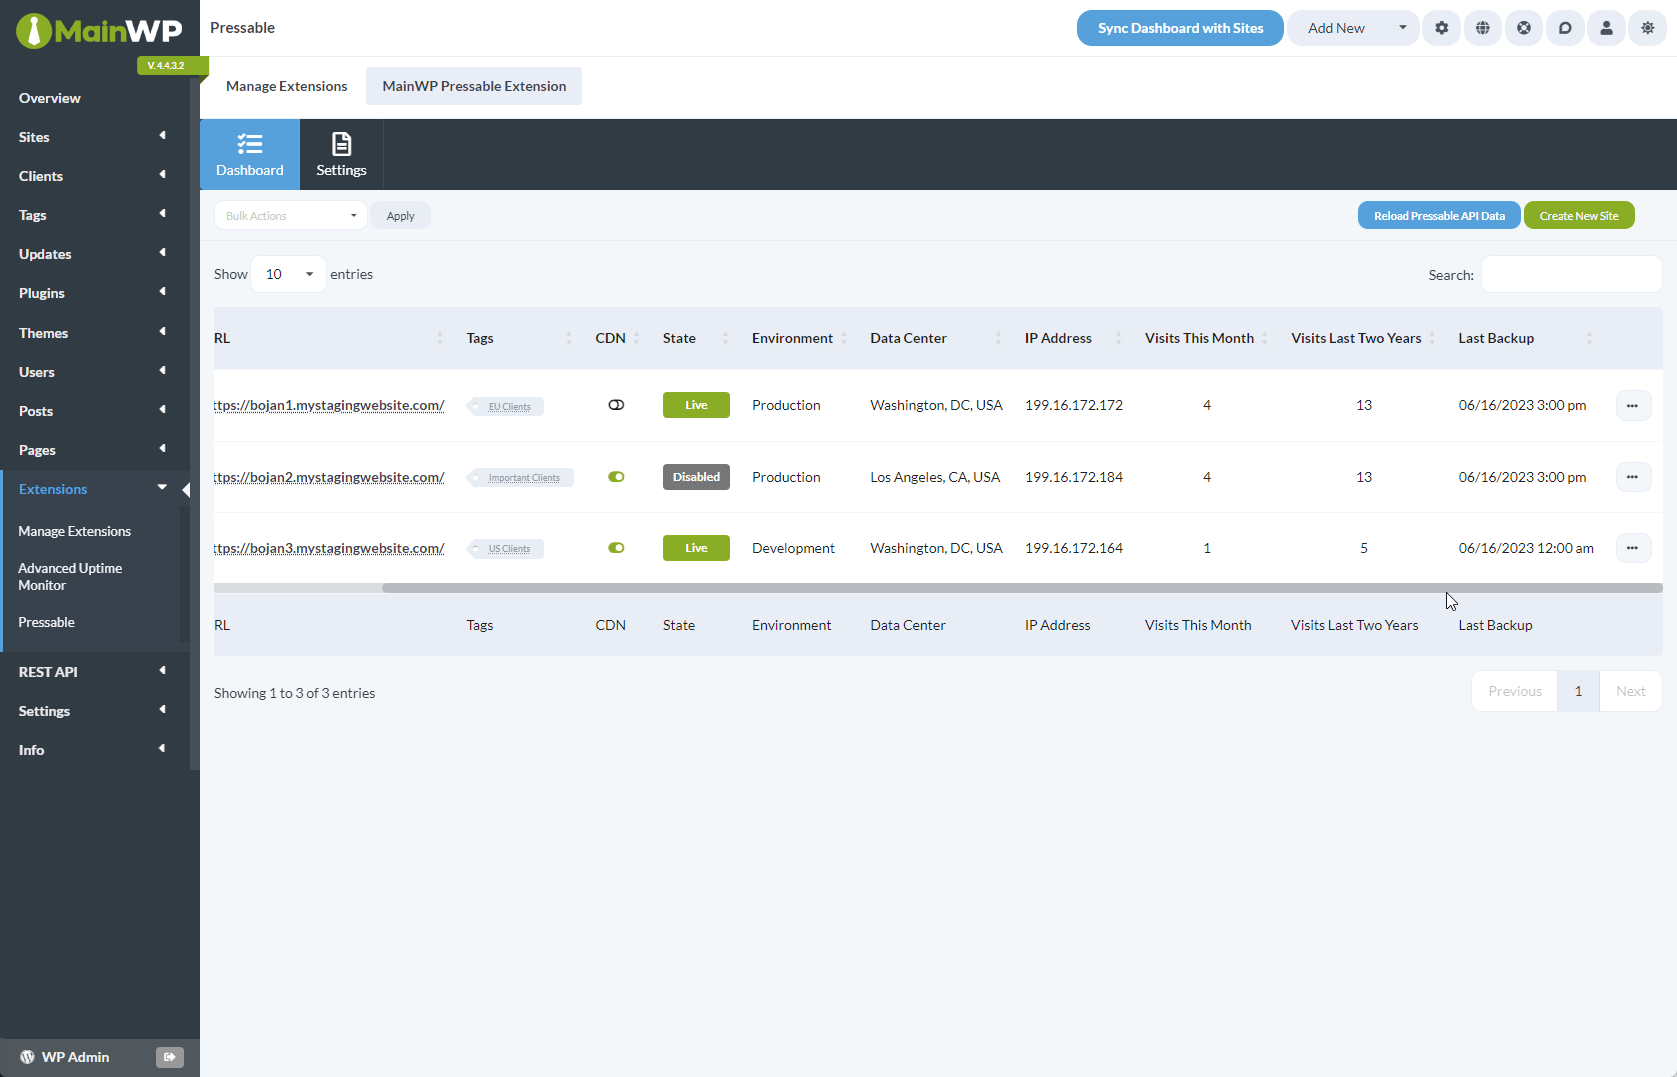 ***
## Related Resources
* [Development Add-ons](/add-ons/development) - Browse all development tools
* [Hosting Compatibility](/advanced/miscellaneous/hosting-compatibility) - Hosting provider information
* [Manage Child Sites](/sites/management/manage-child-sites) - Site management guide
***
## Related Resources
* [Development Add-ons](/add-ons/development) - Browse all development tools
* [Hosting Compatibility](/advanced/miscellaneous/hosting-compatibility) - Hosting provider information
* [Manage Child Sites](/sites/management/manage-child-sites) - Site management guide