> ## Documentation Index
> Fetch the complete documentation index at: https://docs.mainwp.com/llms.txt
> Use this file to discover all available pages before exploring further.
# Pro Reports
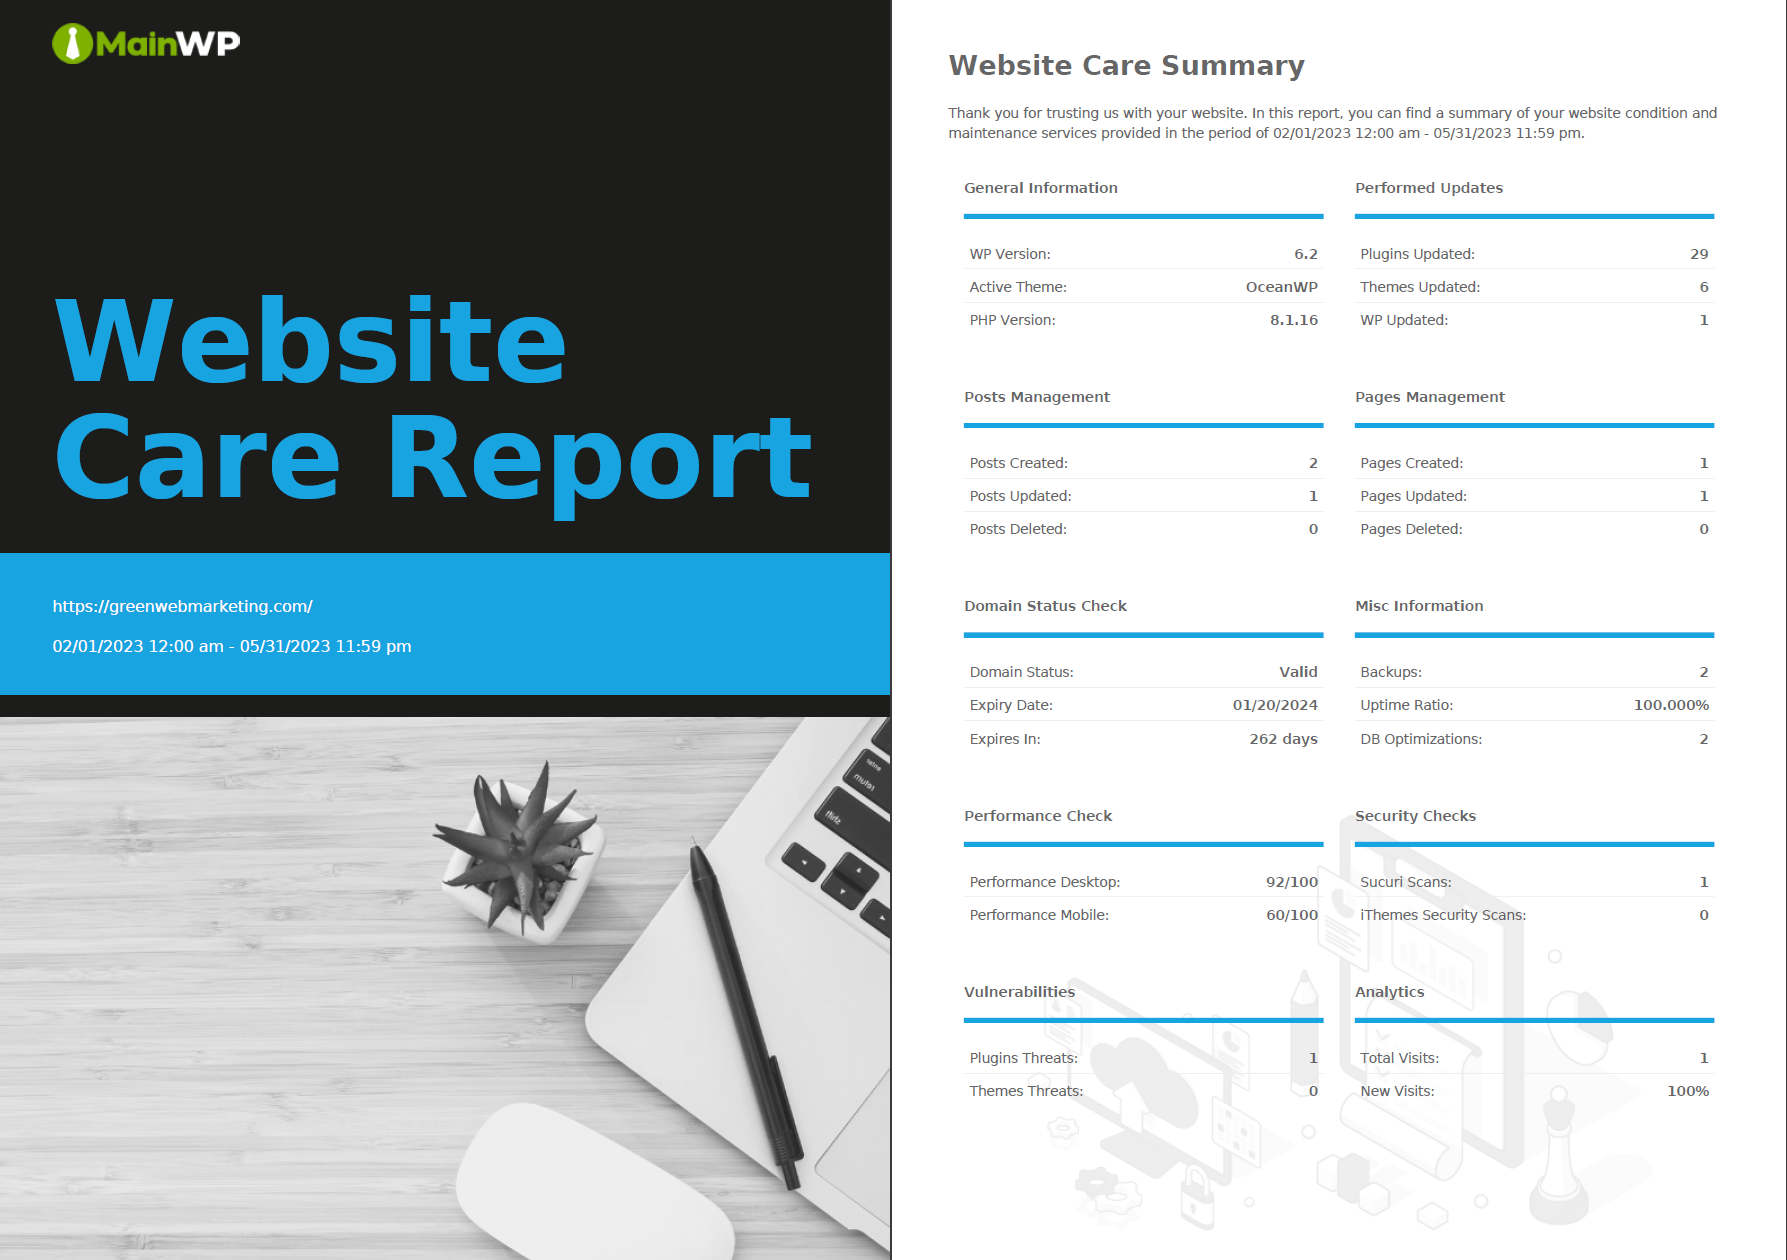
> The MainWP Pro Reports extension is a fully customizable reporting engine that allows you to create the type of report you are proud to send to your clients.
## What You'll Learn
* Setting up the Pro Reports extension and Child Reports plugin
* Creating recurring and one-time reports
* Customizing report templates with tokens
* Managing client information and branding
***
**Extension Add-on** - This add-on provides standalone functionality within MainWP Dashboard. No third-party plugins required.
The [MainWP Pro Reports Extension](https://mainwp.com/extension/pro-reports/) combines the free [MainWP Child Reports](https://wordpress.org/plugins/mainwp-child-reports/) plugin with a customizable reporting engine. The Child Reports plugin tracks changes on your child sites, while the Pro Reports Extension on your Dashboard gathers that information and converts it to PDF reports.
**Key features:**
* Generate professional reports in seconds
* Pre-made templates to get you started
* Automatic PDF attachment to emails
* Include or exclude specific content
* Customizable template system
* Custom branding options
## Setting up the Pro Reports Extension
### Installation
[Install](/sites/plugins/managing-plugins-with-mainwp) the [MainWP Child Reports](https://wordpress.org/plugins/mainwp-child-reports/) plugin on all child sites. This free plugin records logging events that appear in your reports. Records are kept for 100 days.
[Install](/dashboard/overview/manage-extensions#install-add-ons) the MainWP Pro Reports Extension on your Dashboard.
Sync your sites so the Dashboard can detect which sites have the Child Reports plugin installed.
**Reports require recorded activity.** The MainWP Child Reports plugin must collect site data before reports can show meaningful content. After installation, allow several days for the plugin to record events such as updates, posts, and changes. Reports generated immediately after installation will display empty sections.
To test Pro Reports with default settings, skip to [Create a One-Time Report](#create-a-one-time-report). Client information and custom branding can be configured later.
## MainWP Child Reports Plugin
The [MainWP Child Reports plugin](https://wordpress.org/plugins/mainwp-child-reports/) records changes on your child sites and communicates them to the Pro Reports Extension. Built on the [Stream Plugin](https://wordpress.org/plugins/stream/), it currently requires PHP 7.4 or higher.
### Viewing Recorded Data
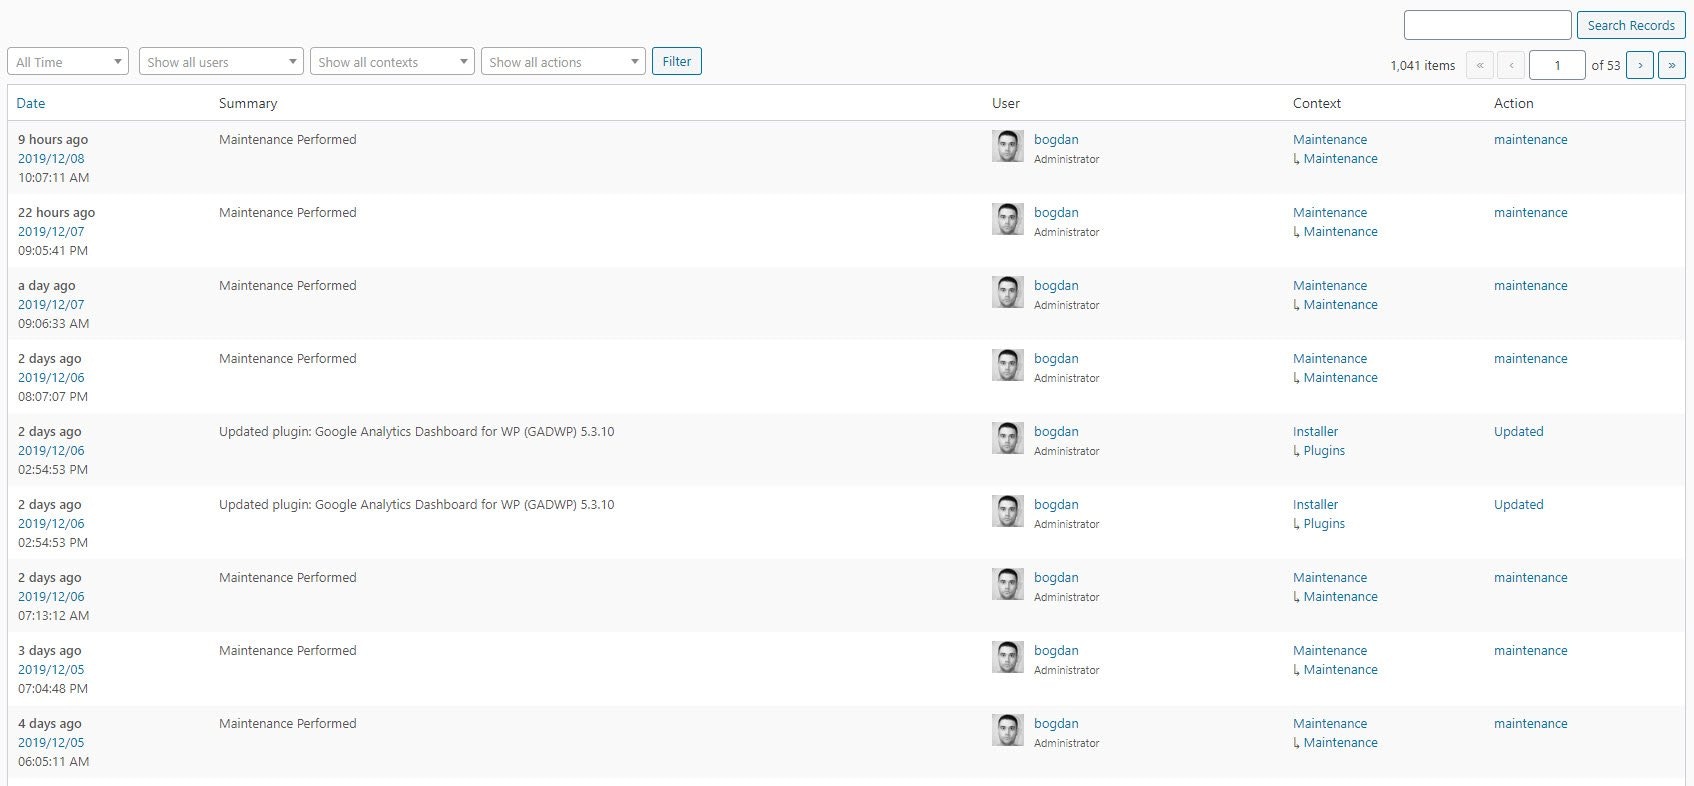
By default, go to **WP Admin > Settings > MainWP Child > Child Reports** on your child site to see recorded activity. If you have customized MainWP Child branding, these labels can differ.
### Child Reports Settings
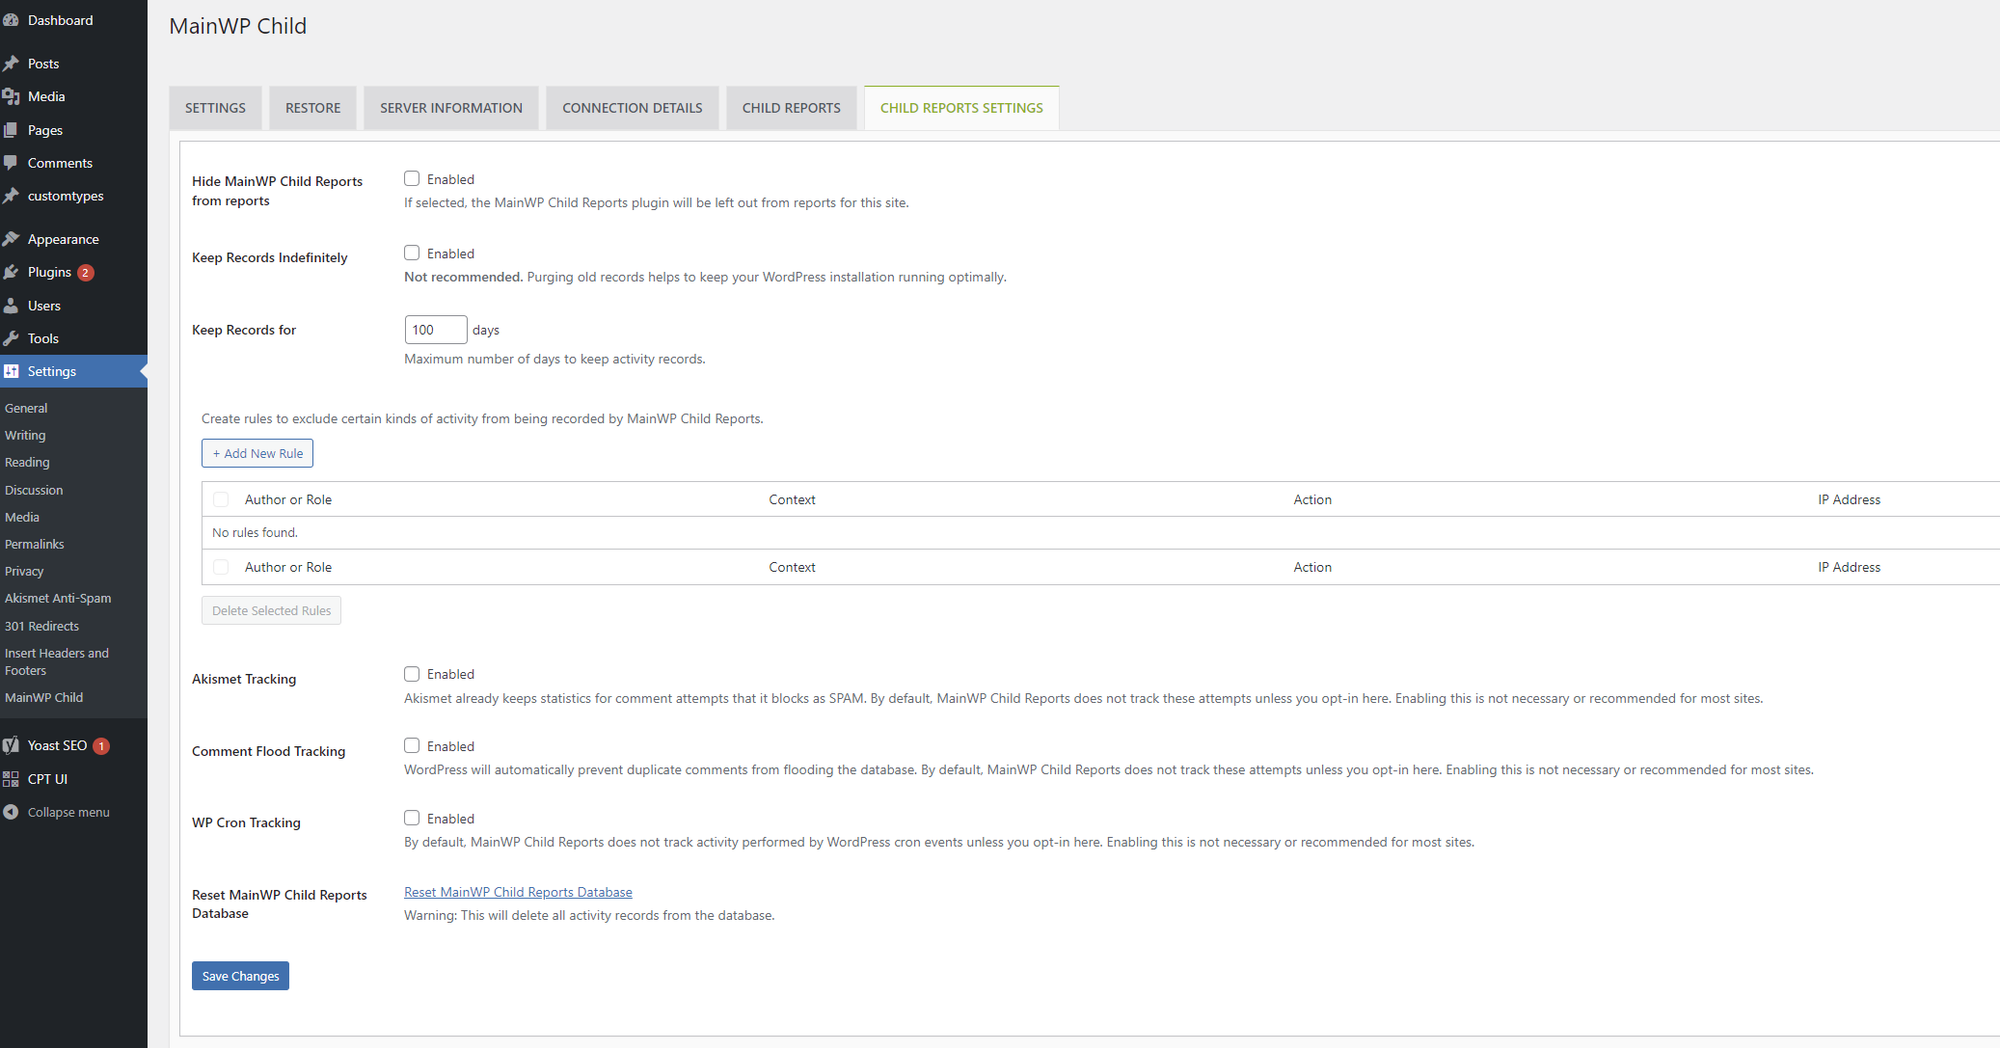
By default, navigate to **WP Admin > Settings > MainWP Child > Child Reports Settings** to configure the plugin. If you have customized MainWP Child branding, these labels can differ.
| Setting | Description |
| ----------------------------------- | --------------------------------------------------------------------- |
| Keep Records for | Maximum days to retain activity records (default: 100) |
| Keep Records Indefinitely | Retains all records (not recommended for performance) |
| Comment Flood Tracking | Track duplicate comments blocked by WordPress (not recommended) |
| Akismet Tracking | Track comment spam attempts blocked by Akismet when Akismet is active |
| WP Cron Tracking | Track WordPress cron event activity when WP-Cron is enabled |
| Reset MainWP Child Reports Database | Delete all activity reports from the database |
### Client Information
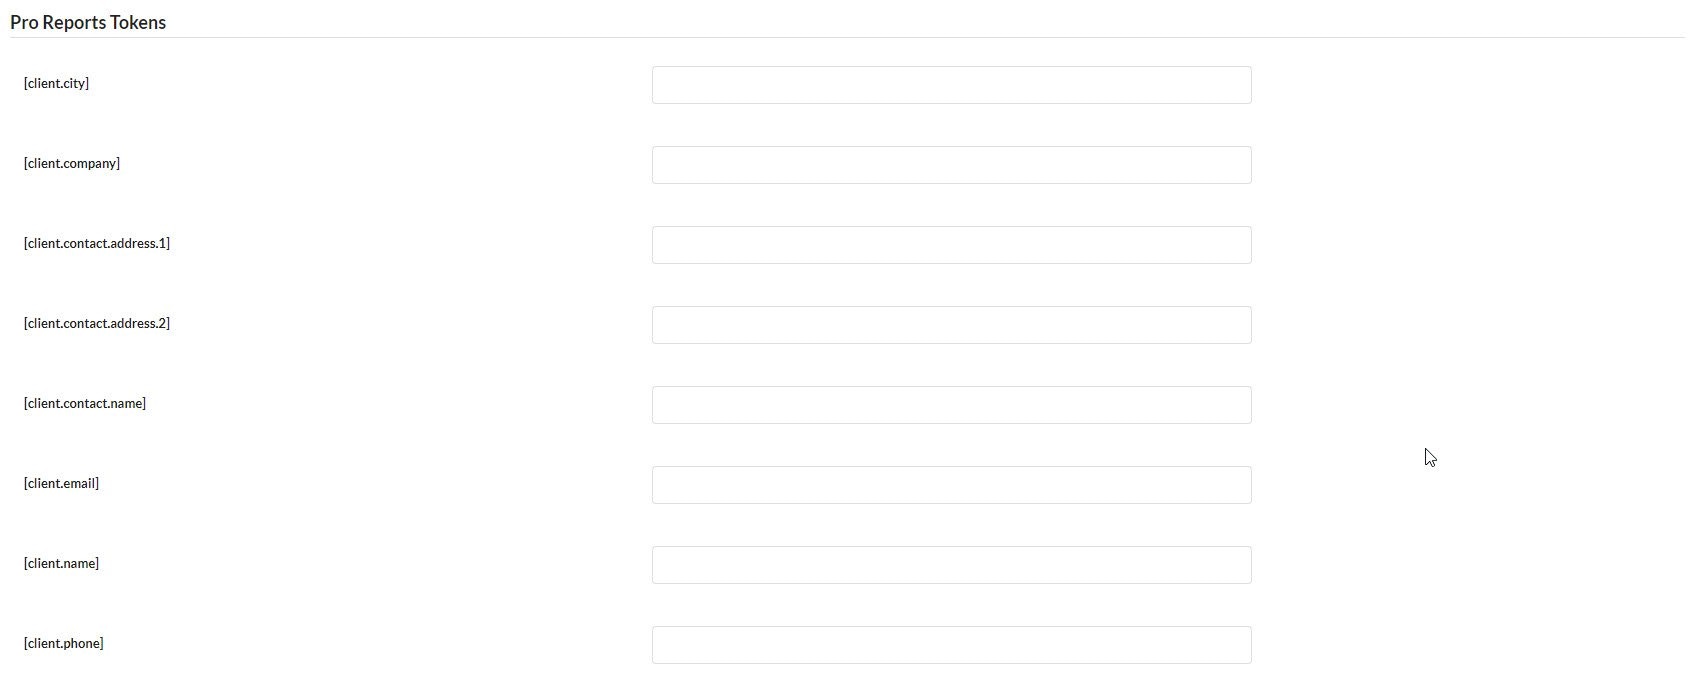
Pro Reports uses tokens to personalize reports without creating separate versions for each client. Tokens are placeholders like `[client.email]` and `[client.name]` that get replaced with actual values when reports generate. You can define client information in two ways:
| Method | Description | Best For |
| ----------------- | ---------------------------------------------------------- | ------------------------------ |
| Client Feature | Define information once, assign multiple sites to a client | Managing many sites per client |
| Per-Site Settings | Set information individually on each site's Edit page | Maximum flexibility |
When the same token is defined in both locations, the per-site value takes priority.
#### Setting Per-Site Client Information
Go to **MainWP Dashboard > Sites > Manage Sites** and click **Edit** on the desired site.
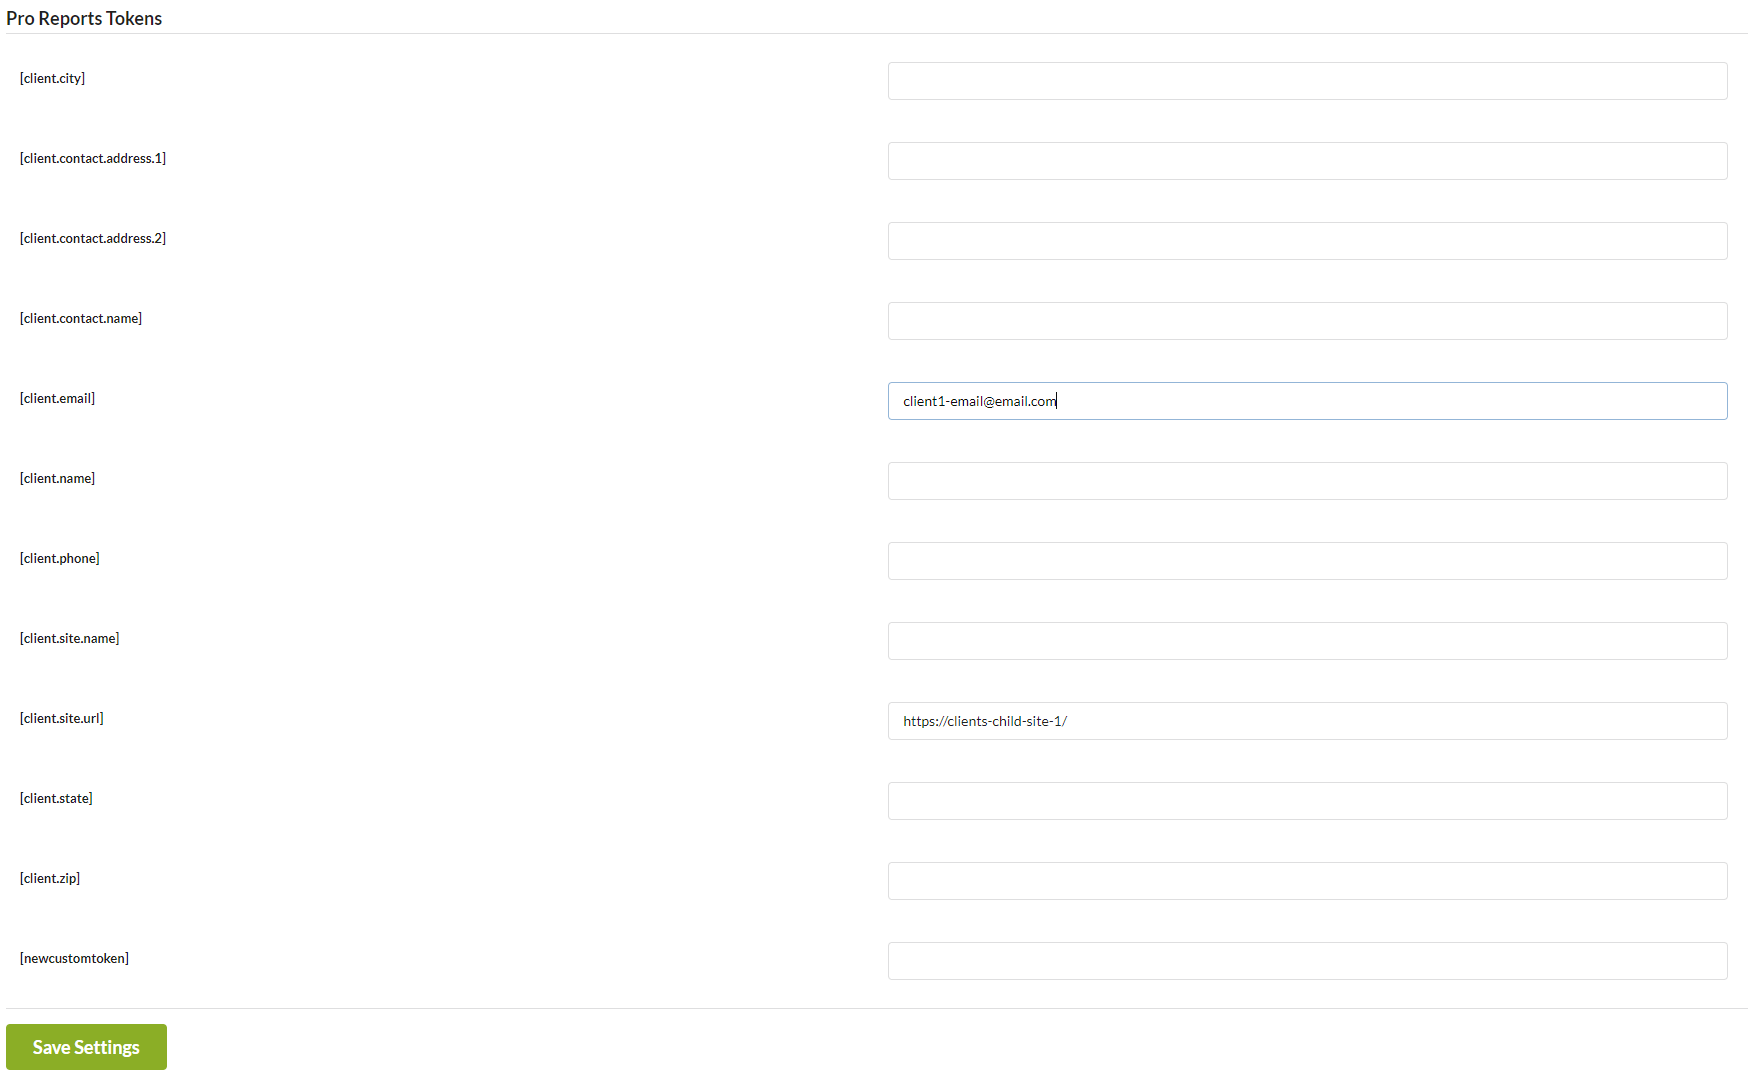
Locate the **Pro Reports Tokens** section and enter values for tokens you plan to use.
Click **Save Settings**.
Understand token priority and when to use each level.
## Report Types
Pro Reports offers two report formats. Recurring reports run on a schedule you define. One-time reports cover a specific date range you select manually.
| Aspect | Recurring | One-Time |
| ---------- | --------------------------- | -------------------------- |
| Schedule | Daily, Weekly, or Monthly | None (manual send) |
| Date Range | Automatic based on schedule | Custom start and end dates |
| Action | Schedule Report | Send Now |
| Use Case | Ongoing client updates | Project completion, audits |
## Create a Recurring Report
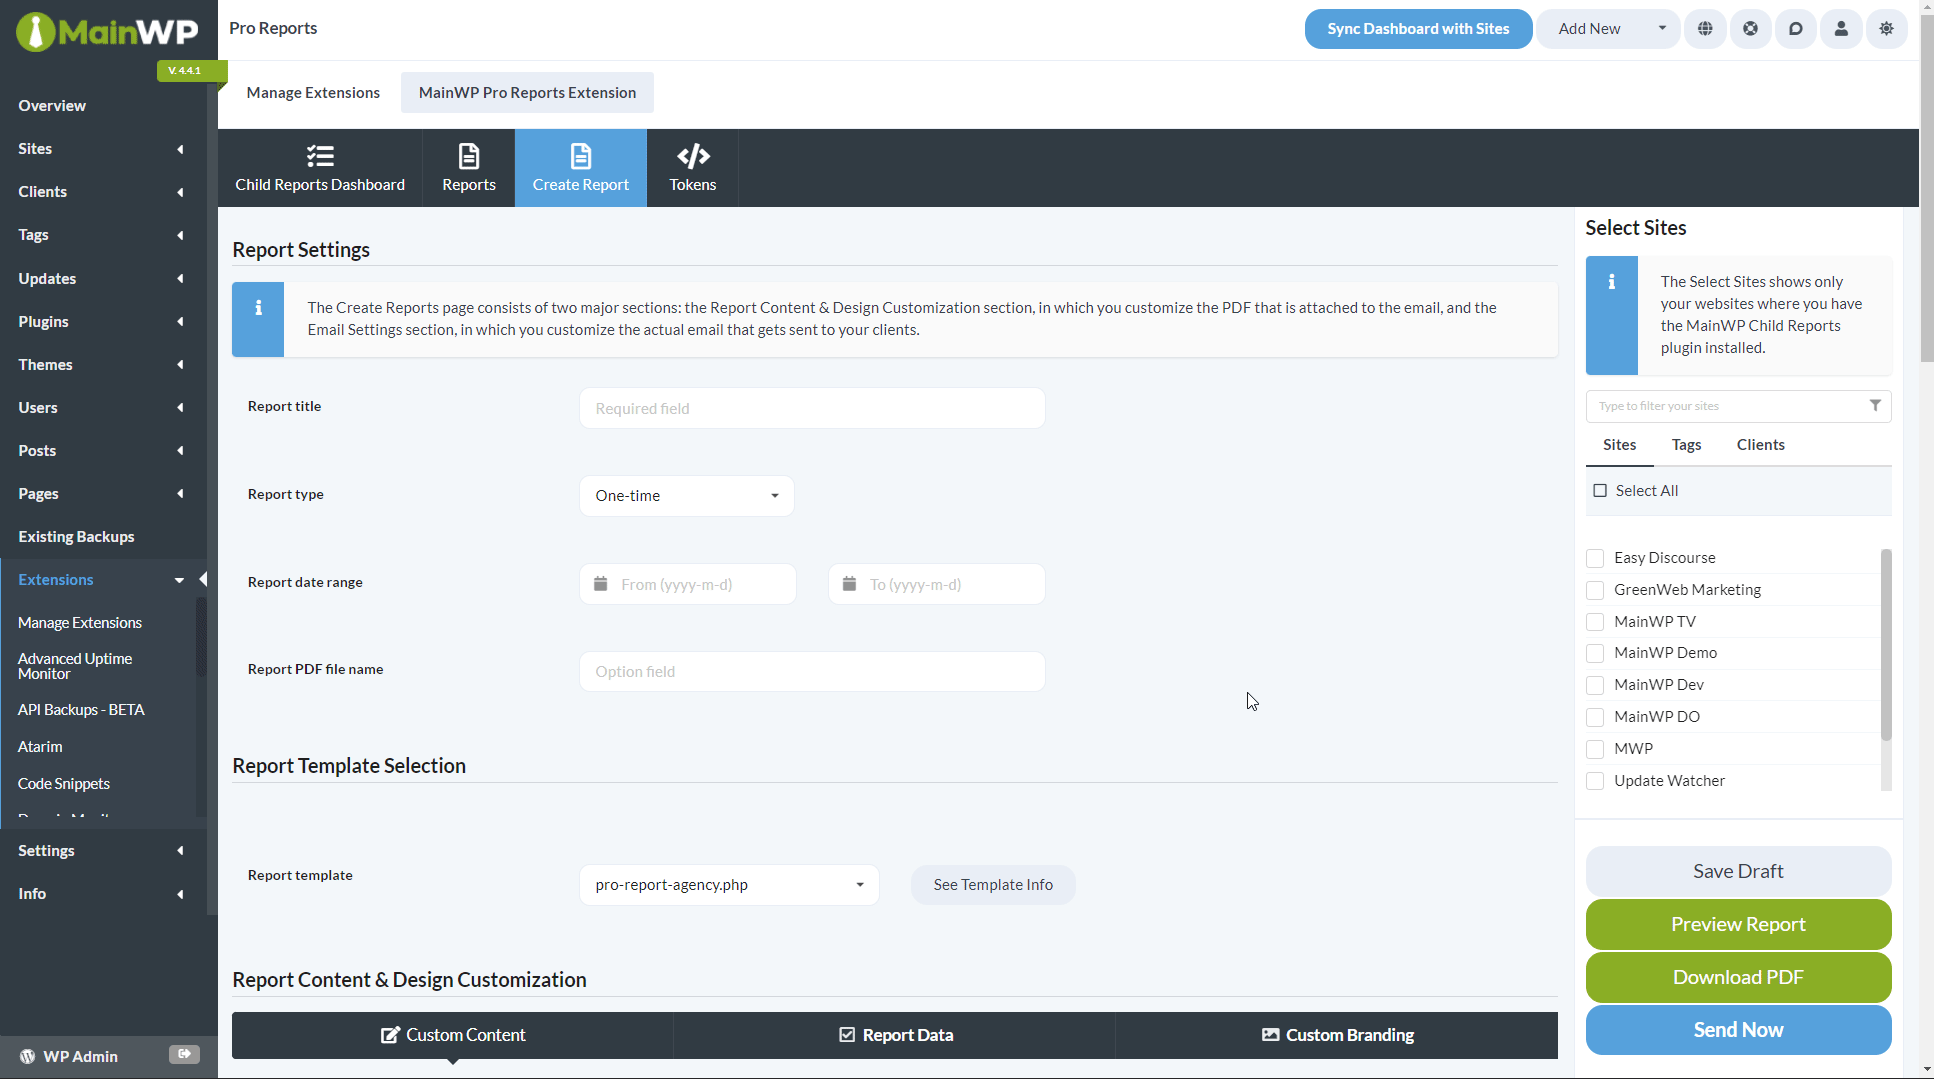
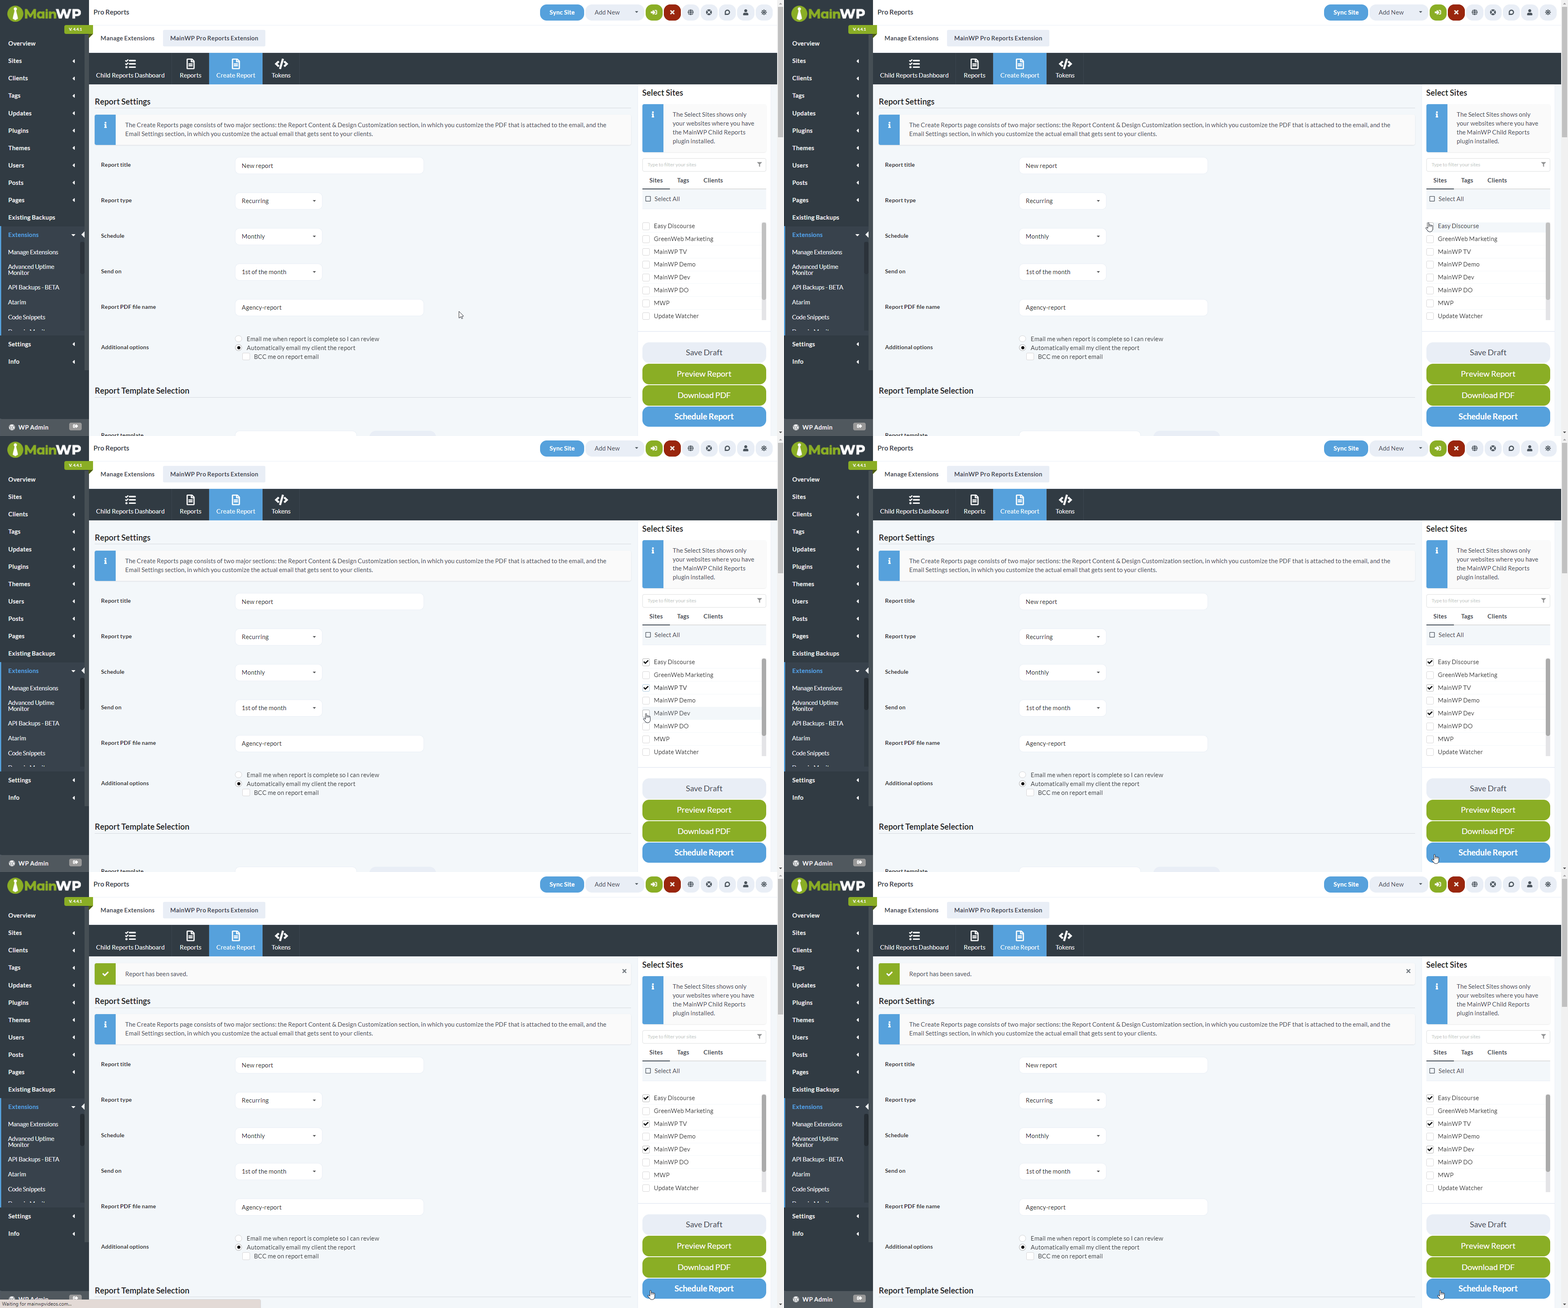
Go to **MainWP Dashboard > Add-ons > Pro Reports > Create Report**.
| Setting | Description |
| -------------------- | --------------------------------------------------- |
| Report title | Name for identifying this report |
| Report type | Select **Recurring** |
| Schedule | Daily, Weekly, or Monthly |
| Send report on | Day of week or month (for Weekly/Monthly schedules) |
| Report PDF file name | Optional custom filename for the PDF attachment |
| Report Template | Select from available templates |
| Tab | Purpose |
| --------------- | --------------------------------------------------------------------------------------------------------------------------------------------------------------------------------------------------------------------------------------------------------------------------------------------------------------------------------------------------------------------------------------------------------------------------------------------------------------------------------------------------------------------------------------------------------------------------------------------------------------------------------------------- |
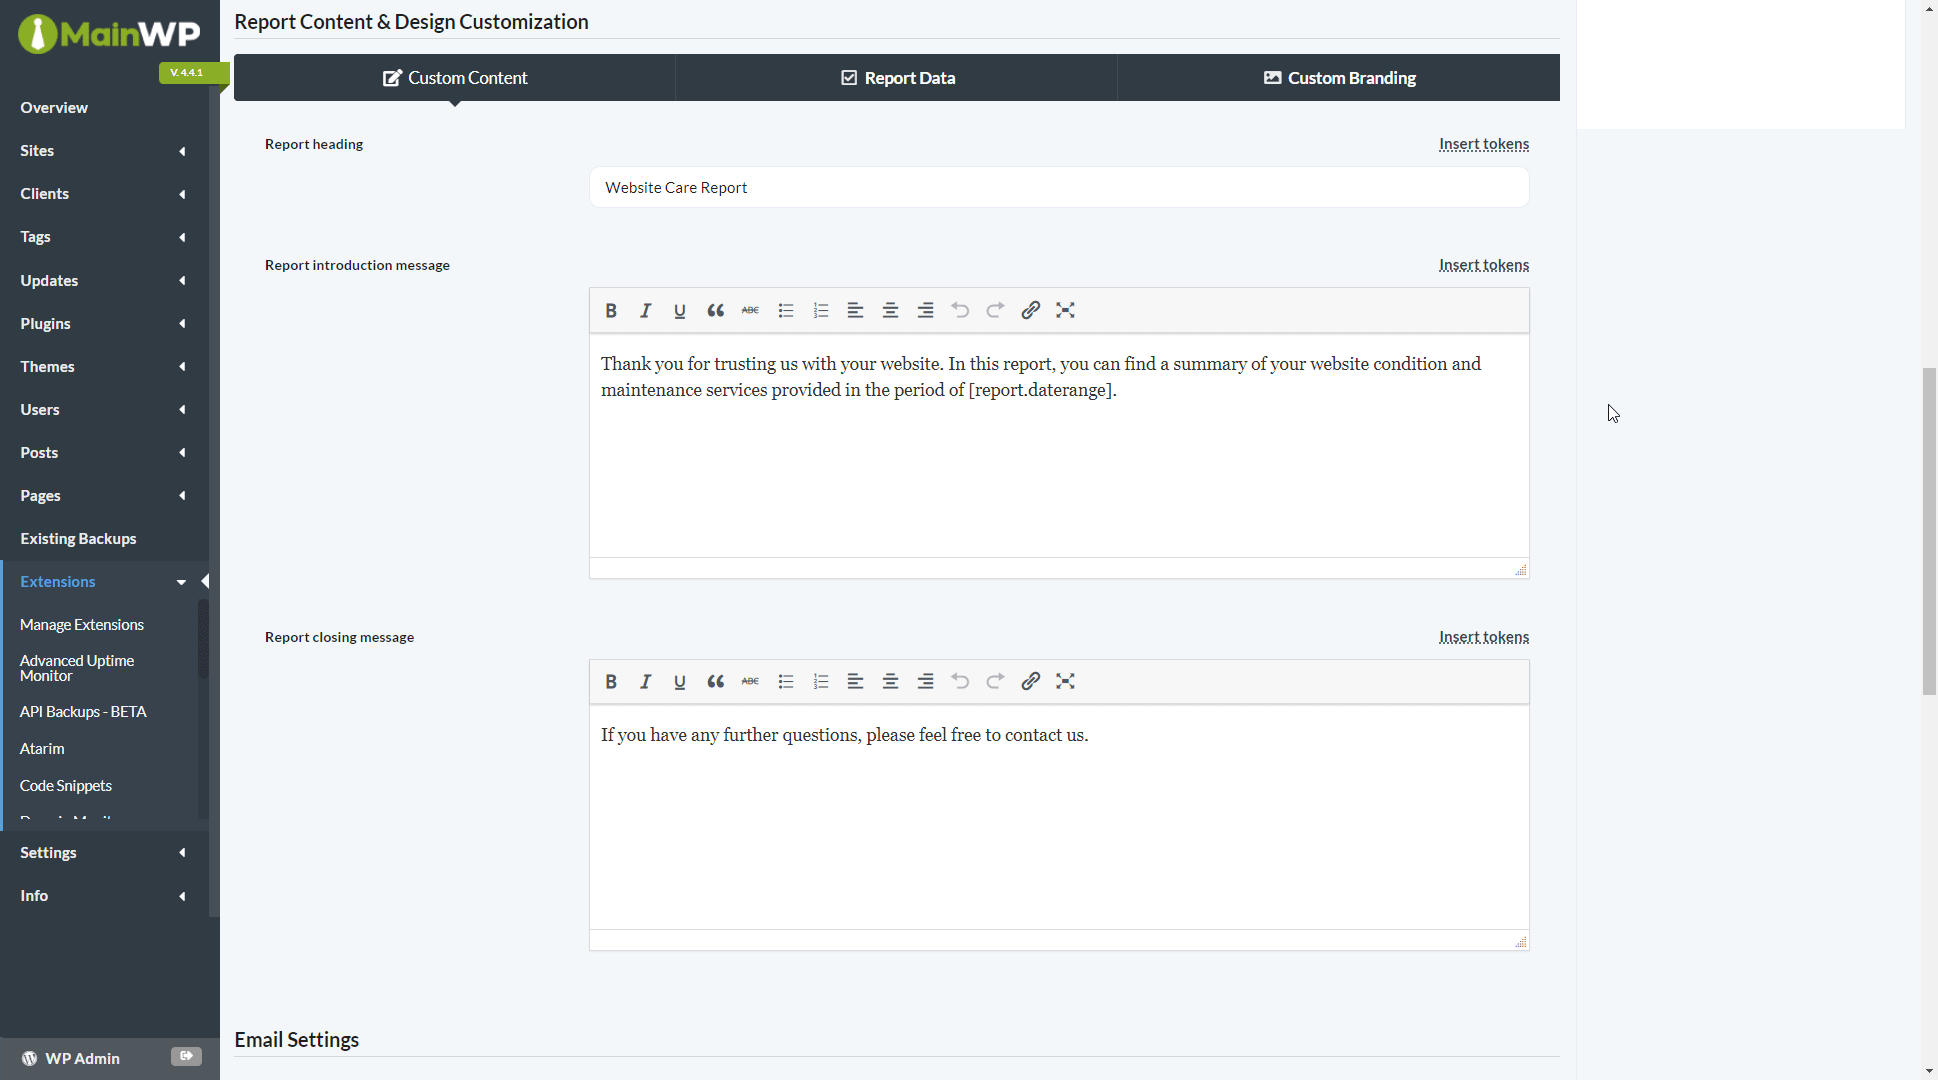
| Custom Content | Set the report heading shown on the first page and write the introduction and closing message. All three fields support tokens, and the introduction and closing message use the visual editor so you can add formatted client-facing copy. |
| Report Data | Control which sections appear in the report and whether each one is set to **Show**, **Hide**, or **Hide if empty**. This includes core report areas such as WordPress, plugin and theme updates, posts, pages, users, comments, and uptime, plus any compatible add-on data currently active on your Dashboard such as backups, analytics, monitoring, security, performance, and maintenance sections. The **Backups** section appears when at least one selected site uses [API Backups](/sites/backups/manage-backups#api-backups) or has a supported backup extension active (BackWPup, BackupWordPress, Solid Backups, or UpdraftPlus). |
| Custom Branding | Upload your logo and an optional first-page header image, then set the first-page background, page background, text, accent, link, and table colors. Use this tab to match the PDF layout to your brand. |
| Custom Titles | Rename or translate report titles, subtitles, and table headings for the sections included in the report. These overrides are saved per report, which lets you keep different client-facing wording or language versions. It changes the labels in the report, but not the actual data values returned by WordPress, themes, plugins, or other integrations. |
| Field | Description |
| ---------------------- | ------------------------------------------------------------- |
| Send email from | Your email address and name |
| Send email to | Client email and name (supports tokens like `[client.email]`) |
| Reply-to | Optional reply address |
| Email subject | Subject line (supports tokens) |
| Email message | Email body (supports tokens) |
| Email template | Select template style |
| BCC email address | Optional blind copy recipient |
| Additional attachments | Optional extra files |
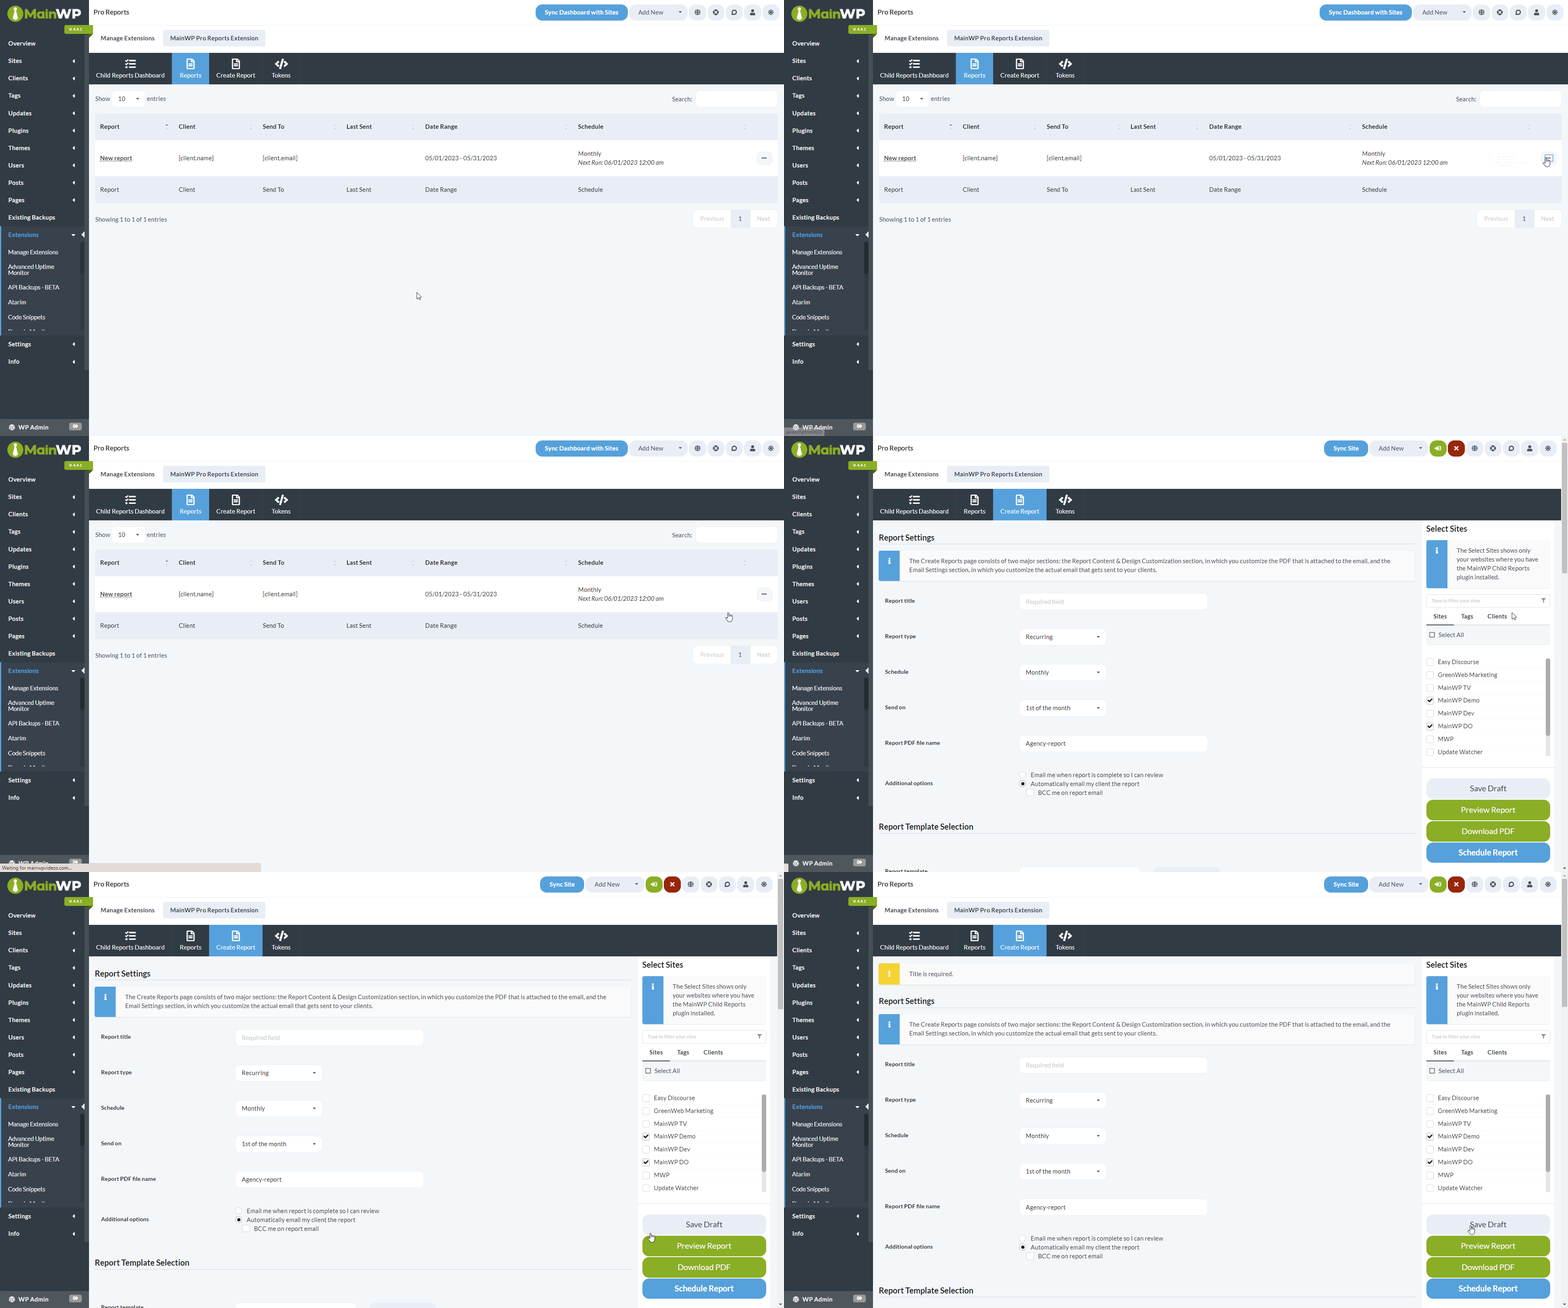
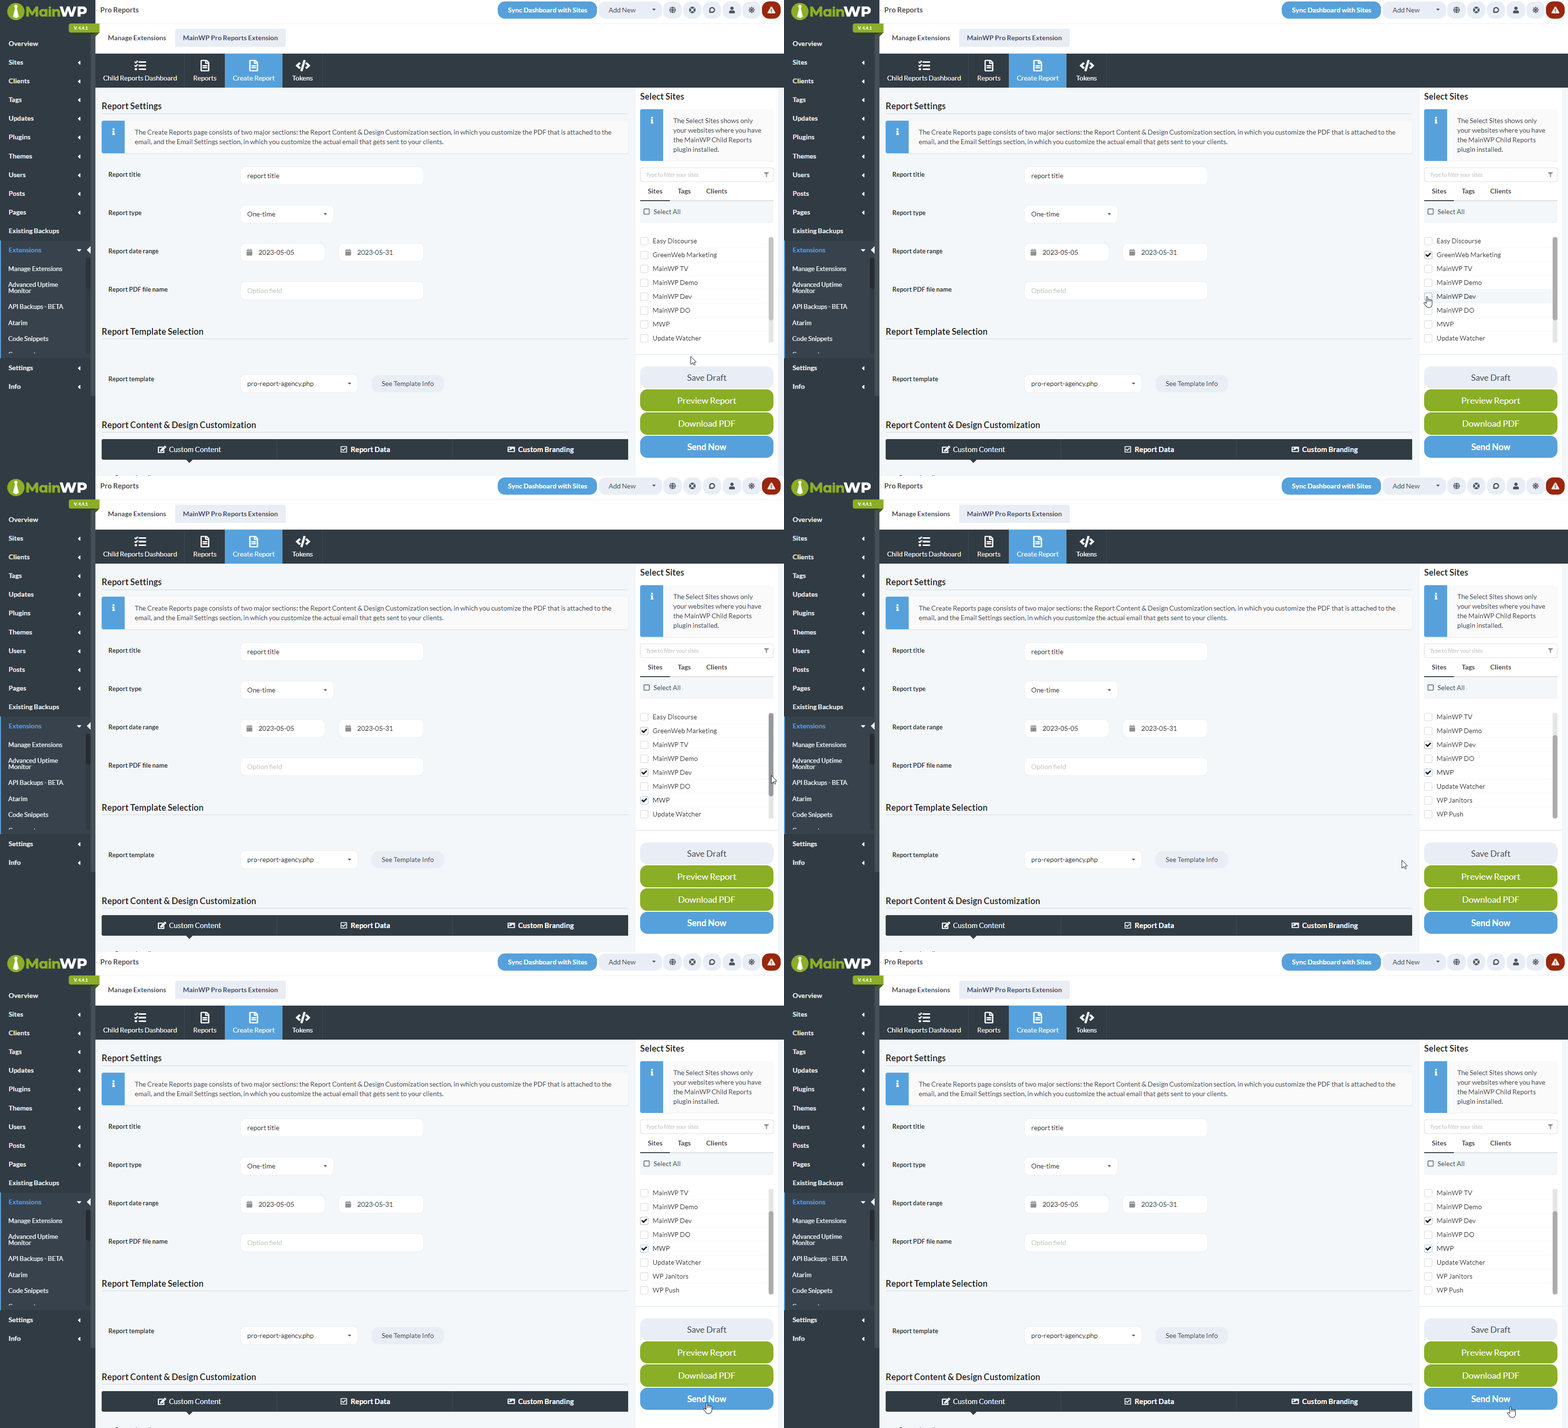
Select sites in the right-hand metabox. Preview as HTML or download the PDF for review. Click **Save Draft** to save without scheduling, or **Schedule Report** when ready.
## Create a One-Time Report
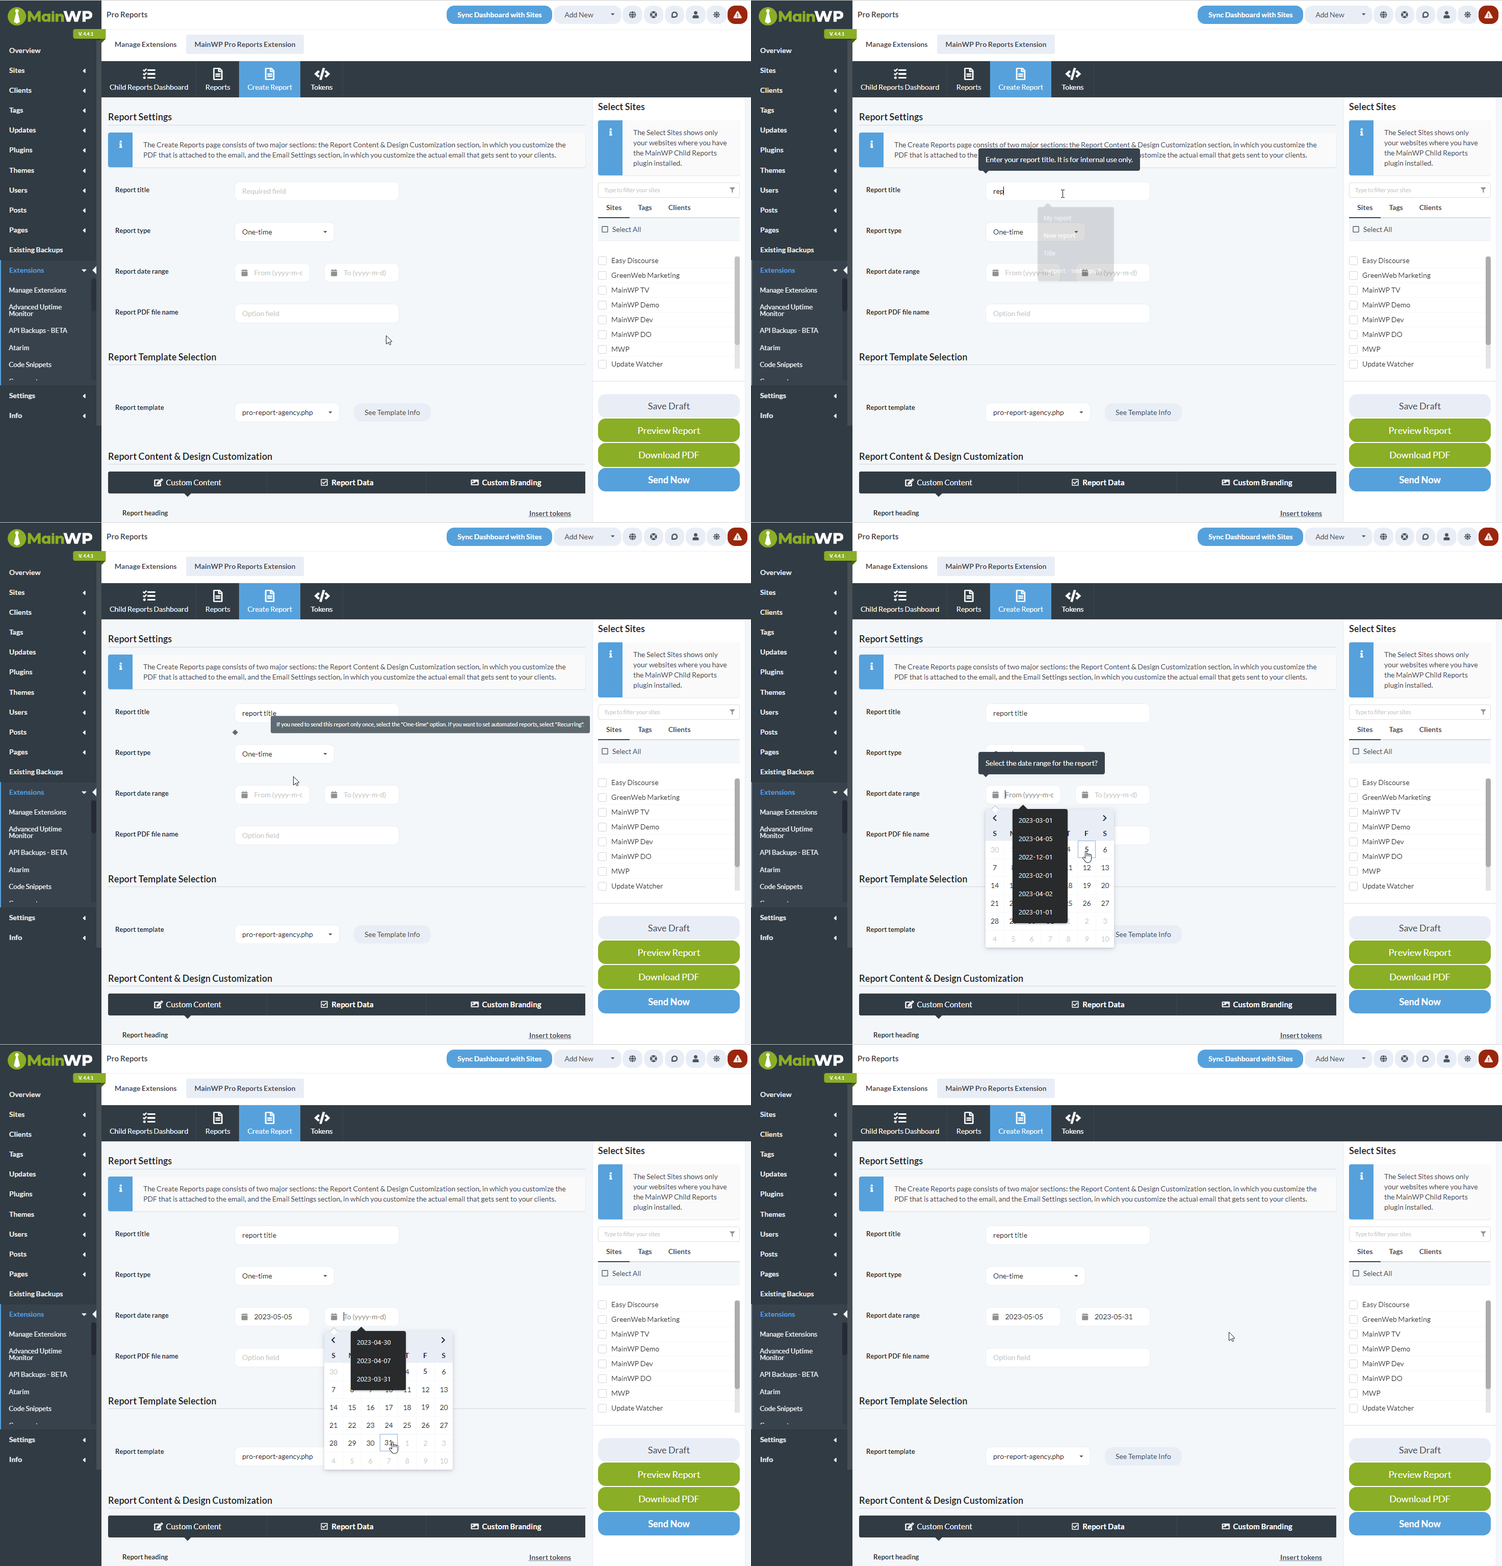
Go to **MainWP Dashboard > Add-ons > Pro Reports > Create Report**.
| Setting | Description |
| -------------------- | -------------------------------- |
| Report title | Name for identifying this report |
| Report type | Select **One-time** |
| Report date range | Starting and ending dates |
| Report PDF file name | Optional custom filename |
| Report Template | Select from available templates |
| Tab | Purpose |
| --------------- | --------------------------------------------------------------------------------------------------------------------------------------------------------------------------------------------------------------------------------------------------------------------------------------------------------------------------------------------------------------------------------------------------------------------------------------------------------------------------------------------------------------------------------------------------------------------------------------------------------------------------------------------- |
| Custom Content | Set the report heading shown on the first page and write the introduction and closing message. All three fields support tokens, and the introduction and closing message use the visual editor so you can add formatted client-facing copy. |
| Report Data | Control which sections appear in the report and whether each one is set to **Show**, **Hide**, or **Hide if empty**. This includes core report areas such as WordPress, plugin and theme updates, posts, pages, users, comments, and uptime, plus any compatible add-on data currently active on your Dashboard such as backups, analytics, monitoring, security, performance, and maintenance sections. The **Backups** section appears when at least one selected site uses [API Backups](/sites/backups/manage-backups#api-backups) or has a supported backup extension active (BackWPup, BackupWordPress, Solid Backups, or UpdraftPlus). |
| Custom Branding | Upload your logo and an optional first-page header image, then set the first-page background, page background, text, accent, link, and table colors. Use this tab to match the PDF layout to your brand. |
| Custom Titles | Rename or translate report titles, subtitles, and table headings for the sections included in the report. These overrides are saved per report, which lets you keep different client-facing wording or language versions. It changes the labels in the report, but not the actual data values returned by WordPress, themes, plugins, or other integrations. |
| Field | Description |
| ---------------------- | --------------------------------------- |
| Send email from | Your email address and name |
| Send email to | Client email and name (supports tokens) |
| Reply-to | Optional reply address |
| Email subject | Subject line (supports tokens) |
| Email message | Email body (supports tokens) |
| Email template | Select template style |
| BCC email address | Optional blind copy recipient |
| Additional attachments | Optional extra files |
Select sites in the right-hand metabox. Preview as HTML or download the PDF for review. Click **Save Draft** to save without sending, or **Send Now** when ready.
Use a different logo in email body versus PDF attachment.
Copy a built-in email template, edit it, upload it, and use it in your report.
Send reports as HTML email without PDF attachments.
## Pro Reports Dashboard
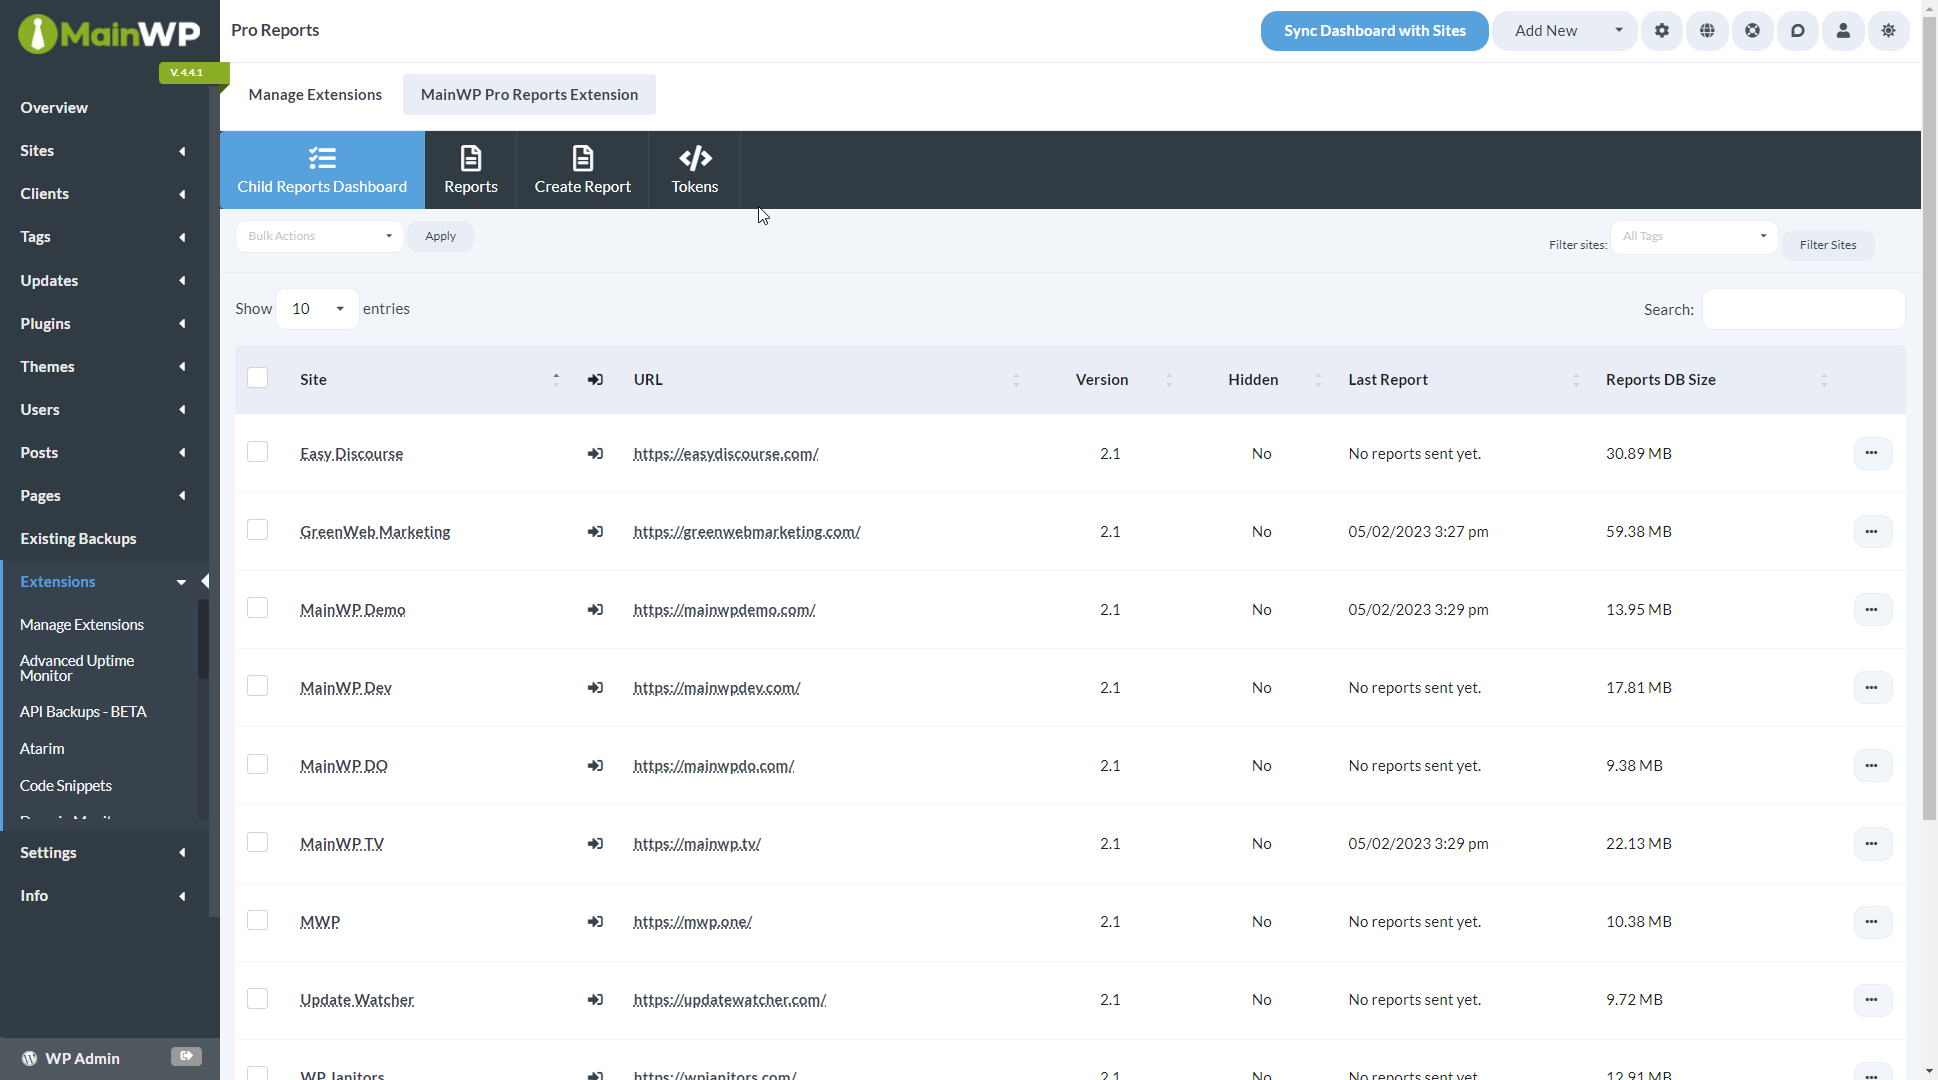
The **MainWP > Add-ons > Pro Reports > Child Reports Dashboard** page monitors all child sites with the MainWP Child Reports plugin installed.
### Status Indicators
| Row Color | Meaning | Available Action |
| --------- | ------------------------- | ---------------- |
| Red | Plugin not activated | Activate |
| Yellow | Update available | Update |
| Normal | Plugin active and current | Hide/Unhide |
### Dashboard Columns
| Column | Description |
| --------------- | ----------------------------------- |
| Version | MainWP Child Reports plugin version |
| Last Report | When the last report was sent |
| Reports DB Size | Database space used by reports |
Bulk actions for Activate, Update, Hide, and Unhide are available at the top of the page. If a site with the plugin installed does not appear, re-sync your sites.
## Create Custom Report Templates
Pro Reports uses PHP templates that you can customize with HTML. The process involves copying a built-in template and modifying it to suit your needs.
### Creating a Custom Template
[Download the MainWP Pro Reports Extension](/dashboard/overview/manage-extensions) from your MainWP Account.
Extract the plugin files and find the default templates in `/mainwp-pro-reports-extension/templates/reports/`.
Copy a PHP file, rename it, and edit with your preferred code editor.
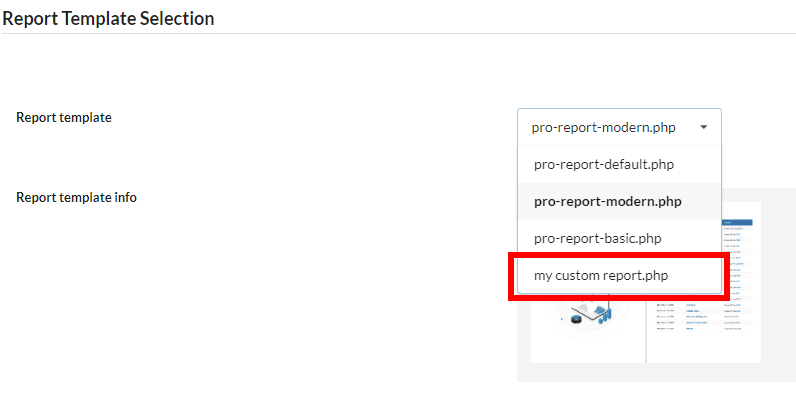
Upload your customized PHP file to `/wp-content/uploads/mainwp/report-templates/` on your Dashboard site.
Your template appears in the **Report template** dropdown.
Build custom PHP templates from scratch with detailed token placement.
Insert custom images and graphics into your report templates.
Control how many rows appear in report sections using CSS.
### Token Types
Pro Reports uses four token types that you can add directly to PHP templates or through the visual editor.
| Type | Description | Example |
| -------------- | ------------------------------------------------- | ------------------------------------------------------------ |
| Client Tokens | Display data from Individual Child site settings | `[client.email]`, `[client.name]` |
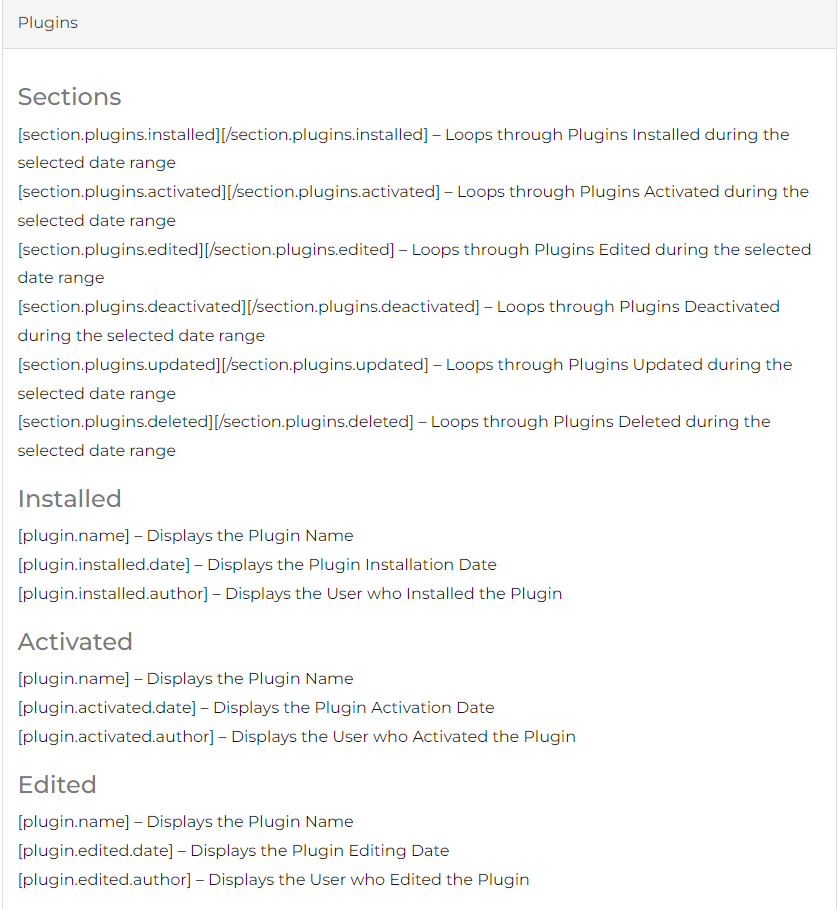
| Section Tokens | Loop through database records within a date range | `[section.plugins.installed]...[/section.plugins.installed]` |
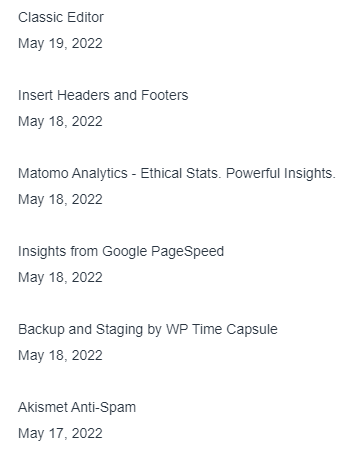
| Data Tokens | Display specific values inside section tokens | `[plugin.name]`, `[plugin.installed.date]` |
| Counter Tokens | Display counts outside section tokens | `[plugin.installed.count]` |
See all available tokens: [Available Pro Reports Tokens](/add-ons/agency/available-pro-reports-tokens)
### Client Tokens
Client tokens display data set in the Individual Child site Edit tab. Set values for tokens you plan to use in reports.
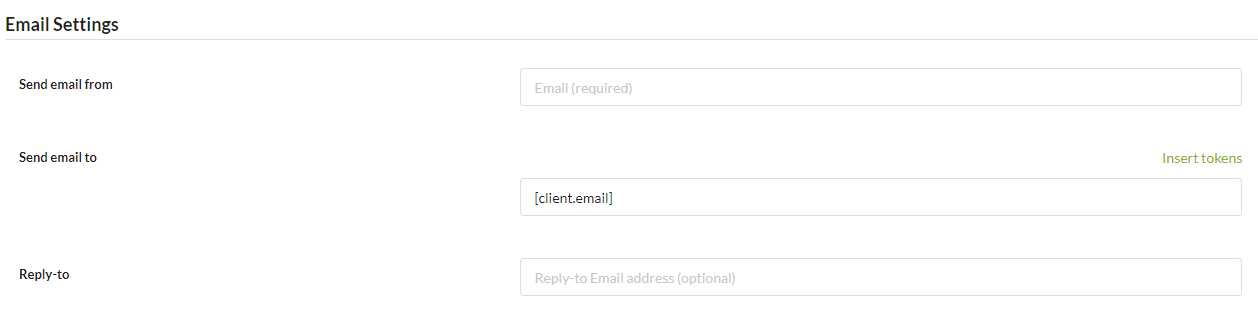
Use `[client.email]` in the **Send email to** field to send reports to multiple clients automatically.
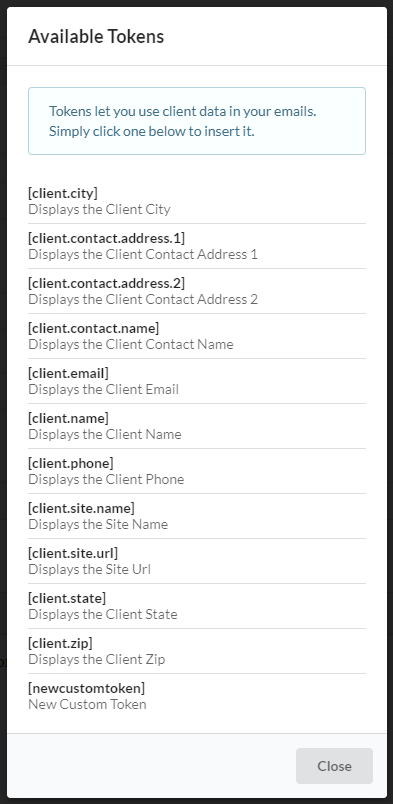
Click **Insert tokens** to see available options.
### How Tokens Work Together
The following example demonstrates all three token types working together in a template:
```
Plugins installed: [plugin.installed.count]
[section.plugins.installed]
Plugin: [plugin.name]
Installed: [plugin.installed.date]
[/section.plugins.installed]
```
**Counter tokens** display totals and must appear outside section tags. They end with `.count`.
**Section tokens** loop through database records within the report date range. They require opening and closing tags.
**Data tokens** display specific values and must appear between section token tags.
Complete reference of 100+ tokens for plugins, themes, posts, users, and more.
Use PHP filters to display dynamic messages based on data values.
## Delete Reports
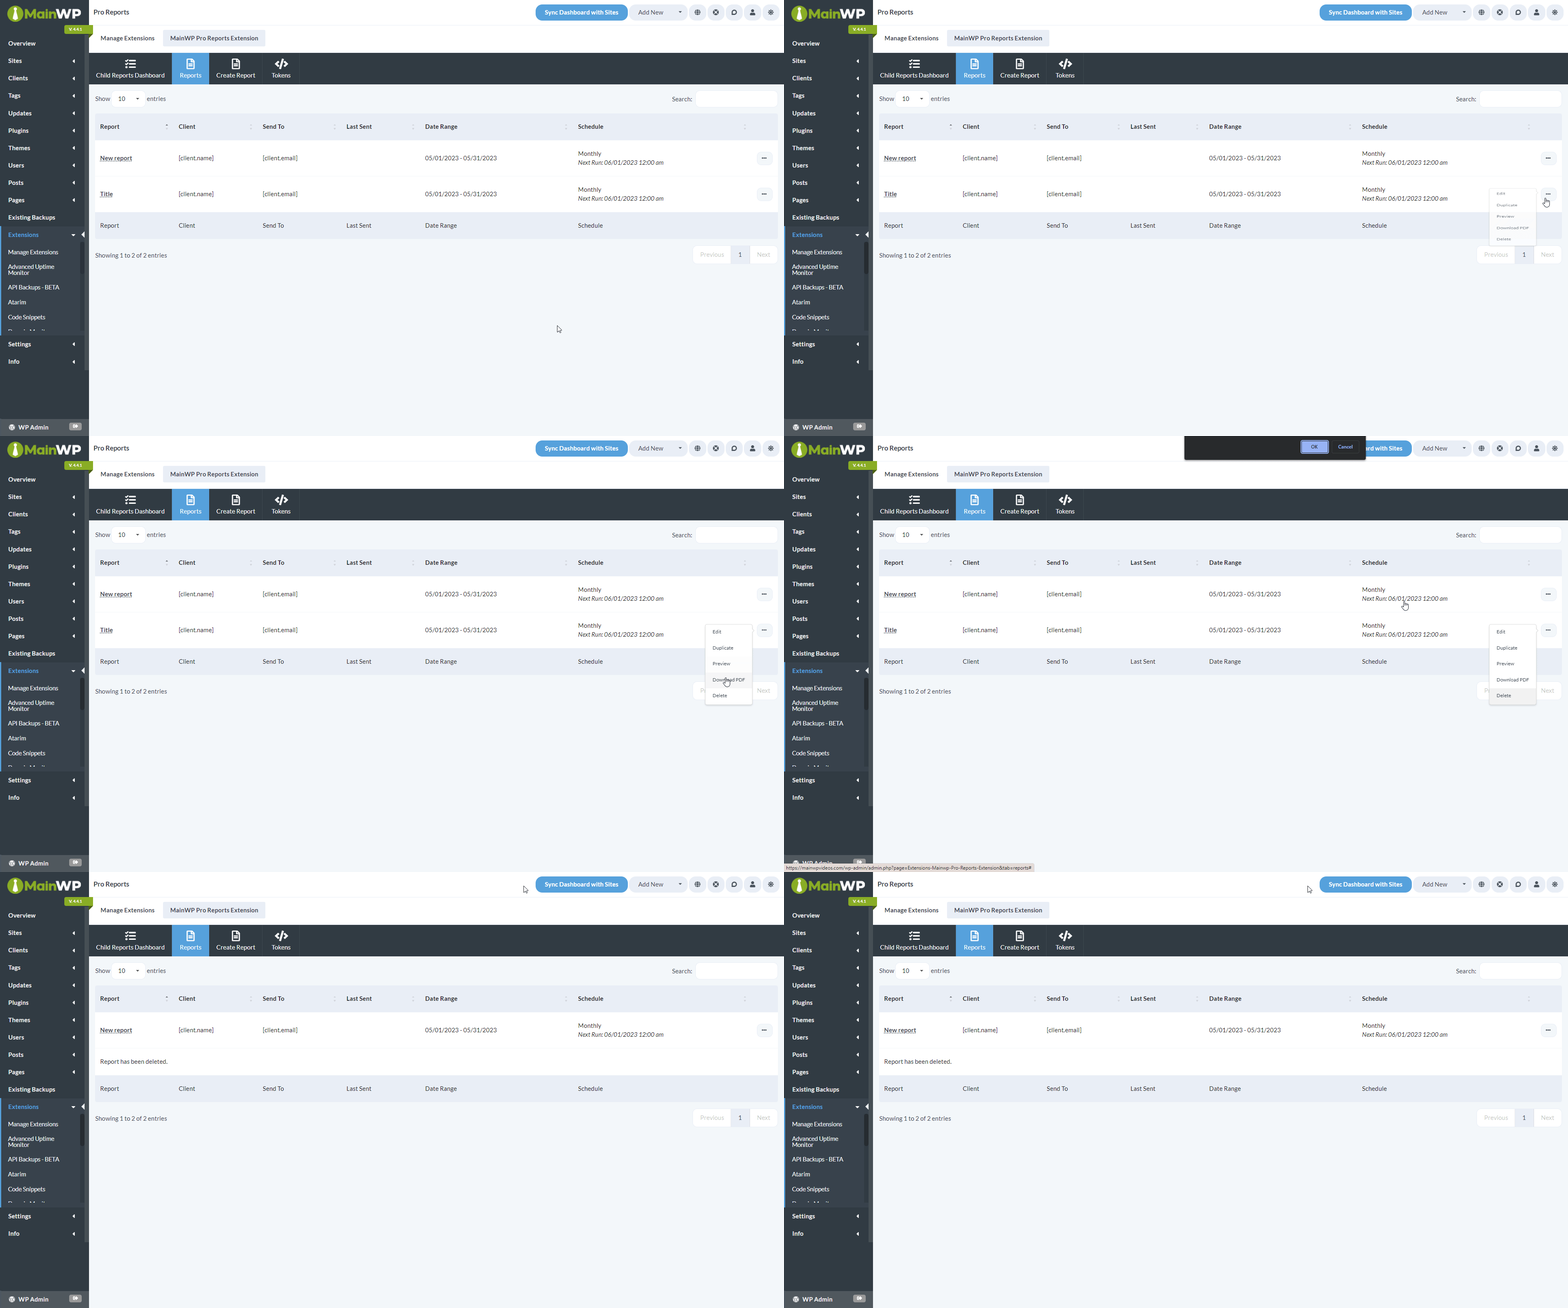
Go to **MainWP > Add-ons > Pro Reports > Reports**.
Click the Actions Menu on the report you want to delete, select **Delete**, and confirm.
## Duplicate Reports
Go to **MainWP > Add-ons > Pro Reports > Reports**.
Click the Actions Menu, select **Duplicate**, enter a new title, configure Send To and Send From fields, and click **Save Draft**.
## PDF Storage
PDFs generated by Pro Reports are saved on the Dashboard site in `/wp-content/uploads/mainwp_pro_reports/`.
## Pro Reports REST API
All MainWP REST API calls, including documentation and examples, are available on [Postman](https://www.postman.com/mainwp/workspace/mainwp/overview). See [MainWP REST API](/api-reference/rest-api/overview) for details on enabling the API and managing keys.
***
## Related Resources
* [Create Custom Report Templates](/add-ons/agency/create-custom-report-templates) - Build custom templates
* [Create a custom Pro Reports email template](/add-ons/agency/create-a-custom-pro-reports-email-template) - Copy and customize a built-in email template
* [Available Pro Reports Tokens](/add-ons/agency/available-pro-reports-tokens) - Token reference
* [Agency Add-ons](/add-ons/agency) - Browse agency add-ons
 ## Setting up the Pro Reports Extension
### Installation
## Setting up the Pro Reports Extension
### Installation
 ### Child Reports Settings
 By default, navigate to **WP Admin > Settings > MainWP Child > Child Reports Settings** to configure the plugin. If you have customized MainWP Child branding, these labels can differ.
| Setting | Description |
| ----------------------------------- | --------------------------------------------------------------------- |
| Keep Records for | Maximum days to retain activity records (default: 100) |
| Keep Records Indefinitely | Retains all records (not recommended for performance) |
| Comment Flood Tracking | Track duplicate comments blocked by WordPress (not recommended) |
| Akismet Tracking | Track comment spam attempts blocked by Akismet when Akismet is active |
| WP Cron Tracking | Track WordPress cron event activity when WP-Cron is enabled |
| Reset MainWP Child Reports Database | Delete all activity reports from the database |
### Client Information
Pro Reports uses tokens to personalize reports without creating separate versions for each client. Tokens are placeholders like `[client.email]` and `[client.name]` that get replaced with actual values when reports generate. You can define client information in two ways:
| Method | Description | Best For |
| ----------------- | ---------------------------------------------------------- | ------------------------------ |
| Client Feature | Define information once, assign multiple sites to a client | Managing many sites per client |
| Per-Site Settings | Set information individually on each site's Edit page | Maximum flexibility |
By default, navigate to **WP Admin > Settings > MainWP Child > Child Reports Settings** to configure the plugin. If you have customized MainWP Child branding, these labels can differ.
| Setting | Description |
| ----------------------------------- | --------------------------------------------------------------------- |
| Keep Records for | Maximum days to retain activity records (default: 100) |
| Keep Records Indefinitely | Retains all records (not recommended for performance) |
| Comment Flood Tracking | Track duplicate comments blocked by WordPress (not recommended) |
| Akismet Tracking | Track comment spam attempts blocked by Akismet when Akismet is active |
| WP Cron Tracking | Track WordPress cron event activity when WP-Cron is enabled |
| Reset MainWP Child Reports Database | Delete all activity reports from the database |
### Client Information
Pro Reports uses tokens to personalize reports without creating separate versions for each client. Tokens are placeholders like `[client.email]` and `[client.name]` that get replaced with actual values when reports generate. You can define client information in two ways:
| Method | Description | Best For |
| ----------------- | ---------------------------------------------------------- | ------------------------------ |
| Client Feature | Define information once, assign multiple sites to a client | Managing many sites per client |
| Per-Site Settings | Set information individually on each site's Edit page | Maximum flexibility |
 | Setting | Description |
| -------------------- | --------------------------------------------------- |
| Report title | Name for identifying this report |
| Report type | Select **Recurring** |
| Schedule | Daily, Weekly, or Monthly |
| Send report on | Day of week or month (for Weekly/Monthly schedules) |
| Report PDF file name | Optional custom filename for the PDF attachment |
| Report Template | Select from available templates |
| Setting | Description |
| -------------------- | --------------------------------------------------- |
| Report title | Name for identifying this report |
| Report type | Select **Recurring** |
| Schedule | Daily, Weekly, or Monthly |
| Send report on | Day of week or month (for Weekly/Monthly schedules) |
| Report PDF file name | Optional custom filename for the PDF attachment |
| Report Template | Select from available templates |
 | Tab | Purpose |
| --------------- | --------------------------------------------------------------------------------------------------------------------------------------------------------------------------------------------------------------------------------------------------------------------------------------------------------------------------------------------------------------------------------------------------------------------------------------------------------------------------------------------------------------------------------------------------------------------------------------------------------------------------------------------- |
| Custom Content | Set the report heading shown on the first page and write the introduction and closing message. All three fields support tokens, and the introduction and closing message use the visual editor so you can add formatted client-facing copy. |
| Report Data | Control which sections appear in the report and whether each one is set to **Show**, **Hide**, or **Hide if empty**. This includes core report areas such as WordPress, plugin and theme updates, posts, pages, users, comments, and uptime, plus any compatible add-on data currently active on your Dashboard such as backups, analytics, monitoring, security, performance, and maintenance sections. The **Backups** section appears when at least one selected site uses [API Backups](/sites/backups/manage-backups#api-backups) or has a supported backup extension active (BackWPup, BackupWordPress, Solid Backups, or UpdraftPlus). |
| Custom Branding | Upload your logo and an optional first-page header image, then set the first-page background, page background, text, accent, link, and table colors. Use this tab to match the PDF layout to your brand. |
| Custom Titles | Rename or translate report titles, subtitles, and table headings for the sections included in the report. These overrides are saved per report, which lets you keep different client-facing wording or language versions. It changes the labels in the report, but not the actual data values returned by WordPress, themes, plugins, or other integrations. |
| Tab | Purpose |
| --------------- | --------------------------------------------------------------------------------------------------------------------------------------------------------------------------------------------------------------------------------------------------------------------------------------------------------------------------------------------------------------------------------------------------------------------------------------------------------------------------------------------------------------------------------------------------------------------------------------------------------------------------------------------- |
| Custom Content | Set the report heading shown on the first page and write the introduction and closing message. All three fields support tokens, and the introduction and closing message use the visual editor so you can add formatted client-facing copy. |
| Report Data | Control which sections appear in the report and whether each one is set to **Show**, **Hide**, or **Hide if empty**. This includes core report areas such as WordPress, plugin and theme updates, posts, pages, users, comments, and uptime, plus any compatible add-on data currently active on your Dashboard such as backups, analytics, monitoring, security, performance, and maintenance sections. The **Backups** section appears when at least one selected site uses [API Backups](/sites/backups/manage-backups#api-backups) or has a supported backup extension active (BackWPup, BackupWordPress, Solid Backups, or UpdraftPlus). |
| Custom Branding | Upload your logo and an optional first-page header image, then set the first-page background, page background, text, accent, link, and table colors. Use this tab to match the PDF layout to your brand. |
| Custom Titles | Rename or translate report titles, subtitles, and table headings for the sections included in the report. These overrides are saved per report, which lets you keep different client-facing wording or language versions. It changes the labels in the report, but not the actual data values returned by WordPress, themes, plugins, or other integrations. |
 | Setting | Description |
| -------------------- | -------------------------------- |
| Report title | Name for identifying this report |
| Report type | Select **One-time** |
| Report date range | Starting and ending dates |
| Report PDF file name | Optional custom filename |
| Report Template | Select from available templates |
| Setting | Description |
| -------------------- | -------------------------------- |
| Report title | Name for identifying this report |
| Report type | Select **One-time** |
| Report date range | Starting and ending dates |
| Report PDF file name | Optional custom filename |
| Report Template | Select from available templates |
 The **MainWP > Add-ons > Pro Reports > Child Reports Dashboard** page monitors all child sites with the MainWP Child Reports plugin installed.
### Status Indicators
| Row Color | Meaning | Available Action |
| --------- | ------------------------- | ---------------- |
| Red | Plugin not activated | Activate |
| Yellow | Update available | Update |
| Normal | Plugin active and current | Hide/Unhide |
### Dashboard Columns
| Column | Description |
| --------------- | ----------------------------------- |
| Version | MainWP Child Reports plugin version |
| Last Report | When the last report was sent |
| Reports DB Size | Database space used by reports |
Bulk actions for Activate, Update, Hide, and Unhide are available at the top of the page. If a site with the plugin installed does not appear, re-sync your sites.
## Create Custom Report Templates
Pro Reports uses PHP templates that you can customize with HTML. The process involves copying a built-in template and modifying it to suit your needs.
### Creating a Custom Template
The **MainWP > Add-ons > Pro Reports > Child Reports Dashboard** page monitors all child sites with the MainWP Child Reports plugin installed.
### Status Indicators
| Row Color | Meaning | Available Action |
| --------- | ------------------------- | ---------------- |
| Red | Plugin not activated | Activate |
| Yellow | Update available | Update |
| Normal | Plugin active and current | Hide/Unhide |
### Dashboard Columns
| Column | Description |
| --------------- | ----------------------------------- |
| Version | MainWP Child Reports plugin version |
| Last Report | When the last report was sent |
| Reports DB Size | Database space used by reports |
Bulk actions for Activate, Update, Hide, and Unhide are available at the top of the page. If a site with the plugin installed does not appear, re-sync your sites.
## Create Custom Report Templates
Pro Reports uses PHP templates that you can customize with HTML. The process involves copying a built-in template and modifying it to suit your needs.
### Creating a Custom Template
 Use `[client.email]` in the **Send email to** field to send reports to multiple clients automatically.
 Click **Insert tokens** to see available options.
 ### How Tokens Work Together
The following example demonstrates all three token types working together in a template:
```
Plugins installed: [plugin.installed.count]
[section.plugins.installed]
Plugin: [plugin.name]
Installed: [plugin.installed.date]
[/section.plugins.installed]
```
**Counter tokens** display totals and must appear outside section tags. They end with `.count`.
**Section tokens** loop through database records within the report date range. They require opening and closing tags.
**Data tokens** display specific values and must appear between section token tags.
### How Tokens Work Together
The following example demonstrates all three token types working together in a template:
```
Plugins installed: [plugin.installed.count]
[section.plugins.installed]
Plugin: [plugin.name]
Installed: [plugin.installed.date]
[/section.plugins.installed]
```
**Counter tokens** display totals and must appear outside section tags. They end with `.count`.
**Section tokens** loop through database records within the report date range. They require opening and closing tags.
**Data tokens** display specific values and must appear between section token tags.