> ## Documentation Index
> Fetch the complete documentation index at: https://docs.mainwp.com/llms.txt
> Use this file to discover all available pages before exploring further.
# Create a custom Pro Reports email template
> Learn how to create a custom Pro Reports email template by copying one of the built-in email templates, editing the PHP file, uploading it to your Dashboard site, and selecting it in the Email template dropdown.
## What You'll Learn
* Copying a built-in Pro Reports email template
* Renaming and editing the template file
* Customizing the email HTML and footer content
* Uploading and selecting a custom email template
***
**Extension Add-on** - This add-on provides standalone functionality within MainWP Dashboard. No third-party plugins required.
The Pro Reports Extension includes built-in email templates. To create a custom email template, start with one of the existing files in the extension, copy it, rename it, edit it, and upload it to your MainWP Dashboard site.
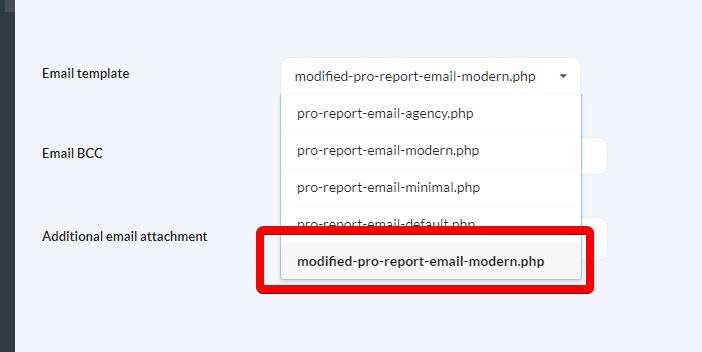
Built-in email templates are stored in the `/mainwp-pro-reports-extension/templates/emails/` directory. Custom email templates are loaded from `/wp-content/uploads/mainwp/report-email-templates/` and become available in the **Email template** dropdown when you edit a report.
Examples of built-in email templates include `pro-report-email-default.php`, `pro-report-email-minimal.php`, `pro-report-email-modern.php`, and `pro-report-email-agency.php`.
## Create a custom email template
Download the extension ZIP file from your MainWP Account so you can access the built-in email template files.
Open the `/mainwp-pro-reports-extension/templates/emails/` directory and choose one of the existing email templates as your starting point.
Copy the selected PHP file and rename it to a unique filename for your custom template.
Open the copied file in your code editor and update the HTML and PHP markup as needed. If you want to change the footer contact details, edit the footer section near the end of the template file.
Upload the finished PHP file to the `/wp-content/uploads/mainwp/report-email-templates/` directory on your MainWP Dashboard site.
Open or edit your Pro Report, choose the uploaded file from the **Email template** dropdown, and save the report. The custom template will now be used for that report's email output.
 Keep the file extension as `.php`. Pro Reports renders the selected email template as a PHP file when the email is generated, so invalid PHP or malformed HTML can prevent the template from rendering correctly.
***
## Related Resources
* [Pro Reports](/add-ons/agency/pro-reports-extension-overview) - Main Pro Reports documentation
* [Create Custom Report Templates](/add-ons/agency/create-custom-report-templates) - Build custom PHP templates
* [How to use a different logo for the Pro Reports email only](/add-ons/agency/how-to-use-a-different-logo-for-the-pro-reports-email-only) - Customize email-only branding
Keep the file extension as `.php`. Pro Reports renders the selected email template as a PHP file when the email is generated, so invalid PHP or malformed HTML can prevent the template from rendering correctly.
***
## Related Resources
* [Pro Reports](/add-ons/agency/pro-reports-extension-overview) - Main Pro Reports documentation
* [Create Custom Report Templates](/add-ons/agency/create-custom-report-templates) - Build custom PHP templates
* [How to use a different logo for the Pro Reports email only](/add-ons/agency/how-to-use-a-different-logo-for-the-pro-reports-email-only) - Customize email-only branding