> ## Documentation Index
> Fetch the complete documentation index at: https://docs.mainwp.com/llms.txt
> Use this file to discover all available pages before exploring further.
# WooCommerce Status
> If you are managing more than one WooCommerce store, this is the Extension for you! It provides quick insights into the status of all your stores from one central location.
## What You'll Learn
* Monitoring WooCommerce store status from MainWP Dashboard
* Understanding the WooCommerce Status widgets
* Installing the extension and WooCommerce plugin
***
**Integration Add-on** - This add-on extends MainWP to work with WooCommerce. Requires WooCommerce to be installed and activated on your child sites.
[MainWP WooCommerce Status](https://mainwp.com/extension/woocommerce-status/) Extension provides you the ability to see the WooCommerce status right from your MainWP Dashboard site. It enables you to monitor all your stores from one place.
## WooCommerce Status Dashboard
On the **MainWP > Sites > Monitoring > WooCommerce Status** page, you can see all your child sites with the WooCommerce plugin installed and active. Here you can see for each child site:
* Income for the current month
* Top Seller product for the current month
* Number of orders awaiting processing
* Number of orders on hold
* Number of products low on stock
* Number of products out of stock
By clicking the metric links in the table, the extension opens the corresponding WooCommerce page on the child site.
## WooCommerce Status Widgets
The extension adds a WooCommerce Status widget to the MainWP Overview page and to each individual child site overview. The individual child site widget shows **Sales This Month**, **Top Seller**, **Awaiting Processing**, **On Hold**, **Low in Stock**, and **Out of Stock**, with links that open the related WooCommerce screen on that child site. 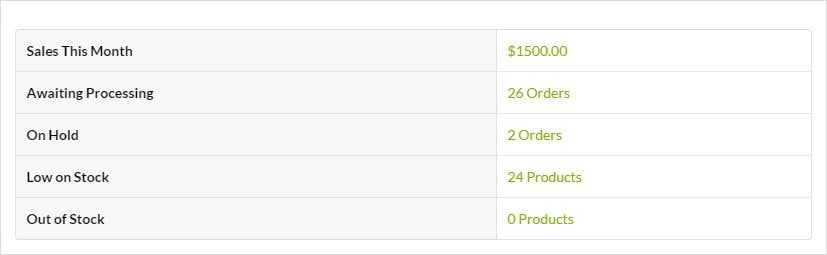 The global Overview widget does not mirror the full per-site widget. It shows combined totals for **Awaiting Processing**, **On Hold**, **Low in Stock**, and **Out of Stock**, plus separate **Top Sellers** and **Sales** sections that break the data down by child site.
## Install and Set the WooCommerce Status Extension
Installation of the MainWP WooCommerce Status Extension requires two important steps:
* Installing the Extension itself on your MainWP Dashboard site
* Installing the WooCommerce Plugin on Child Sites
### Installing the Extension
The MainWP WooCommerce Status Extension needs to be installed only on your MainWP Dashboard site. You can [install it as any other MainWP Extension.](/dashboard/overview/manage-extensions#install-extensions)
### Installing the Plugin
For the proper use of the MainWP WooCommerce Status Extension, you need to install the WooCommerce Plugin on your child sites.
### Install from MainWP Dashboard
[Select your child](/getting-started/mainwp-user-interface) sites
In the **Installation Options** box, make sure that the **Activate after installation option** is selected
For additional help with installing WordPress plugins from the MainWP Dashboard, please review this [help document](/sites/plugins/managing-plugins-with-mainwp).
### Install directly on Child Site
For additional help with installing WordPress plugins, please review this [help document.](https://wordpress.org/documentation/article/manage-plugins/)
#### Important Note
After installing and activating the WooCommerce plugin, synchronize your sites so your MainWP Dashboard detects it and refreshes the stored WooCommerce status data.
***
## Related Resources
* [WooCommerce Shortcuts Extension](/add-ons/administrative/woocommerce-shortcuts-extension) - Quick links to WooCommerce pages
* [Administrative Add-ons](/add-ons/administrative) - Browse administrative add-ons
The global Overview widget does not mirror the full per-site widget. It shows combined totals for **Awaiting Processing**, **On Hold**, **Low in Stock**, and **Out of Stock**, plus separate **Top Sellers** and **Sales** sections that break the data down by child site.
## Install and Set the WooCommerce Status Extension
Installation of the MainWP WooCommerce Status Extension requires two important steps:
* Installing the Extension itself on your MainWP Dashboard site
* Installing the WooCommerce Plugin on Child Sites
### Installing the Extension
The MainWP WooCommerce Status Extension needs to be installed only on your MainWP Dashboard site. You can [install it as any other MainWP Extension.](/dashboard/overview/manage-extensions#install-extensions)
### Installing the Plugin
For the proper use of the MainWP WooCommerce Status Extension, you need to install the WooCommerce Plugin on your child sites.
### Install from MainWP Dashboard
[Select your child](/getting-started/mainwp-user-interface) sites
In the **Installation Options** box, make sure that the **Activate after installation option** is selected
For additional help with installing WordPress plugins from the MainWP Dashboard, please review this [help document](/sites/plugins/managing-plugins-with-mainwp).
### Install directly on Child Site
For additional help with installing WordPress plugins, please review this [help document.](https://wordpress.org/documentation/article/manage-plugins/)
#### Important Note
After installing and activating the WooCommerce plugin, synchronize your sites so your MainWP Dashboard detects it and refreshes the stored WooCommerce status data.
***
## Related Resources
* [WooCommerce Shortcuts Extension](/add-ons/administrative/woocommerce-shortcuts-extension) - Quick links to WooCommerce pages
* [Administrative Add-ons](/add-ons/administrative) - Browse administrative add-ons